- Cisco Community
- Technology and Support
- Collaboration
- Collaboration Knowledge Base
- CUCM SIP Trunk TLS Configuration and Troubleshooting
- Subscribe to RSS Feed
- Mark as New
- Mark as Read
- Bookmark
- Subscribe
- Printer Friendly Page
- Report Inappropriate Content
- Subscribe to RSS Feed
- Mark as New
- Mark as Read
- Bookmark
- Subscribe
- Printer Friendly Page
- Report Inappropriate Content
09-26-2011 07:45 AM - edited 03-12-2019 09:40 AM
- Purpose
- SIP TLS on Inter Cluster Trunk Configruation
- Lab Network Overview
- Download CallManager.pem Certificates
- Upload CallManager.pem Certificates
- Create SIP Trunk Security Profiles
- Create SIP Trunks
- Create Route Patterns
- Troubleshooting
- Collect Packet Captures on CUCM
- Collect CUCM Traces
Purpose
This document will serve as an instructional guide to help understand and configure SIP TLS on Communications Manager. This will supplement the original Security Guide by providing diagrams and images, along with further explanation.
After following this doc, SIP messages between two clusters will be encrypted using TLS. To encrypt phone signaling, or media (RTP) please follow the Phone Security Guide.
SIP TLS on Inter Cluster Trunk Configruation
Lab Network Overview

Cluster 1 consists of two servers running CUCM 7.1(3).
Cluster 2 is just a single node running 8.5(1).
Note the very important distinction that phone 7131001 has a CMG (CallManagerGroup) that points to the Publisher as the primary node for registration. 7131002 has a CMG that causes it to register with the Subscriber server. This will make a difference later on.
Download CallManager.pem Certificates
The very first step is to download every single CallManager.pem certificate from every node that could potentially be involved in a SIP call on both clusters. Self Signed certificates are being used in this lab example. If CA signed certificates were used instead, only the CA certificate would be needed for this step.
For more information on CA Signed Certificates see the following Document covering CA Signed Certificates in Tomcat. The theory is similar.
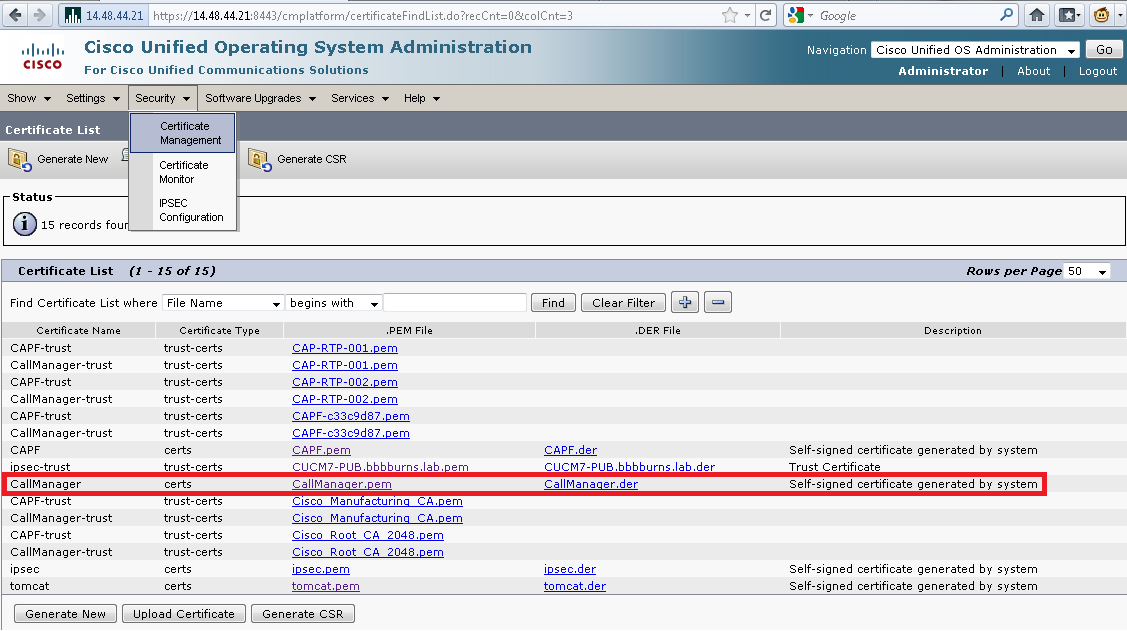
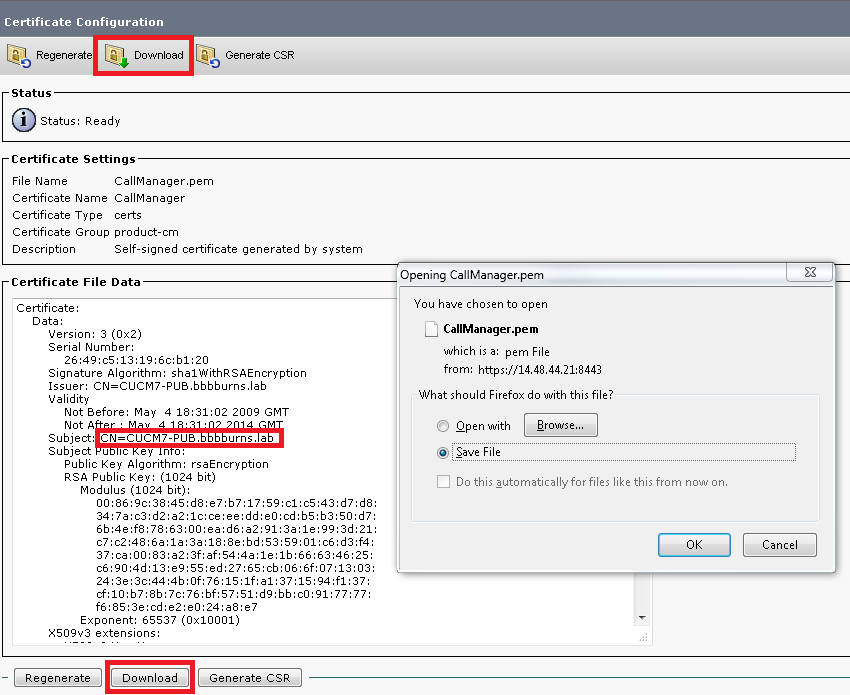
The browser suggests the file should be saved as CallManager.pem. It's very helpful to instead take the CN (Common Name) of the server and use that as a file name. When the next step comes up this will make a lot of sense.

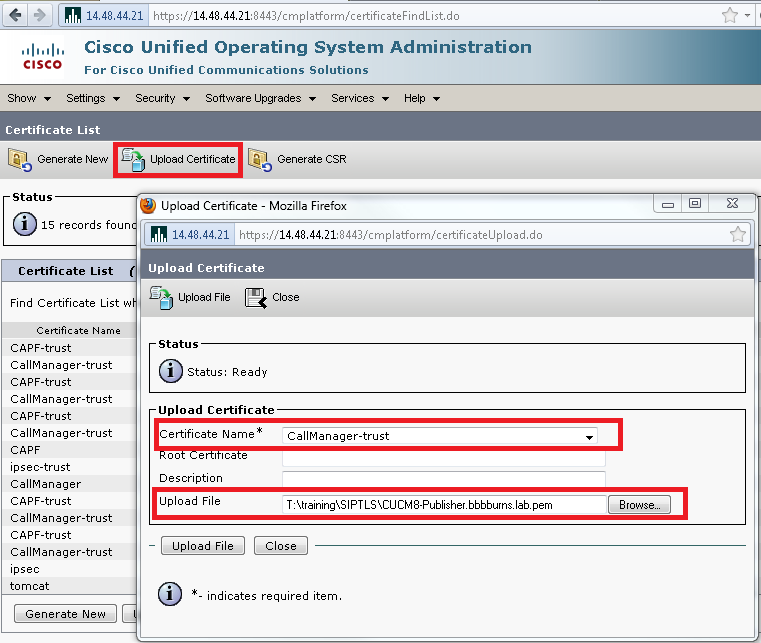
Upload CallManager.pem Certificates
Each CUCM server now needs the certificate from every server that can make a SIP connection to it. Upload these certificates as the type "CallManager-trust". This is much easier if each certificate file is named with the Common Name.
In this step on the CA Root Certificates need to be uploaded if using CA Signed Certificates. In this example Self Signed Certificates are used, so all certificates must be uploaded.
Certificates Uploaded on CUCM7-PUB and CUCM7-SUB1
Cluster 1 can only make and receive a connection to a single server, CUCM8-Publisher. Therefore only the single certificate from Cluster 2 needs to be uploaded.
It's important to upload this file on both the publisher and subscriber in Cluster 1, because both servers in Cluster 1 could potentially make or receive a SIP call to the remote cluster. The OS Admin Certificate Management web page should look like this:

Certificates Uploaded on CUCM8-Publisher
On Cluster 2, both certificates from the Cluster 1 publisher and subscriber must be uploaded. This is so the Cluster 2 server can establish secure connections to either of these servers.

Create SIP Trunk Security Profiles
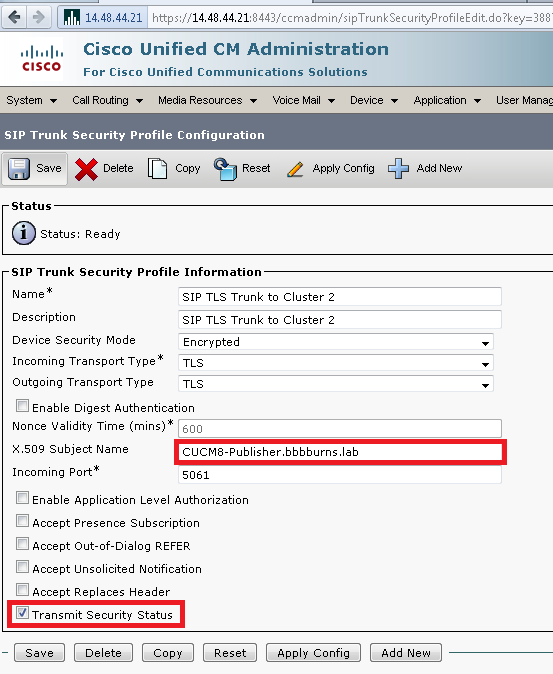
The SIP Trunk Security Profile must be created on each cluster. This sets the security parameters for the SIP trunk. When using SIP TLS, a unique SIP Trunk Security Profile must be created for each SIP Trunk in a cluster.
The Transport Type is set to TLS, which means an X.509 certificate Subject Name must also be configured. On Cluster 1 this must be set to the Common Name in the certificate from Cluster 2 that was just uploaded. In this case, CUCM8-Publisher.bbbburns.lab.
Since this is also an Inter Cluster Trunk between two CUCM clusters, the "Transmit Security Status" can be sent across the trunk so phones display the appropriate lock or shield icon for the call security status.
On Cluster 2 the configuration is slightly more complex. Since Cluster 2 can establish TLS connections with two different servers, the Subject Name of both servers must be listed in Cluster 2's SIP Trunk Security Profile. In this case the comma separated list of "CUCM7-PUB.bbbburns.lab, CUCM7-SUB1.bbbburns.lab" is required. These fields are not case sensitive.
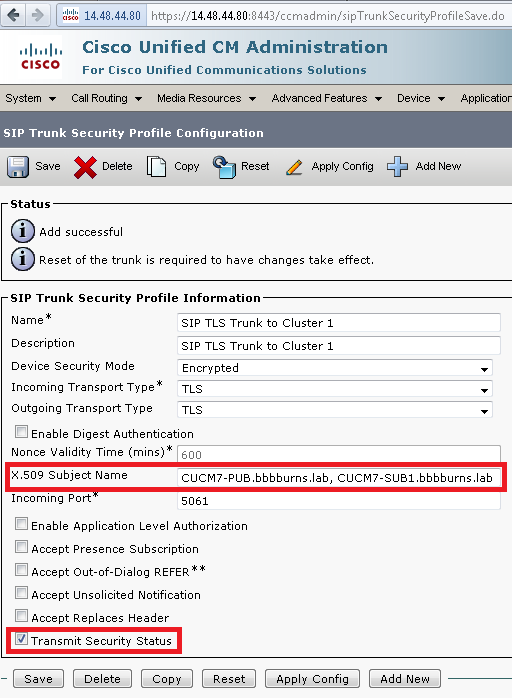
Both SIP Trunk Security Profiles set an incoming port of 5061. That means each cluster will be listening on TCP port 5061 for new inbound SIP TLS calls.
Create SIP Trunks
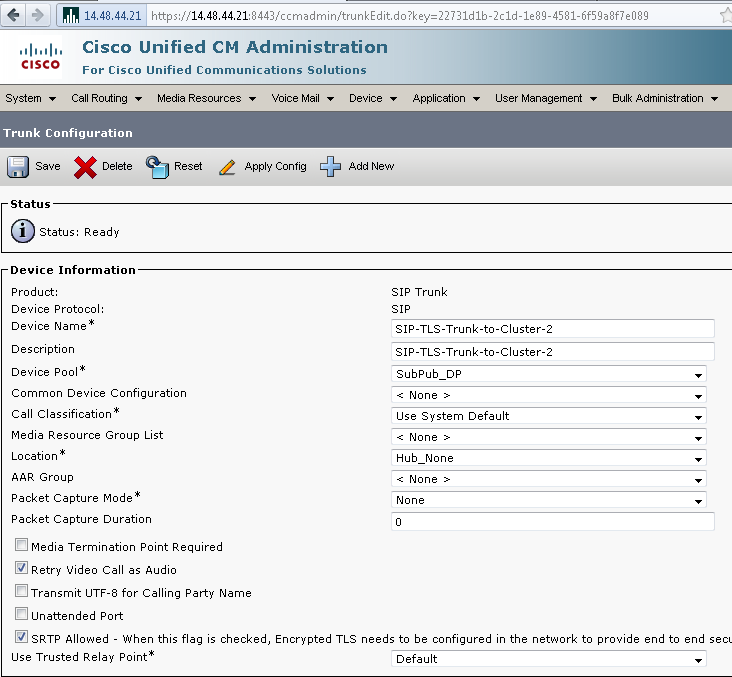
After the Security Profiles are created, then the SIP Trunks that use the Security Profiles can be created as well.
The only configuration parameter changed in this screen on Cluster 1 is "SRTP Allowed". This will allow secure RTP to be used for calls over this trunk. This box should only be checked when using SIP TLS, because the keys for SRTP are exchanged in the body of the SIP message. The SIP signaling must be secured by TLS, otherwise anyone with the non secure SIP signaling could decrypt the corresponding Secure RTP stream over the trunk.
The Device Pool of this SIP trunk on Cluster 1 contains both the publisher and subscriber. That means this SIP Trunk will run on the publisher and subscriber, listening for new incoming calls to both of these nodes.
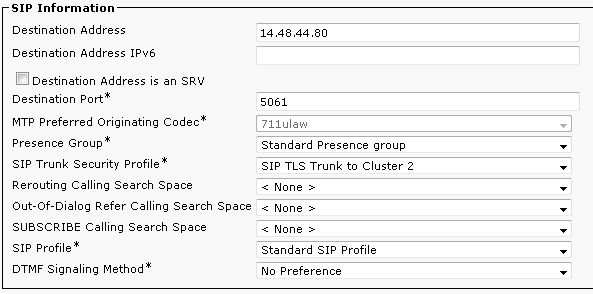
On the bottom section of the SIP Trunk configuration for Cluster 1, note the Destination IP Address, Destination Port, and Security Profile.
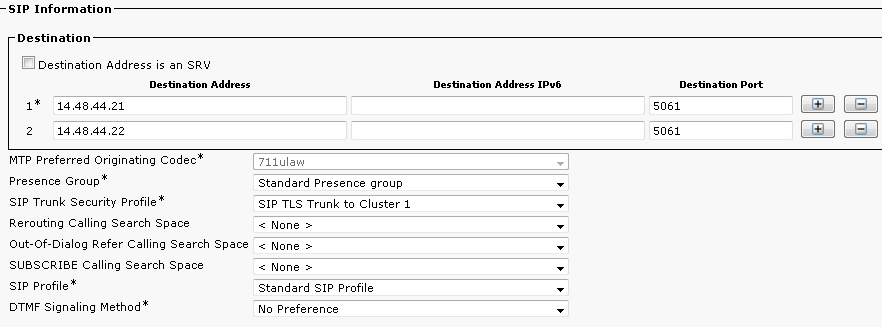
Cluster 2 has a similar SIP Trunk configuration.

Since Cluster 2 is on 8.5(1) it has the ability to add up to 16 destinations for the SIP trunk. We use only two, and set the destination port to 5061 accordingly. Remember that 5061 is the port that Cluster 1 is listening on, and Cluster 1 has a Device Pool that allows both servers to accept SIP calls for this trunk.
Create Route Patterns
In this case the simplest method is to create a Route Pattern on each cluster pointing directly to the SIP Trunk. Route Groups and Route Lists could also be used.
Here is the SIP Trunk on Cluster 1. Note that the Trunk page allows the associated Route Pattern to be easily viewed. Cluster 1 points to 851XXXX via the trunk to Cluster 2.

Cluster 2 points to 713XXXX via the trunk to Cluster 1.

Troubleshooting
A SIP TLS call can be debugged with just a few tools.
Collect Packet Captures on CUCM
Command Line Packet Captures to Screen
The fastest way to verify connectivity between clusters is to take a packet capture on the CUCM servers and watch for SIP TLS traffic. Remember that it should be transmitted on TCP port 5061.
In the following example there is an SSH CLI session established to both the publisher and subscriber servers on Cluster 1. Test calls are made from 7131001 and 7131002, both calling 8151001.
This example shows that when 7131001 makes a call, the TCP session comes from CUCM7-PUB.bbbburns.lab, and goes to CUCM8-Pub.bbbburns.lab.
admin:utils network capture host ip 14.48.44.80
Executing command with options:
size=128 count=1000 interface=eth0
src= dest= port=
ip=14.48.44.80
13:31:51.787879 IP CUCM7-PUB.bbbburns.lab.37448 > cucm8-pub.bbbburns.lab.5061: S 3618047650:3618047650(0) win 5840 <mss 1460,sackOK,timestamp 944769035 0,nop,wscale 2>
13:31:51.788102 IP cucm8-pub.bbbburns.lab.5061 > CUCM7-PUB.bbbburns.lab.37448: S 1615387233:1615387233(0) ack 3618047651 win 5792 <mss 1460,sackOK,timestamp 1044807200 944769035,nop,wscale 2>
13:31:51.788124 IP CUCM7-PUB.bbbburns.lab.37448 > cucm8-pub.bbbburns.lab.5061: . ack 1 win 1460 <nop,nop,timestamp 944769039 1044807200>
Now watch what happens on the Subscriber server when 7131002 makes the call.
admin:utils network capture host ip 14.48.44.80
Executing command with options:
size=128 count=1000 interface=eth0
src= dest= port=
ip=14.48.44.80
13:32:17.928367 IP CUCM7-SUB1.bbbburns.lab.52172 > cucm8-pub.bbbburns.lab.5061: S 4239526776:4239526776(0) win 5840 <mss 1460,sackOK,timestamp 346555111 0,nop,wscale 2>
13:32:17.928511 IP cucm8-pub.bbbburns.lab.5061 > CUCM7-SUB1.bbbburns.lab.52172: S 1630528437:1630528437(0) ack 4239526777 win 5792 <mss 1460,sackOK,timestamp 1044833336 346555111,nop,wscale 2>
13:32:17.928530 IP CUCM7-SUB1.bbbburns.lab.52172 > cucm8-pub.bbbburns.lab.5061: . ack 1 win 1460 <nop,nop,timestamp 346555115 1044833336>
These packet captures demonstrate that a phone making a call out a SIP Trunk attempts to use the SIP Trunk process on the same server where the phone is registered if possible. In this case the SIP Trunk on Cluster 1 has a CMG that did allow it to exist on both the publisher and subscriber.
These results would be different if the CMG of the SIP Trunk on Cluster 1 only contained a single server. We would only see traffic sourced from that single server.
Let's test multiple calls in the reverse direction now and gather a capture on the CUCM 8 server:
admin:utils network capture port 5061
Executing command with options:
size=128 count=1000 interface=eth0
src= dest= port=5061
ip=
First call attempt goes to 14.48.44.22 (cucm7-sub1.bbbburns.lab)
13:44:26.128758 IP CUCM8-Publisher.bbbburns.lab.48393 > cucm7-sub1.bbbburns.lab.5061: P 1909893565:1909894727(1162) ack 217213568 win 6161 <nop,nop,timestamp 1045561456 347159087>
13:44:26.128876 IP cucm7-sub1.bbbburns.lab.5061 > CUCM8-Publisher.bbbburns.lab.48393: . ack 1162 win 6641 <nop,nop,timestamp 347283235 1045561456>
Next call attempt is load balanced to 14.48.44.21 (cucm7-pub.bbbburns.lab)
13:45:11.098222 IP CUCM8-Publisher.bbbburns.lab.48417 > cucm7-pub.bbbburns.lab.5061: P 1951301588:1951302750(1162) ack 3961011476 win 5189 <nop,nop,timestamp 1045606420 945409167>
13:45:11.098450 IP cucm7-pub.bbbburns.lab.5061 > CUCM8-Publisher.bbbburns.lab.48417: . ack 1162 win 5479 <nop,nop,timestamp 945568267 1045606420>
These captures demonstrate that when a SIP Trunk has multiple destinations (Like the SIP Trunk configured on Cluster 2), calls can be load balanced between the different destinations.
A common complaint about calls over a trunk is "One out of every X calls fails". If there are X destinations on a SIP Trunk, this probably means one of those destinations is failing for some reason when a call is load balanced to that destination.
Command Line Captures to File
A packet capture to the screen can be useful to verify packets are being sent and received in both directions. To look at what is actually inside the packets a capture to file is the best option.
utils network capture port 5061 file 851SIPTLS count 1000 size all
file get activelog platform/cli/851SIPTLS.cap
The capture will be written in a standard pcap format. This example uses Wireshark, but any packet capture display tool could be used. This packet capture is attached to the document. It can be downloaded to follow along with this example and do deeper digging into the packet bytes.
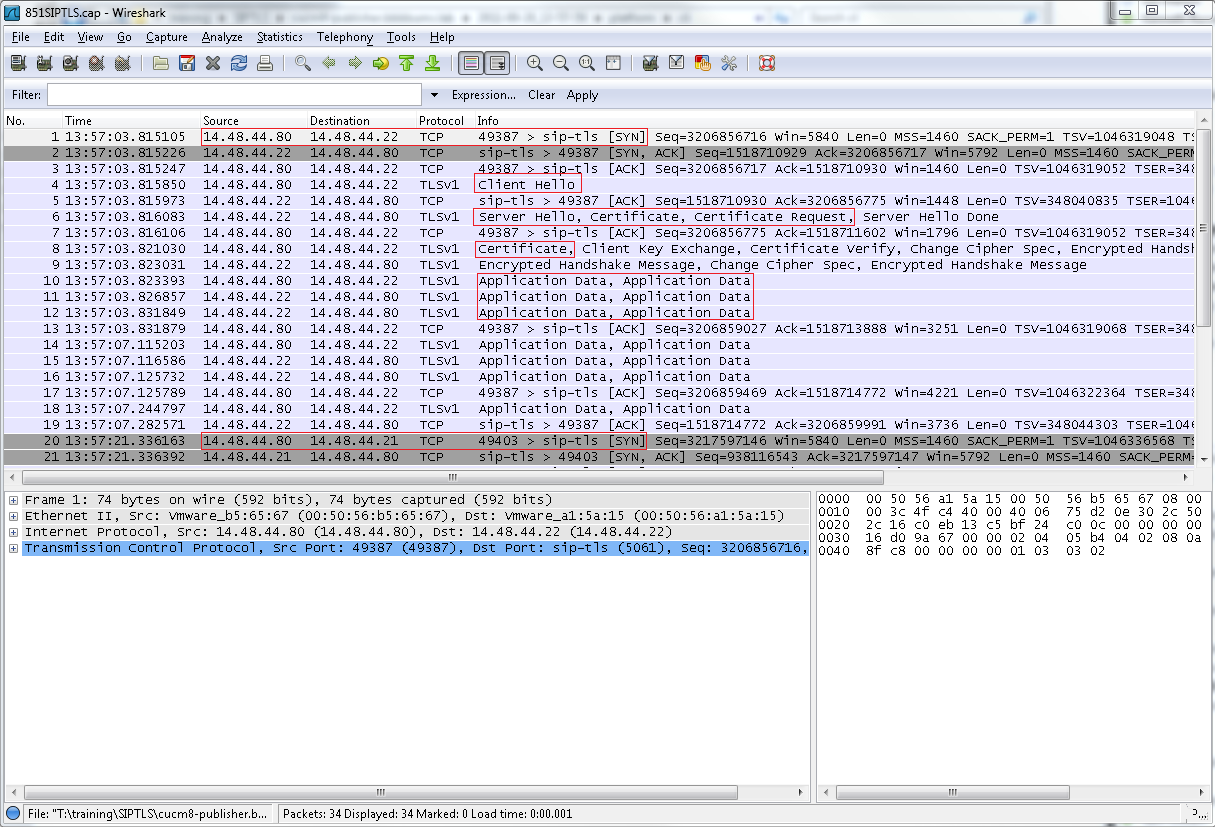
The highlighted parts are in order,
- The TCP SYN to establish TCP communication between CUCM8-Publisher (Client) and CUCM7-SUB1 (Server).
- The Client Hello that CUCM8-Publisher sends to start the TLS session.
- The Server Hello, Server Certificate, and Certificate Request that the CUCM7-SUB1 sends to start the certificate exchange process.
- The Certificate that the Client CUCM8-Publisher sends to complete the certificate exchange.
- The Application Data that is encrypted SIP signaling. Showing us the TLS session has been established.
- The next TCP SYN sent from CUCM8-Publisher to CUCM7-Publisher, showing the load balancing that happens for multiple calls.
Let's drill down and focus on the most important pieces for troubleshooting. There is nothing too interesting in the Client Hello. Let's start with the Server Hello and Server Certificate:

The Server Hello also contains the Server Certificate. The serial number and subject information that the server CUCM7-PUB is presenting to CUCM8-Publisher is visible here. The serial number, subject, issuer, and validity dates can all be compared to what has actually been uploaded into the OS Admin Certificate Management page.
If there is a mismatch between the certificates in the packet capture and the certificates in the OS Admin Web Page, the correct certificates must be uploaded into the OS Admin Cert page.
The final part of interest is the "Certificate Request" in this message. The server has presented its own certificate for verification, now it wants to see the certificate of the client. Verification happens in both directions.
The same fields in the Client Certificate can be analyzed and compared to what has been uploaded to the OS Admin Cert page.

The certificate exchange completes successfully in this instance. Application Data then flows between the Client and the Server. The Application Data here is a SIP INVITE.
Collect CUCM Traces
In addition to packet captures, CUCM traces can also be helpful to determine what sort of messages are being exchanged between the servers, and whether or not the SSL session is properly established.
Follow this great article for collecting the CCM traces.
In this example traces from Cluster 2 will be analyzed. 8511001 makes a call to 7131001 over the SIP TLS Trunk. Start with the SDI traces for basic information, and for more details the SDL traces can be reviewed as well.
Here the SDI traces show the Calling and Called numbers in the Digit Analysis block. The Route Pattern used can also be viewed.
13:57:03.801 ||PretransformCallingPartyNumber=8511001
|CallingPartyNumber=8511001
|DialingPartition=
|DialingPattern=713XXXX
|FullyQualifiedCalledPartyNumber=7131001
The messages in the SDI traces are quite sparse regarding SIP TLS, but here it is visible that SIP TLS is being used on port 5061 for this call.
13:57:03.811 |//SIP/SIPHandler/ccbId=0/scbId=0/SIP_PROCESS_ENQUEUE: createConnMsg tls_security=3
13:57:03.823 |//SIP/SIPTcp/wait_SdlSPISignal: Outgoing SIP TCP message to 14.48.44.22 on port 5061 index 19
INVITE sip:7131001@14.48.44.22:5061 SIP/2.0
Via: SIP/2.0/TLS 14.48.44.80:5061;branch=z9hG4bK28140d6fdf
From: <sip:8511001@14.48.44.80>;tag=5164~fa1de7d3-3a9e-4568-ae99-39e270e47fbc-30262865
To: <sip:7131001@14.48.44.22>
13:57:03.827 |SIPSocketProtocol(1,100,13,5)::SendTLSConnectionInfo
Now let's look at the SDL traces for more detailed information. Here the Subject CN and connection information for the TLS session is available. The key pieces are the SdlSSLTCPConnector, and the SIPCertificateInd message that comes from SIPTcp to SIPHandler containing the Subject CN of the remote cluster.
001569030 |2011/09/28 13:57:03.815 |100 |Created | | |SdlSSLTCPConnection(1,100,13,5) |SdlSSLTCPConnector(1,100,12,3) | |NumOfCurrentInstances: 1
001569032 |2011/09/28 13:57:03.827 |100 |SdlSig |SIPCertificateInd |wait |SIPHandler(1,100,65,1) |SIPTcp(1,100,57,1) |1,100,50,1.395726^14.48.44.202^SEP0011215A1AE3 |[T:N-H:0,N:1,L:0,V:0,Z:0,D:0] connIdx= 19 --remoteIP=14.48.44.22 --remotePort = 5061 --X509SubjectName /CN=CUCM7-SUB1.bbbburns.lab --Cipher AES128-SHA --SubjectAltname =
- Mark as Read
- Mark as New
- Bookmark
- Permalink
- Report Inappropriate Content
Hello,
I try to do CA Signed Certificate following this link.
https://supportforums.cisco.com/docs/DOC-6119#comment-9935
I need to do for SIP TLS between CUCM and UM Exchange. what is diferent in the procedure?. If you know at leat one question please tell me any thing is help.
1) what is the service i need to restart?
2) in step 5 and 6 I dont know if is base 64 or DER?.
3) I think the step 7 we need to choose "certificate name = calmanger-trust"
4) I think the step 7 we need to choose "certificate name = calmanger"
thanks very much.
- Mark as Read
- Mark as New
- Bookmark
- Permalink
- Report Inappropriate Content
The procedure is very similar and uses the same basic concepts.
1. You need to restart the CallManager service after completing all of the steps.
2. Open the certificate file with notepad.exe. If you can read the "begin certificate" and "end certificate" lines you have a base64 PEM file. If the file is just binary special characters then you probably have a DER encoded file. Note that if you have a pkcs7 or pkcs12 file then you need to follow a different procedure to extract the individual certs from the file and save them as base64 PEM files. You can tell if you have the pkcs7 or 12 files because they will end with a file extension containing, 7, 12, of pfx.
3. Yes.
4. Correct.
- Mark as Read
- Mark as New
- Bookmark
- Permalink
- Report Inappropriate Content
Jason,
first of all, this is a great document. But it would be great if it includes the order of operation when the Clusters are in mixed-mode and i have to use CA signed certificates instead of self signed certificates.
Would the order of operation be as follows? (The phones are already secure (Installed LSC and appropriate Sec Profile) without CA signed certificates and CUCM Version is 8.6.2):
1) Create a CSR for the callmanager.pem and let it sign by the CA
2) Install all the CA Certificates (Root Certificates) as Callmanager Trust
3) Install the signed callmanager.pem as callmanager
4) Rerun the CTL Client to update the CTL
5) Restart CTL Provider on all applicable Servers
5) Restart the TFTP Service on all applicable servers
6) Reboot all the Phones so they get the new CTL File
7) Restart all CUCM Servers
Would this be ok, or should i reinstall all Phone LSCs before i reboot them?
Thanks.
/Robert
- Mark as Read
- Mark as New
- Bookmark
- Permalink
- Report Inappropriate Content
Great document Jason as always. On a similar note can you use a CA cert for Cross cluster extension mobility as opposed to consolidating all cucm certs
Find answers to your questions by entering keywords or phrases in the Search bar above. New here? Use these resources to familiarize yourself with the community: