- Cisco Community
- Technology and Support
- Collaboration
- Collaboration Knowledge Base
- Dumping CUCM Fresh Install Logs - Virtualization
- Subscribe to RSS Feed
- Mark as New
- Mark as Read
- Bookmark
- Subscribe
- Printer Friendly Page
- Report Inappropriate Content
- Subscribe to RSS Feed
- Mark as New
- Mark as Read
- Bookmark
- Subscribe
- Printer Friendly Page
- Report Inappropriate Content
10-09-2013 12:41 AM - edited 03-12-2019 10:05 AM
Introduction
This document covers the Procedure for Dumping CUCM Fresh Install Logs - Virtualization
Problem Description
In order to dump install logs on a virtual UC installation, it is necessary to use a virtual serial port on the virtual machine. By default, a serial port is not present when deploying from the Cisco provided OVA. Thus it will often be the case that the first time you hit an installation problem and need to dump the logs, the serial port will not be available. Use this procedure to add a serial port to the virtual machine and dump the logs.
Procedure
Follow this procedure to dump install logs to the serial port on the VM.
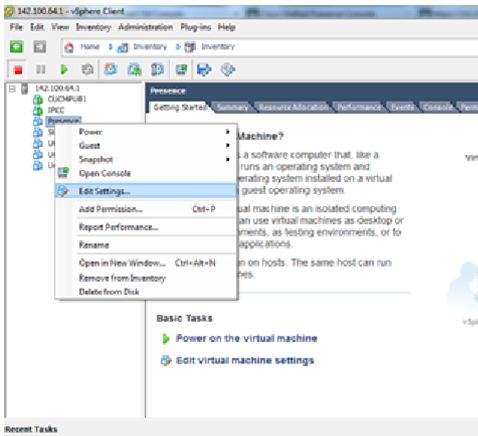
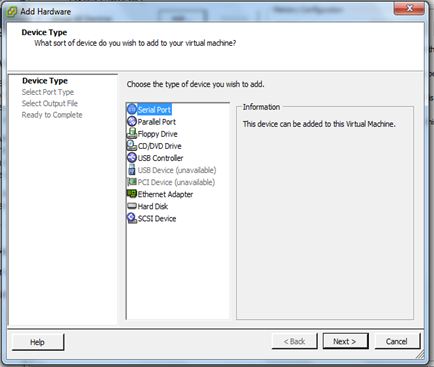
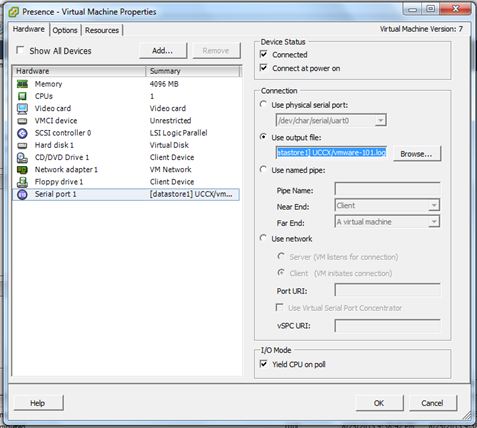
1. When the VM is powered off, edit settings and add a serial port to the VM.
Note: You cannot add one while the VM is running.
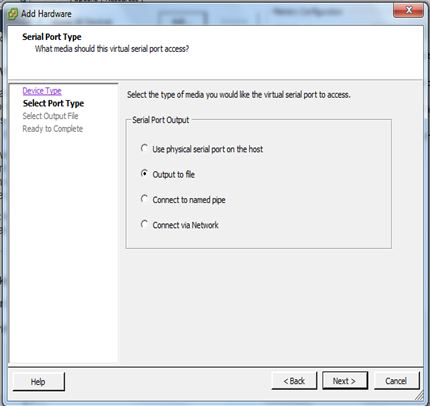
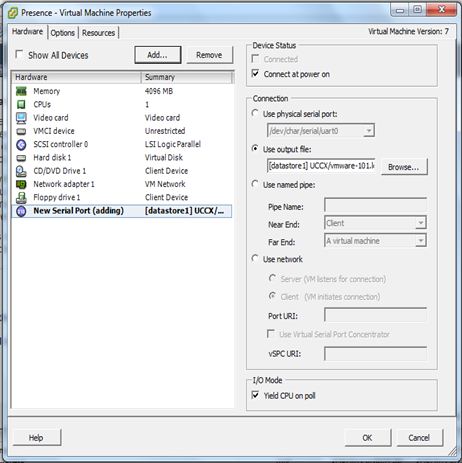
2. You will be required at this time to attach the serial port to a file. Just attach to any temp/junk file, as this file will NOT be used to dump the logs.
3. Power on the VM and start your installation. At boot up, linux will dump some garbage characters (escape sequence characters) into the temp file you attached to the serial port.
4. When you're ready to actually dump the log files, attach a new, empty file to the serial port by editing settings of the VM while the machine is running. You do not have to power down the VM to change the file attached to the serial port.
5. After the file is saved, you can open it using 7-zip (http://www.7-zip.org/download.html)
6. After you have a successful install in the VM, power off the VM, edit settings and remove the serial port from the VM.

Note
Leaving the serial port (or any other unnecessary virtual hardware) can negatively impact performance of the VM. There is no other use of the serial port in a Unified CM VM other than dumping the install logs, so you will not need it again unless you do a fresh install.
- Mark as Read
- Mark as New
- Bookmark
- Permalink
- Report Inappropriate Content
and to open the file you will need the program 7zip
- Mark as Read
- Mark as New
- Bookmark
- Permalink
- Report Inappropriate Content
Hi,
Thanks for this document. At the end of the document it says:
"There is no other use of the serial port in a Unified CM VM other than dumping the install logs, so you will not need it again unless you do a fresh install."
Does this indicate that a "direct standard" install do NOT need a serial port?
Creating this serial port would need to shutdown the VMs which is not a small task. I am performing a "Direct Standard" upgrade so I want to know if I need the serial port or not.
Thanks.
-Ben
- Mark as Read
- Mark as New
- Bookmark
- Permalink
- Report Inappropriate Content
No longer supported on CUCM 15,
Steps to Recover Logs using Recovery CD
You should use the Recovery CD to recover the logs to access the diagnostic information. Follow the steps mentioned:
Insert the recovery CD.
Reboot the system.
Once the recovery CD menu comes up, press Alt + F2 to get to the command prompt.
Find the largest partition by performing a "df -h". (/mnt/part6).
Locate the install logs at: /mnt/part6/log/install/ directory.
Collect the logs.
- Mark as Read
- Mark as New
- Bookmark
- Permalink
- Report Inappropriate Content
Steps to Recover Logs using Recovery CD
***Gain access to VOS command line and find the location of the install logs
- Mount the recovery disk to the VOS virtual machine
- Reboot the VOS VM and boot to the recovery disk
- Press “Alt + F2” to get CLI access
- Type “df -h” to show the available partitions.
- The biggest partition should have the install logs, example: part6.
- The install logs should be in the following directory "/mnt/<your_install_partition>/log/install"
***Assign IP and Gateway to machine for network access
- Type “ifconfig” to see the available interfaces.
- In this case its "eth0".
- It could also be "ens160".
***Next type the following to set the IP address on your interface
- "ifconfig eth0"
- "ifconfig eth0 netmask <netmask>"
- "route add default gw <gateway_address> eth0"
*** Transfer Files Using SFTP
- Change the directory to the path where the install logs are located
- example: "cd /mnt/part6/log/install"
***Next, connect to the SFTP server from the VOS console.
- Type in sftp "sftp_username@sftp_ip"
- After logging in successfully with username/pw, the prompt should change to sftp
***Since we changed the directory to where the install files are located, you should be able to type the following (This should grab all files in the install folder):
- "put *"
- Now go to your SFTP server and see if the files are downloaded.
- To exit SFTP just type “exit”
- To get back to the recovery disk prompt press “Alt + F1”
*** Optional *** How to Grab the installdb logs
- The installdb logs are in a different location. If the install is failing at the DB compontent, you may want to pull these as well.
- The location should be as follows: "/mnt/<your_install_partition>/log/taos-log-a/cm/trace/db/sdi"
- If you cannot find the installdb log then use this command to find the path: "find / -name installdb*"
- Then change the directory to the location of the installdb log and transfer them with the sftp server commands.
References:
https://defaultgateway.org/2022/07/18/how-to-pull-the-install-logs-using-the-recovery-disk/
Find answers to your questions by entering keywords or phrases in the Search bar above. New here? Use these resources to familiarize yourself with the community: