- Cisco Community
- Technology and Support
- Collaboration
- Collaboration Knowledge Base
- How to Configure Unified Communication Manager Directory Integration in a Multi-Forest Environment
- Subscribe to RSS Feed
- Mark as New
- Mark as Read
- Bookmark
- Subscribe
- Printer Friendly Page
- Report Inappropriate Content
- Subscribe to RSS Feed
- Mark as New
- Mark as Read
- Bookmark
- Subscribe
- Printer Friendly Page
- Report Inappropriate Content
04-29-2011 12:21 AM - edited 03-12-2019 09:37 AM
- Introduction
- Prerequisites
- Background Information
- Active Directory Multiple Forest Support Scenario in Unified CM
- Domain Trust Relationship
- Install AD LDS
- Install the Instance for Multiple-Forest Support
- Copy the Schema from Each Domain to ADAM
- Extend the AD LDS Schema with the User-Proxy Objects
- Import the Users from AD DC to AD LDS
- Create the User in AD LDS for Unified CM Synchronization and Authentication
- Configure Bind Redirection
- Configure Unified CM
- Create a Custom LDAP Filter in Unified CM
- Related Information
Introduction
This document discusses how to configure Unified Communication Manager Directory Integration in a Multi-Forest Environment.
Prerequisites
Requirements
Ensure that you meet these requirements:
Have knowledge of deploying and configuring Cisco Unified Communications Manager directory integration.
Are responsible for deploying, configuring, and maintaining Microsoft Active Directory Application Mode 2003 or Microsoft Active Directory Lightweight Directory Services 2008.
Your number of User Accounts to be synchronized does not exceed 60,000 accounts per Unified CM Publisher. When more than 60,000 accounts need to be synchronized, the IP Phone Services SDK must be used to provide a custom directory. Refer to the Cisco Developer Network for additional details.
Note: LDAP authentication user search base must match the ADAM domain as well as if the search base shows "LDAP user search base is formed using the User ID information" you have selected an attribute that cannot be used.
Components Used
The information in this document is based on these software and hardware versions:
Cisco Unified Communications Manager, Release 8.0(1), or later
Microsoft Active Directory Application Mode 2003 or Lightweight Directory Services 2008
The information in this document was created from the devices in a specific lab environment. All of the devices used in this document started with a cleared (default) configuration. If your network is live, make sure that you understand the potential impact of any command.
Conventions
Refer to the Cisco Technical Tips Conventions for more information on document conventions.
Background Information
Microsoft Active Directory Lightweight Directory Service (AD LDS), formerly known as Active Directory Application Mode (ADAM), can be used to provide directory services for directory-enabled applications. Instead of using your organization’s Active Directory Domain Service (AD DS) to store the directory-enabled application data, AD LDS can be used to store the data. AD LDS can be used in conjunction with AD DS, so that you can have a central location for security accounts (AD DS) and another location to support the application configuration and directory data (AD LDS). Using AD LDS, you can reduce the overhead associated with Active Directory (AD) replication. You do not have to extend the AD schema to support the application, and you can partition the directory structure, so that the AD LDS service is only deployed to the servers that need to support the directory-enabled application.
Many differences exist between ADAM and Active Directory. ADAM can only deliver some of the AD functions, as shown here:
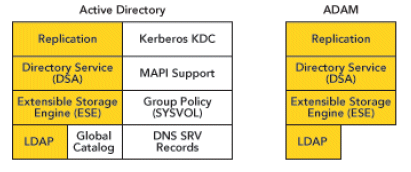
This document describes the mechanisms that allow Cisco Unified Communications Manager (Unified CM), or any other Cisco products that use the Cisco Unified CM Directory Integration Service (DirSync), to get user information and perform authentication from different AD forests, that can exist in different forests. To achieve this objective, we use ADAM, which can synchronize its user database with different AD domain controllers or other Lightweight Directory Access Protocol (LDAP) sources.
ADAM can create a database of users and store the user details. Single Sign On (SSO) functionalities are desired to avoid end users having to maintain different sets of credentials in different systems; therefore, ADAM bind redirection is used. ADAM bind redirection is a special function for applications that support LDAP bind as an authentication mechanism. In some cases, the special schema, or naming context, may force you to avoid AD, making ADAM a necessary choice.
A special user proxy object in ADAM maps to a regular AD user account. The user proxy does not have an actual password stored in the ADAM object itself. When performing its normal bind operation, the application checks the ID locally but checks the password against Active Directory in the background, as Figure 1 illustrates. The application does not need to be aware of this AD interaction
Figure 1: ADAM User Proxy Password Authentication

ADAM bind redirection should be used only in special cases where an application can perform a simple LDAP bind to ADAM. However, the application still needs to associate the user with a security principal in AD.
ADAM bind redirection occurs when a bind to ADAM is attempted using a special object called a proxy object. A proxy object is an object in ADAM that represents a security principal in AD. Each proxy object in ADAM contains the SID of a user in AD. When a user attempts to bind to a proxy object, ADAM takes the SID that is stored in the proxy object, together with the password that is supplied at bind time, and presents the SID and the password to AD for authentication. A proxy object in ADAM does not store a password, and users cannot change their AD passwords through ADAM proxy objects.
The password is presented in plain text to ADAM because the initial bind request is a simple LDAP bind request. For this reason, an SSL connection is required by default between the directory client and ADAM. ADAM uses Windows Security APIs to present the password to AD.
For more information about bind redirection, refer to Understanding ADAM bind redirection.
Note: The requirement for SSL when using bind redirection should not be disabled in a production environment.
Active Directory Multiple Forest Support Scenario in Unified CM
For the purpose of explaining the method, we imagine a scenario where Cisco Systems (Forest 2) has acquired two other companies: WebEx (Forest 1) and Tandberg (Forest 3). In the migration phase, we integrate the AD structure of each company, which allows the deployment of a single Cisco Unified Communications cluster.
Figure 2: Example of Multi-Forest Scenario
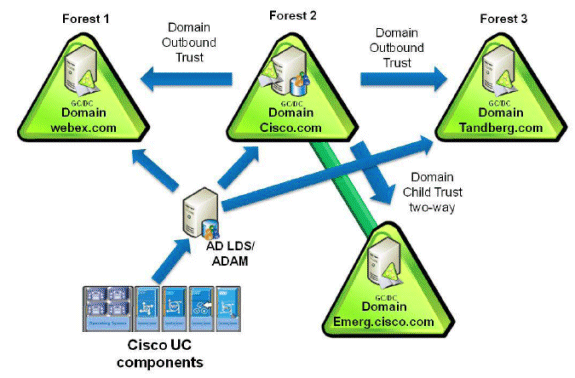
In our example, company Cisco (Forest 2) has two domains: Forest root domain called CISCO (DNS cisco.com), and a sub-domain called EMERG (DNS emerg.cisco.com). Both domains have a domain controller (DC) that is also a Global Catalog, and each one is hosted in Windows 2008 Server SP2.
Company WebEx (Forest 1) has a single domain with a DC that is also a Global Catalog, and it is hosted in Windows 2003 R2 Server SP2.
Company Tandberg (Forest 3) has a single domain with a DC that is also a Global Catalog, and it is hosted in Windows 2008 Server SP2.
AD LDS is installed in the DC for domain CISCO; in fact, any machine anywhere in one of the three forests can be used. The DNS infrastructure must be in place such that domains in one forest can communicate with domains in other forests and can establish the appropriate trust relationships and validations between the forests.
Domain Trust Relationship
For the authentication of the users to succeed, you need to have a trust between the domain where the ADAM instance is hosted and the other domain(s) that hosts the user accounts. This trust can be a one-way trust if required (outgoing trust from the domain that hosts the ADAM instance to the domain(s) that host the user accounts). Thus, the ADAM instance can forward the authentication requests to DCs in those account domains.
Furthermore, you need a user account from both account domains that have access to all attributes of all user accounts in the domain. ADAMSync uses this account to synchronize the account domain users to ADAM.
Finally, the machine that runs ADAM must be able to find all domains (DNS), find domain controllers in both domains (using DNS), and connect to these DCs.
Perform these steps to set up the inter trust relationships:
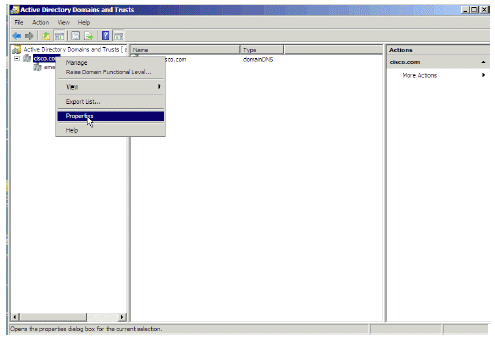
Open Active Directory Domains and Trusts, choose the domain that hosts AD LDS, right-click on the domain, and choose Properties.
- Figure 3: Active Directory Domains and Trusts Window
Note: The domain functional level and the forest functional level should specify 2003 or higher.
Go to the Trusts tab, and click New Trust.
Figure 4: Trusts Tab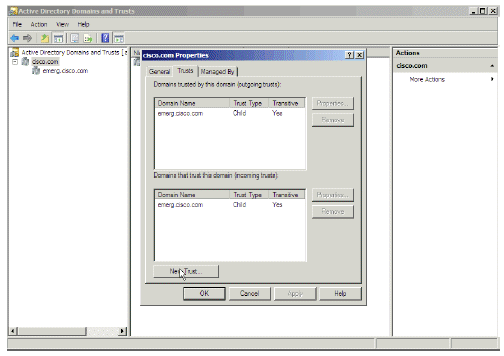
Follow the wizard and provide the name of the domain with which you want to establish the trust and click Next.
Figure 5: New Trust Wizard Name Entry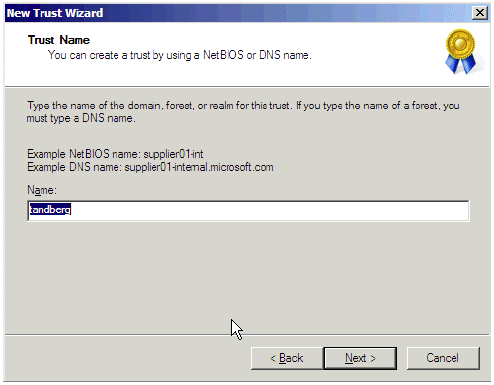
In the Trust Type window, choose Forest trust and click Next.
Figure 6: Trust Type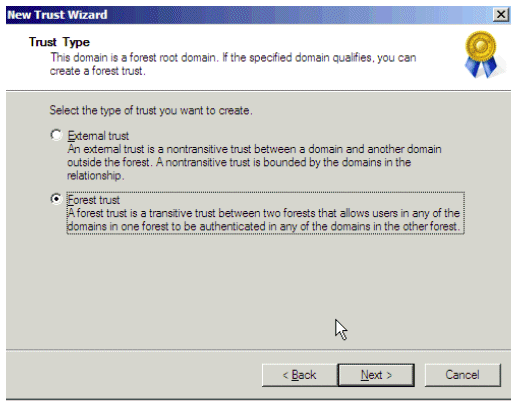
In the Direction of Trust window, choose One-way: outgoing (required) and click Next.
Figure 7: Direction of Trust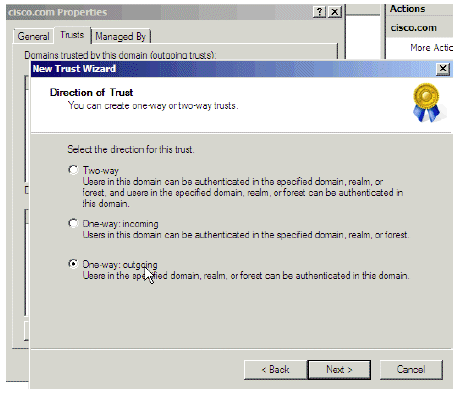
In the Sides of Trust window, allow the wizard to configure both domains. To do so, choose Both this domain and the specified domain and click Next.
Figure 8: Sides of Trust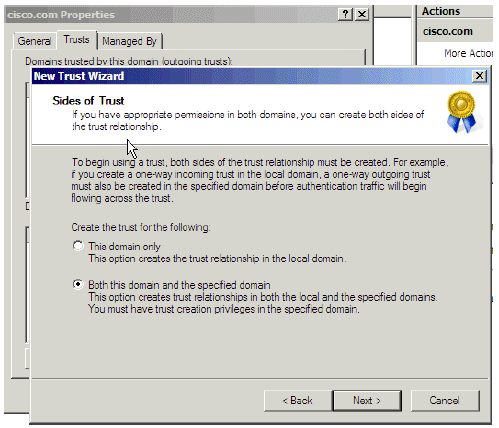
In the User Name and Password window, provide the credentials for the other domain. Click Next.
Figure 9: User Name and Password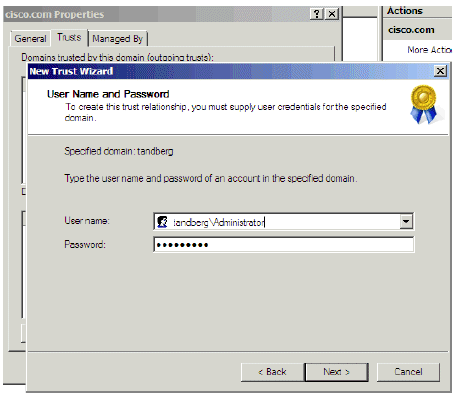
In the Outgoing Trust Authentication Level—Local Forest window, choose Forest-wide authentication. Click Next.
Figure 10: Outgoing Trust Authentication Level—Local Forest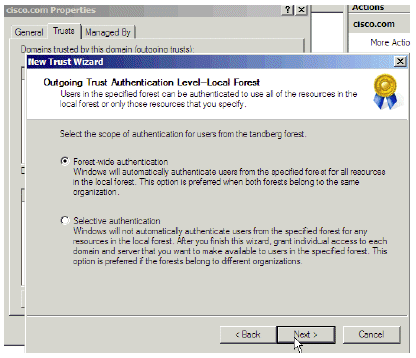
In the Confirm Outgoing Trust window, choose Yes, confirm the outgoing trust and click Next.
Figure 11: Confirm Outgoing Trust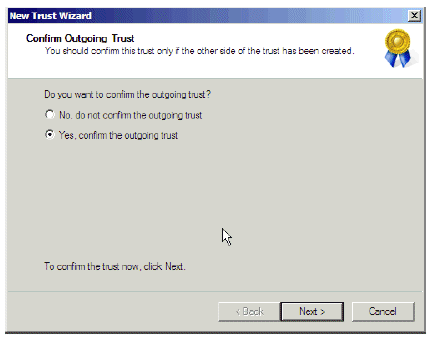
This displays after you run this process for both the Tandberg and WebEx domains:
Figure 12: Properties Window, Trusts Tab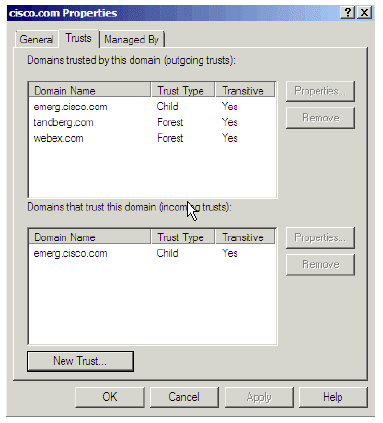
The emerg domain displays by default, because it is a child domain.
Install AD LDS
Perform these steps to install AD LDS:
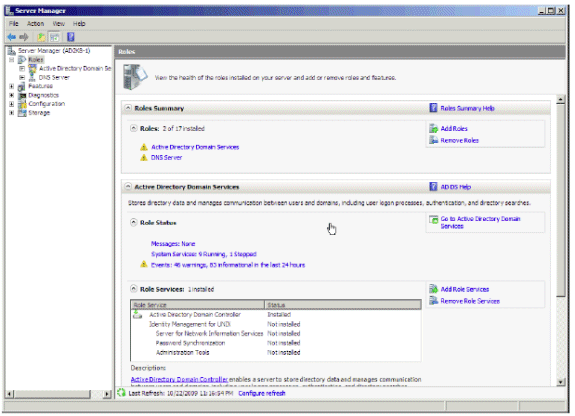
Open Server Manager, click Roles, and choose add New.
Figure 13: Server Manager
In the Select Server Roles window, choose Active Directory Lightweight Directory Services and click Next.
Figure 14: Select Server Roles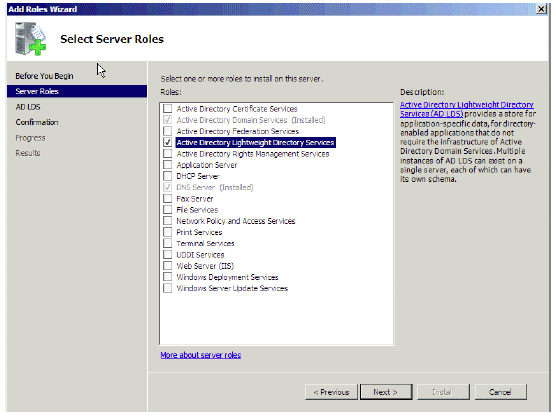
AD LDS services installation.
Figure 15: Installation Progress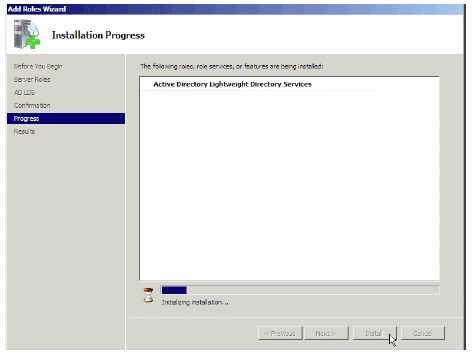
Install the Instance for Multiple-Forest Support
AD LDS can run different instances of the services with different ports, which allows for different user directory “applications” to be run on the same machine. By default, AD LDS chooses ports 389/LDAP and 636/LDAPS. If the system already has any kind of LDAP services running, however, it uses ports 50000/LDAP and 50001/LDAPS. Each instance has a pair of ports that increment based on the previous numbers used.
In some cases, due to a Microsoft bug, the ports are already in use by the Microsoft DNS server and the instance wizard shows an error, which is not self explanatory. To resolve this error, reserve the ports in the tcp/ip stack. If you find this problem, refer to AD LDS service start fails with error "setup could not start the service..." + error code 8007041d ![]() .
.
Perform these installation steps:
In the Server Manager, choose Roles > AD LDS.
Choose Click here to create an AD LDS instance.
Figure 16: Active Directory Lightweight Directory Services Window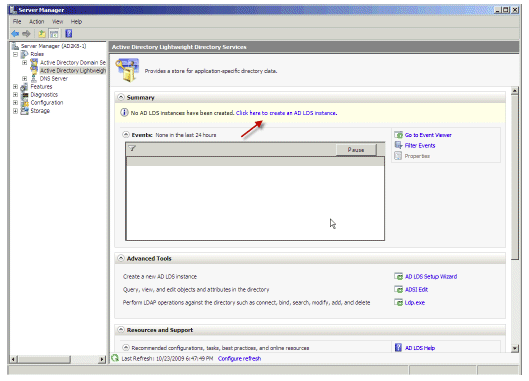
In the Setup Options window, choose A unique instance. Click Next.
Figure 17: Setup Options Window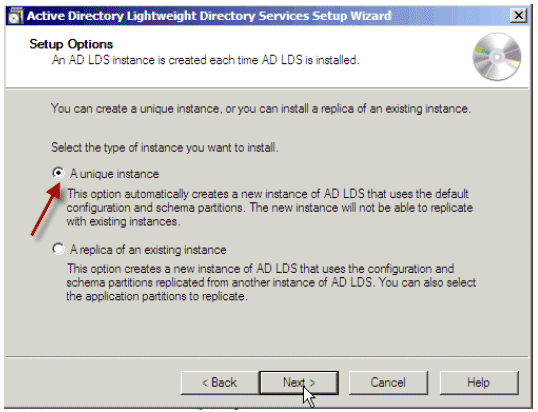
In the Instance Name window, provide the name of the instance. In our example, this is MultiForest. Click Next.
Figure 18: Instance Name Window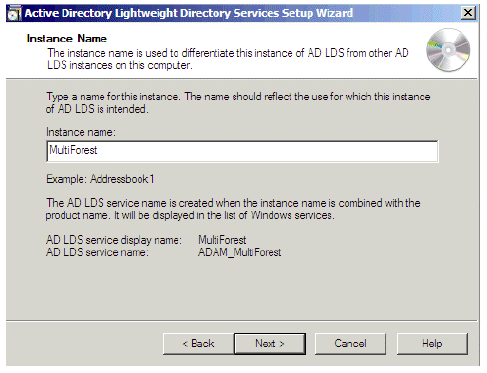
In the Ports window, choose the ports or allow the system to choose them for you. Click Next.
Figure 19: Ports Window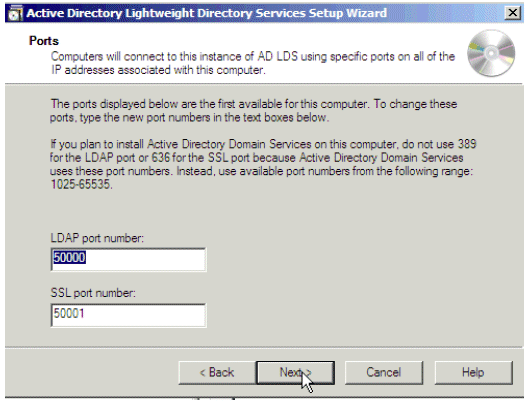
In the Application Directory Partition window, provide a partition name for the instance. Do not provide a "CN" such as the one provided in the example of the wizard, because most of the time that will create an error in the Schemas. In our scenario, we choose the same partition as the AD DC that hosts AD LDS (dc=Cisco,dc=com). Click Next.
Figure 20: Application Directory Partition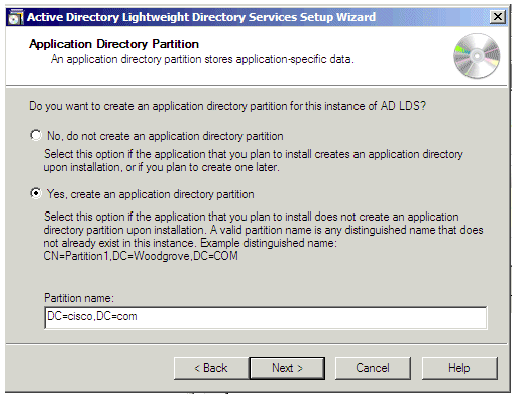
In the Service Account Selection window, provide an account to start the server. Click Next.
Figure 21: Service Account Selection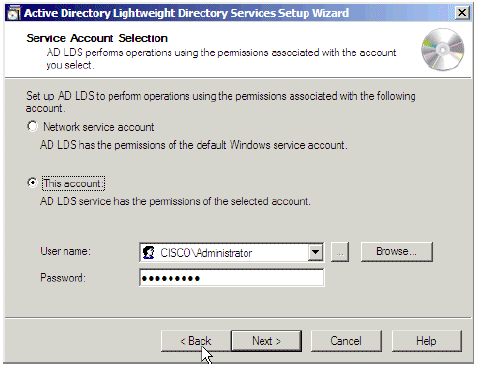
Provide the name of the user that has administrative permissions. Click Next.
Figure 22: AD LDS Administrators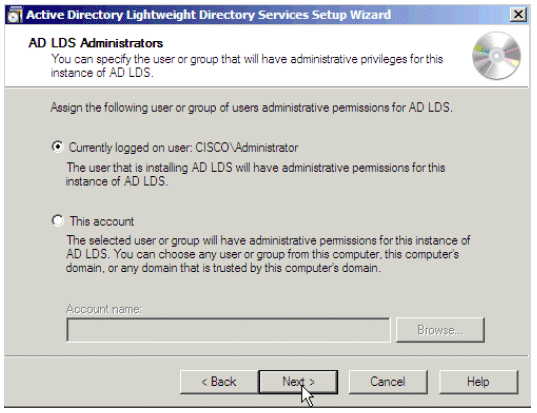
Import the highlighted default LDIF files to build the schema. Click Next.
Figure 23: Importing LDIF Files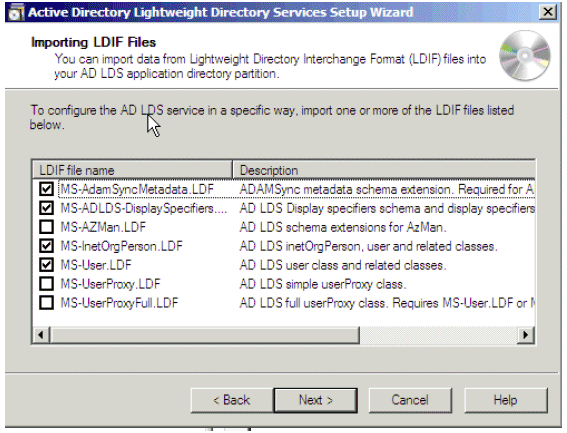
Note: If ADAM is being installed on a Windows 2003 server, Figure 23 shows only four options: MS-AZMan.LDF, MS-InetOrgPerson.LDF, MS-User.LDF, and MS-UserProxy.LDF. From these four, select only MS-User.LDF and MS-InetOrgPerson.LDF.
Copy the Schema from Each Domain to ADAM
This process needs to be repeated for each domain for which you need to synchronize. This example only shows the process against one of the domains in the scenario.
Perform these steps:
Open the AD DS/LDS schema analyzer (ADSchemaAnalyzer.exe) in the directory C:\windows\adam.
Choose File > Load target schema.
Figure 24: AD DS/LDS Schema Analyzer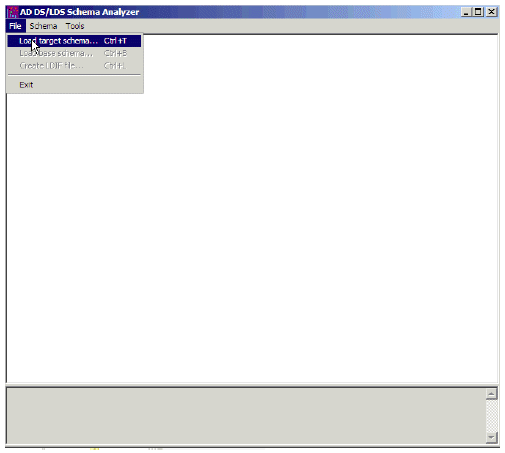
Provide the credentials of the source AD DC from which you want to import.
Figure 25: Load target schema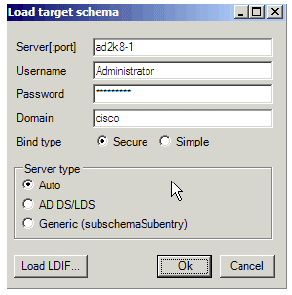
Choose File > Load base schema.
Figure 26: File > Load base schema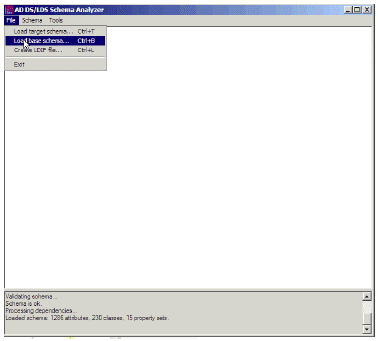
Specify the AD LDS to which you want to connect and extend the schema.
Figure 27: Load base schema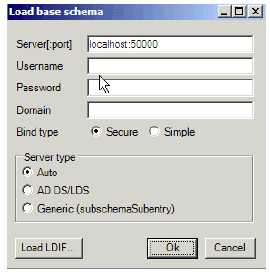
Choose Schema > Mark all non-present elements as included.
Figure 28: Mark all non-present elements as included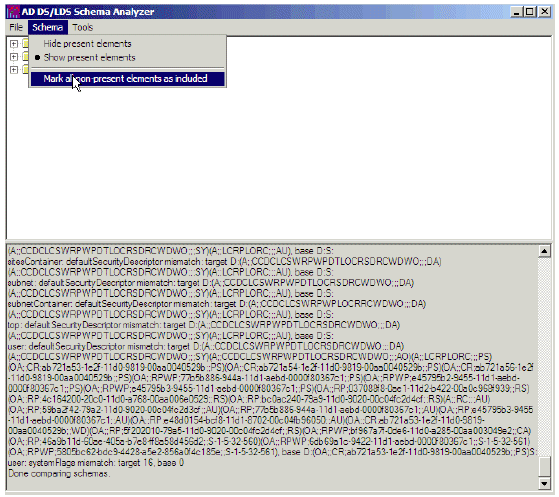
Choose File > Create LDIF file. In this example, the file being created via this step is diff-schema.ldf. To simplify the process, the file should be created in C:\windows\adam.
Figure 29: Create LDIF file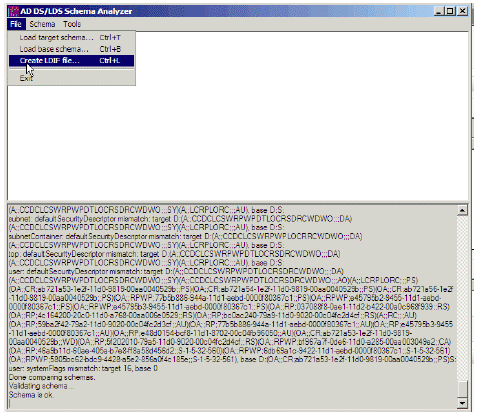
One option to help organize the files that need to be generated is to create a separate directory. This directory allows the files to be separated from the main C:\windows\adam directory.
Open a command prompt and create a log directory in the C:\windows\adam directory:
cd \windows\adam
mkdir logs
Import the ldif schema (created using the ADSchemaAnalyzer) to AD LDS:
ldifde -i -s localhost:50000 -c CN=Configuration,DC=X #ConfigurationNamingContext -f diff-schema.ldf -j c:\windows\adam\logs
Refer to Using LDIFDE to import and export directory objects to Active Directory
 for additional ldifde options and command formats.
Figure 30: Importing the LDIF Schema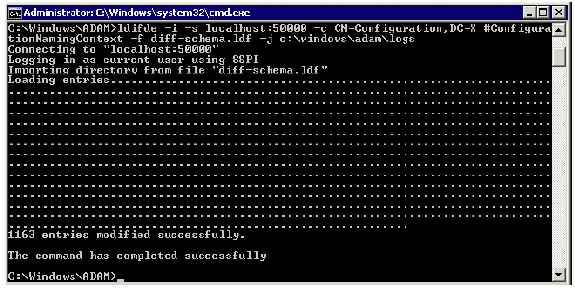
Extend the AD LDS Schema with the User-Proxy Objects
The object for the proxy authentication needs to be created and the object class user is not used. The object class being created, userProxy, allows the bind redirection. The object class detail needs to be created in an LDIF file. The file is a creation of a new file, which in this example, is MS-UserProxy-Cisco.ldf. This new file is generated from the original MS-UserProxy.ldf and edited, using a text editor, so that it has this content (or see Attachments at the end of this document):
#==================================================================
# @@UI-Description: AD LDS simple userProxy class.
#
# This file contains user extensions for default ADAM schema.
# It should be imported with the following command:
# ldifde -i -f MS-UserProxy-Cisco.ldf -s server:port -b username domain password -k -j . -c "CN=Schema,CN=Configuration,DC=X" #schemaNamingContext
#
#==================================================================
dn: CN=User-Proxy,CN=Schema,CN=Configuration,DC=X
changetype: ntdsSchemaAdd
objectClass: top
objectClass: classSchema
cn: User-Proxy
subClassOf: top
governsID: 1.2.840.113556.1.5.246
schemaIDGUID:: bxjWYLbzmEiwrWU1r8B2IA==
rDNAttID: cn
showInAdvancedViewOnly: TRUE
adminDisplayName: User-Proxy
adminDescription: Sample class for bind proxy implementation.
objectClassCategory: 1
lDAPDisplayName: userProxy
systemOnly: FALSE
possSuperiors: domainDNS
possSuperiors: organizationalUnit
possSuperiors: container
possSuperiors: organization
defaultSecurityDescriptor:
 D:(OA;;CR;ab721a53-1e2f-11d0-9819-00aa0040529b;;PS)S:
defaultHidingValue: TRUE
defaultObjectCategory: CN=User-Proxy,CN=Schema,CN=Configuration,DC=X
systemAuxiliaryClass: msDS-BindProxy
systemMayContain: userPrincipalName
systemMayContain: givenName
systemMayContain: middleName
systemMayContain: sn
systemMayContain: manager
systemMayContain: department
systemMayContain: telephoneNumber
systemMayContain: mail
systemMayContain: title
systemMayContain: homephone
systemMayContain: mobile
systemMayContain: pager
systemMayContain: msDS-UserAccountDisabled
systemMayContain: samAccountName
systemMayContain: employeeNumber

dn:
changetype: modify
add: schemaUpdateNow
schemaUpdateNow: 1
-
Perform these steps:
Save the MS-UserProxy-Cisco.ldf file in the C:\windows\adam directory.
Import the new object class to AD LDS:
ldifde -i -s localhost:50000 -c CN=Configuration,DC=X #ConfigurationNamingContext -f MS-UserProxy-Cisco.ldf -j c:\windows\adam\logs
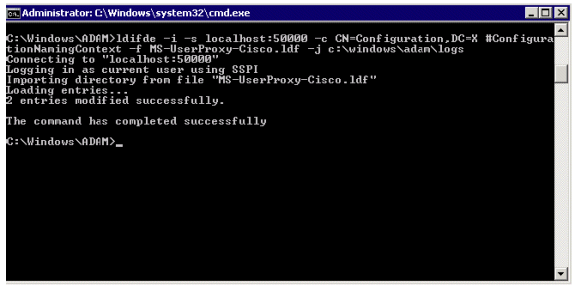
If ADAM is being installed on a Windows 2003 server, run this command as well:
ldifde -i -s localhost:50000 -c CN=Configuration,DC=X #ConfigurationNamingContext -f MS-AdamSyncMetaData.ldf -j c:\windows\adam\logs
Import the Users from AD DC to AD LDS
The user from each domain now needs to be imported to AD LDS.
Note: This step needs to be repeated for each domain that needs to synchronize. This example only shows the process against one of the domains.
Perform these steps:
Starting with the original MS-AdamSyncConf.xml, create an XML file for each domain that needs to be synchronized and modify the file with the details specific to each domain to have the following content:
<?xml version="1.0"?>
<doc>
<configuration>
<description>cisco.com</description>
<security-mode>object</security-mode>
<source-ad-name>cisco.com</source-ad-name>
<source-ad-partition>dc=cisco,dc=com</source-ad-partition>
<source-ad-account></source-ad-account>
<account-domain></account-domain>
<target-dn>dc=cisco,dc=com</target-dn>
<query>
<base-dn>dc=cisco,dc=com</base-dn>
<object-filter>
(|(&(objectClass=user)(objectCategory=person))
(&(objectClass=user)(isDeleted=TRUE)))
</object-filter>
<attributes>
<include>objectSID</include>
<include>mail</include>
<include>userPrincipalName</include>
<include>middleName</include>
<include>manager</include>
<include>givenName</include>
<include>sn</include>
<include>department</include>
<include>telephoneNumber</include>
<include>title</include>
<include>homephone</include>
<include>mobile</include>
<include>pager</include>
<include>msDS-UserAccountDisabled</include>
<include>samAccountName</include>
<include>employeeNumber</include>
<exclude></exclude>
</attributes>
</query>
<user-proxy>
<source-object-class>user</source-object-class>
<target-object-class>userProxy</target-object-class>
</user-proxy>
<schedule>
<aging>
<frequency>0</frequency>
<num-objects>0</num-objects>
</aging>
<schtasks-cmd></schtasks-cmd>
</schedule>
</configuration>
<synchronizer-state>
<dirsync-cookie></dirsync-cookie>
<status></status>
<authoritative-adam-instance></authoritative-adam-instance>
<configuration-file-guid></configuration-file-guid>
<last-sync-attempt-time></last-sync-attempt-time>
<last-sync-success-time></last-sync-success-time>
<last-sync-error-time></last-sync-error-time>
<last-sync-error-string></last-sync-error-string>
<consecutive-sync-failures></consecutive-sync-failures>
<user-credentials></user-credentials>
<runs-since-last-object-update></runs-since-last-object-update>
<runs-since-last-full-sync></runs-since-last-full-sync>
</synchronizer-state>
</doc>In this file, these tags should be replaced to match the domain:
<source-ad-name> - Use the DNS name of the domain (e.g., cisco.com).
<source-ad-partition> - Use the root partition from the source AD DC that you want to import from (for example dc=Cisco, dc=com, or dc=Tandberg, dc=com).
<base-dn> - Choose the container from which to import. For example, if all users of the domain are required, this should be the same as <source-ad-partition>, but if users are from a specific organizational unit (for example, Finance OU), it should be something like OU=Finance,DC=Cisco,DC=com.
Save the newly created XML file in the C:\windows\adam directory.
Open a command window:
cd \windows\adam
Run this command:
ADAMSync /install localhost:50000 AdamSyncConfCisco.xml /log logs\install.log
Note: The file AdamSyncConfCisco.xml is the newly created XML file.
Synchronize the users with this command:
ADAMSync /sync localhost:50000 "dc=cisco,dc=com" /log logs\sync.log
The result should be something similar to Figure 31:
Figure 31: User Synchronization Results
To perform a periodic sync from AD to ADAM, use the Task Scheduler in Windows.
Create a .cmd or .bat file with this content:
cd \Windows\ADAM
ADAMSync /install localhost:50000 AdamSyncConfCisco.xml /log logs\install.log
ADAMSync /sync localhost:50000 "dc=cisco,dc=com" /log logs\sync.log
Schedule the task to run the .cmd or .bat file as required. This ensures that additions, modifications, and deletions in AD also get reflected in ADAM.
You can create another .cmd or .bat file and schedule it to perform a periodic sync from the other forest.
Create the User in AD LDS for Unified CM Synchronization and Authentication
Perform these steps:
From the Administrator tools in the Start menu, open ADSI Edit.
On the Action menu, choose Connect to.
Connect to base DN of the AD LDS tree (DC=Cisco,DC=com) and specify the host and port where it is hosted (localhost:50000). Click OK.
Figure 32: Connection Settings
Right-click on the base DN, then choose New > Object.
Figure 33: Create New Object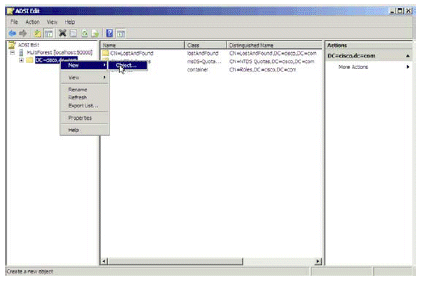
Select a class of user. Click Next.
Figure 34: Select New User Class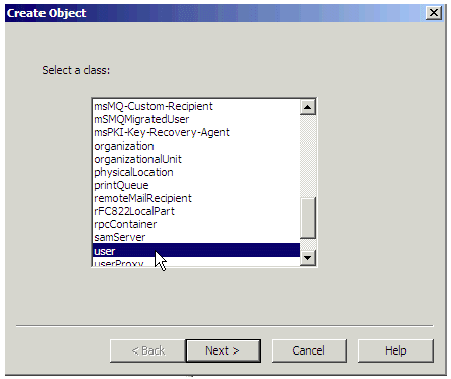
In this example, “root” was chosen. (Any name can be chosen here.)
Figure 35: Name an Object Attribute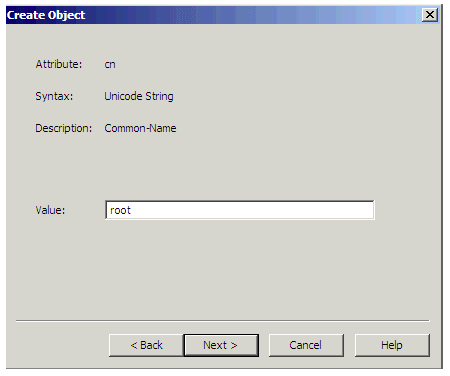
Provide a password for the new user, right-click on the user, and choose Reset Password.
Figure 36: Reset New User Password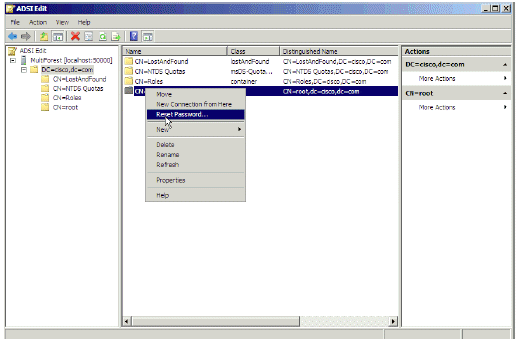
Enable the new user, which is disabled by default. Right-click on the user and choose Properties.
Figure 37: Enable New User
Browse to the msDS-UserAccountDisabled attribute.
Figure 38: Attribute Editor for User Account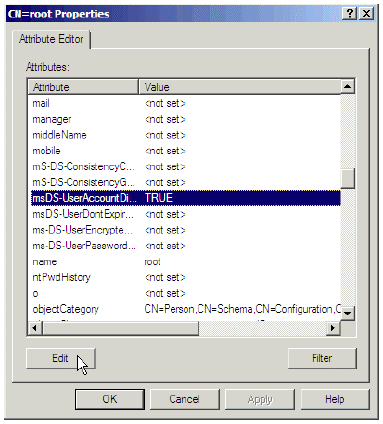
Choose Edit and change the value to False.
Figure 39: Boolean Attribute Editor
The new user needs to be added to one group that has read permission to the AD LDS. In this example, Administrators was chosen.
Browse to the CN=Roles container, right-click on the CN=Administrators group, and choose Properties.
Figure 40: Properties of CN=Administrators
Browse to the member attribute, and click Edit.
Figure 41: Attribute Editor for member Attribute
Add the new Distinguished Name (DN) that was previously created (cn=root,dc=Cisco,dc=com) to this group.
Figure 42: Add Distinguished Name
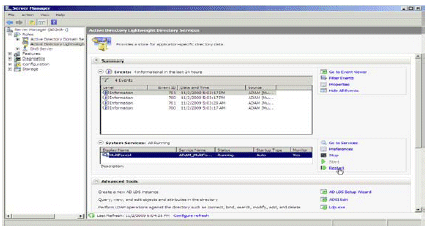
Update the schema and restart AD LDS.
Figure 43: Update Schema Now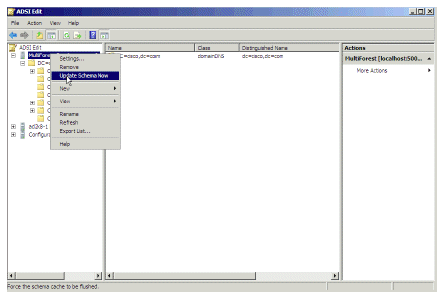
Figure 44: Restart AD LDS
Configure Bind Redirection
By default, binding to ADAM with bind redirection requires an SSL connection. SSL requires the installation and use of certificates on the computer that is running ADAM and on the computer that connects to ADAM as a client. If certificates are not installed in your ADAM test environment, you can disable the requirement for SSL as an alternative.
Note: Disabling the requirement for SSL for bind redirection causes the password of a Windows security principal to pass to the computer that is running ADAM without encryption. Thus, you should only disable the SSL requirement in a test environment.
By default, SSL is enabled. Perform these steps:
Generate the certificate for ADAM/AD LDS. Consult Microsoft documentation for information regarding ADAM/AD LDS certification generation.
Upload the ADAM/AD LDS certificate to the Unified CM. Refer to the Cisco Unified Communications Operating System Administration Guide for additional details.
Choose the checkbox to use SSL in LDAP Directory page and LDAP Authentication page.
Enter 50001 (in our example) for the LDAP port, which is the SSL port number given while installing ADAM/AD LDS instance.
To disable the SSL requirement for bind redirection, perform these steps:
Click Start, point to Administrative Tools, and click ADSI Edit.
On the Action menu, choose Connect to.
Under computer, type localhost:50000 (This is the ADAM host and port.)
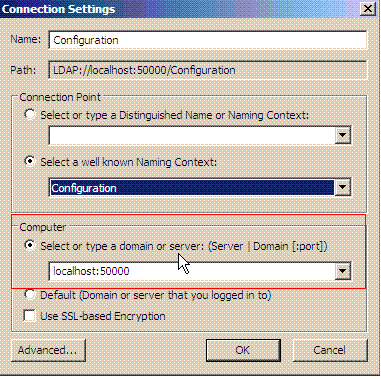
Under Connection point, choose Select a well-known Naming Context > Configuration. Click OK.
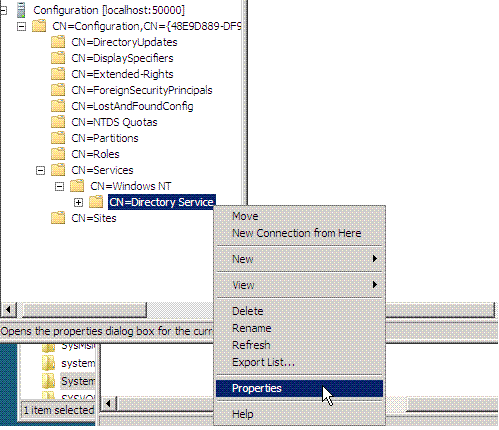
In the console tree, browse to this container object in the configuration partition: CN=Windows NT,CN=Services.
Right-click CN=Directory Service, and then choose Properties.
In Attributes, click msDS-Other-Settings, and then click Edit.
In Values, click RequireSecureProxyBind=1, and then click Remove.
In Value to add, type RequireSecureProxyBind=0, click Add, and then click OK.
Restart AD LDS for the changes to take effect.
For more information, refer to Managing Authentication in ADAM ![]() .
.
Configure Unified CM
ADAM/AD LDS synchronization and authentication is supported in Unified CM version 8.0(1) and later.
Perform these steps:
Choose System > LDAP > LDAP System.
Perform these steps in order to map the Cisco UserID to mail, employeeNumber, or telephoneNumber:
Choose Microsoft Active Directory Application Mode.
Choose from any of the following LDAP userid attributes: mail, employeeNumber, or telephoneNumber.
Figure 45: LDAP System Configuration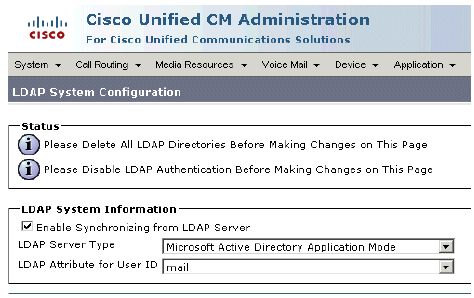
Perform these steps in order to map the Cisco UserID to samAccountName as the LDAP userid attribute:
Choose Microsoft Active Directory (rather than Microsoft Active Directory Application Mode).
Choose sAMAccountName from the LDAP userid attribute drop-down list.
Figure 46: LDAP System Configuration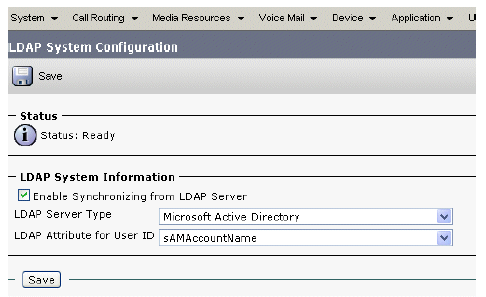
Configure LDAP synchronization with the credentials of the user that was created in AD LDS (e.g., cn=root,dc=cisco,dc=com). If SSL is desired and the steps to use SSL have been completed, specify the appropriate port (e.g. 50001), and choose Use SSL.
Figure 47: LDAP DirectoryConfigure LDAP authentication with the credentials of the user that was created in AD LDS. If SSL is desired and the steps to use SSL have been completed, specify the appropriate port (e.g. 50001), and choose Use SSL.
Figure 48: LDAP Authentication
Note: After the users from AD LDS have been synchronized into Unified CM, the users must be configured and assigned to the Standard CCM Users group. Any attempt with LDAP Authentication will fail if the users are not assigned to the user group.
Create a Custom LDAP Filter in Unified CM
The user object class is no longer being used; therefore, the LDAP filter needs to be changed to use userProxy instead.
The default filter must be changed.
Default Filter
(&(objectClass=user)(!(objectClass=Computer))(!(msDS-UserAccountDisabled=TRUE)))
Create the Custom Filter (Required):
(&(objectClass=userProxy)(!(objectClass=Computer))(!(msDS-UserAccountDisabled=TRUE)))
Perform these steps in order to create the custom filter on Unified CM 8.0(1):
Log in to Cisco Unified CM Administration using a web browser
Select the LDAP Custom Filter option from the LDAP configuration menu.
Create a new filter using the example above
Save the filter
Assign the filter to each applicable Synchronization Agreement
Figure 49: LDAP Filter Configuration
This filter is used in the LDAP directory page while configuring LDAP synchronization agreement as shown in Figure 47.
Related Information
- Voice Technology Support
- Voice and Unified Communications Product Support
- Troubleshooting Cisco IP Telephony

- Technical Support & Documentation - Cisco Systems
--
- Mark as Read
- Mark as New
- Bookmark
- Permalink
- Report Inappropriate Content
We completed a start to finish test yesterday and here is what we found:
Step one, we deleted all users in test environment along with all LDAP connections. We then configured an LDAP connection to the "old" domain and ran the sync. This imported all 1900 users that are within the range of the filter I specified. We then configured a few of those users with device associations, group membership and IPCC Extension. The selected users were then assigned some skills and resource groups in the UCCX.
Step two was to delete the current LDAP connection, which set all of the users to "Inactive". As I understand it, the users are not deleted until the garbage process runs. (we are trying to determine when that process runs)
The users that we set up in UCCX we place in an "Inactive" state and were not showing as a resource.
Step three, we created the connection to ADAM and ran the sync process. That brought in an additional 400 or so users (which was expected) and marked ALL users Active once again.
When we looked at the test users that were configured in UCCX, they went from the "Inactive" container to "Active" as a resource. All device associations were maintained.
Questions that remain:
1. When does the garbage process run
2. Each user has GUID which seems to be unchanged in UCM, but in our case will change when they finally migrate from "old domain" to "new domain". Are the GUIDs assigned by UCM and domain memberships ignored, as long as the USERID remains unchanged, or are the GUIDs part of the record that gets imported from AD/ADAM or are they assigned by the UCM
3. What is e preferred method of backing up the UCM/UCCX in the event we need to roll back
We are also going to open a TAC case and run this by them.
Any thoughts are welcome....
- Mark as Read
- Mark as New
- Bookmark
- Permalink
- Report Inappropriate Content
Any further word on this? I'm doing the exact same thing. My only other thought is to wait for 10.x of CUCM and then convert all my AD users into local users change the LDAP sync then change them all back.
- Mark as Read
- Mark as New
- Bookmark
- Permalink
- Report Inappropriate Content
We just completed the migration to ADAM and it was pulled off without a hitch.
After some extensive testing, we were comfortable that even though you get a message that ALL user accounts will be deleted, when you remove the LDAP Directory, they are only marked "Inactive" until the garbage process runs at 3 AM (hard coded local time), at which point they are marked "Pending Delete". At the next run of the garbage process, they are deleted. Since this change only takes less than one hour, this isn't an issue.
We removed the old LDAP Directory that pointed to a single forest AD and created the new one to point to ADAM and did a full sync. All "Inactive users became "Active" and we were back up in less then 1 hour.
The key here is to Leave the Directory Source listed as Active Directory, even though you are using ADAM or LDS.
- Mark as Read
- Mark as New
- Bookmark
- Permalink
- Report Inappropriate Content
Thanks for the followup that gives me some hope for doing this in my environment. I've been running some tests with 8.6 and even changing the Directory from Active Directory over to ADAM the inactive users still seem to get marked active as long as the UserID matches.
- Mark as Read
- Mark as New
- Bookmark
- Permalink
- Report Inappropriate Content
That is exactly right, as long as that userid stays the same, they come back as active. We even did an expert of the CUCM user DB and the GUID is unchanged as long as the userid field stays the same (SamAccountName).
- Mark as Read
- Mark as New
- Bookmark
- Permalink
- Report Inappropriate Content
Answers to the mdflowers questions
1. In CUCM 10.x the garbage process runs at 3:15 AM (this is fixed and cannot be changed). The account must be inactive for > 24 hours before it will be deleted.
2. For AD deployments, the ObjectGUID is used internally in Unified CM as the key attribute of a user. The attribute in AD that corresponds to the Unified CM User ID may be changed in AD. For
example, if sAMAccountname is being used, a user may change their sAMAccountname in AD, and the corresponding user record in Unified CM would be updated. So a new GUID would cause a new account to be created.
3. DRS for 10.x http://www.cisco.com/c/en/us/td/docs/voice_ip_comm/connection/10x/design/guide/10xcucdgx/10xcucdg065.html. Not used it before but COBRA S might be useful for this scenario
- Mark as Read
- Mark as New
- Bookmark
- Permalink
- Report Inappropriate Content
I am having a terrible time getting this working... Do I have to remove the existing AD connections before I setup and sync my ADAM connection?
Also If I delete my existing AD connection, then try ADAM and it fails, can I then go back and re-add my AD connection?
- Brandon
- Mark as Read
- Mark as New
- Bookmark
- Permalink
- Report Inappropriate Content
How did you keep the USERID the same for different domain? I have an issue of keeping the same USERID. I'm trying to migrate users from AD integration to ADAM integration. In AD integration, CUCM used sAMAccountName (USERID in this case). In ADAM, CUCM used UPN which is an email address. How do I migrate the users with losing user information in CUCM?
Thanks in advance.
- Mark as Read
- Mark as New
- Bookmark
- Permalink
- Report Inappropriate Content
Hello,
I followed the procedure many times but I have always the same problem : no users in ADSI Edit MMC, no users in CUCM.
Have you an Idea?
My topic : Problem with MultiForest and AD LDS
- Mark as Read
- Mark as New
- Bookmark
- Permalink
- Report Inappropriate Content
These steps worked. This example showed only steps to pull user directory from one AD. You need one application paritition for each domain. If all domains are resided in the same forest, you can setup LDAP authentication to the top of the forest. If you have multiforest, you need to use SSO.
- Mark as Read
- Mark as New
- Bookmark
- Permalink
- Report Inappropriate Content
I'm in the same situation as in the example as shown in my topic.
- Mark as Read
- Mark as New
- Bookmark
- Permalink
- Report Inappropriate Content
Hi Bradley, we cant not find the SSO requirement for this. Is there really one for multi-forest and LDS?
Or if the forests in AD are trusted, then why would we need SSO?
Thanks!
- Mark as Read
- Mark as New
- Bookmark
- Permalink
- Report Inappropriate Content
I didn't have any luck with this doc either and I don't even have a multiforest environment. It's a single domain but I had to seek this out because we have a painstaking routing security requirement which precludes are WAN-connected offices from crossing VLANs, so none of my CiscoWhateverServers can handle authentication at subscriber sites. This became the biggest issue with Jabber clients since they couldn't even sign on. Weird thing is, the configuration in this document actually worked for CUCM, but not for Unity Connection. Deleted all directories, restarted DirSync, tried it all. I'm on 9.1.2. This doc is 5 years old now though, so I think it's safe to say it's no longer entirely relevant, no matter how many hours I spent into picking it apart line by line. Good luck.
- « Previous
-
- 1
- 2
- Next »
Find answers to your questions by entering keywords or phrases in the Search bar above. New here? Use these resources to familiarize yourself with the community: