- Cisco Community
- Technology and Support
- Collaboration
- Collaboration Knowledge Base
- How to dump CCM memory/IMDB diagnostic information to traces
- Subscribe to RSS Feed
- Mark as New
- Mark as Read
- Bookmark
- Subscribe
- Printer Friendly Page
- Report Inappropriate Content
- Subscribe to RSS Feed
- Mark as New
- Mark as Read
- Bookmark
- Subscribe
- Printer Friendly Page
- Report Inappropriate Content
04-17-2012 12:47 PM - edited 03-12-2019 09:44 AM
Background
In troubleshooting various problems related to the Cisco CallManager (ccm) process it might be necessary to dump information from memory. Some of this information might be dumped from ccm In Memory Database (IMDB) or directly from the ccm process.
Note: This document specifically pertains to CUCM 6.x and higher although previous versions use similar steps.
Enable Dialing Forest Dump Service Parameter
In order to dump any diagnostic information to the Cisco CallManager traces, the Dialing Forest Dump Service parameter must be enabled. This parameter is set to False by default to prevent malicious users from attempting to overwhelm the system and cause a Code Yellow or system hang.
Note: Enabling this parameter will allow a knowledgeable malicious user to force a system hang.
Use best judgement when enabling this parameter, and be sure to revert this parameter back to default when done.
1. Login to the Cisco Unified Communications Manager (CUCM) Administration Page
2. Navigate to System->Service Parameters
3. Choose any server in the cluster on which Cisco CallManager is Active from the "Server" dropdown
4. Select the the "Cisco CallManager (Active)" service from the Service dropdwn
5. Click "Advanced"
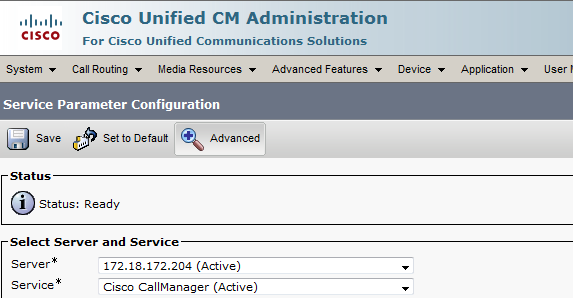
6. When the page refreshes find the "Dialing Forest Dump Enabled" Parameter under the Clusterwide Parameters (System - General) section, and set it to True.

Set the CCM Trace Level to Detailed
CCM dump data is written to the CCM trace files at the Detailed level. To set the traces to Detailed, complete the following steps:
1. Login to the CUCM Serviceability page
2. Select Trace->Configuration
3. Select any server on which the phone performing the dump is located.
4. Select "CM Services"
5. Select the "Cisco CallManager (Active)" service
6. Set the "Debug Trace Level" dropdown to Detailed. "Device Named Based Trace Monitoring" should be unchecked. The Trace configuration for the Cisco CallManager service should look similar to the following:
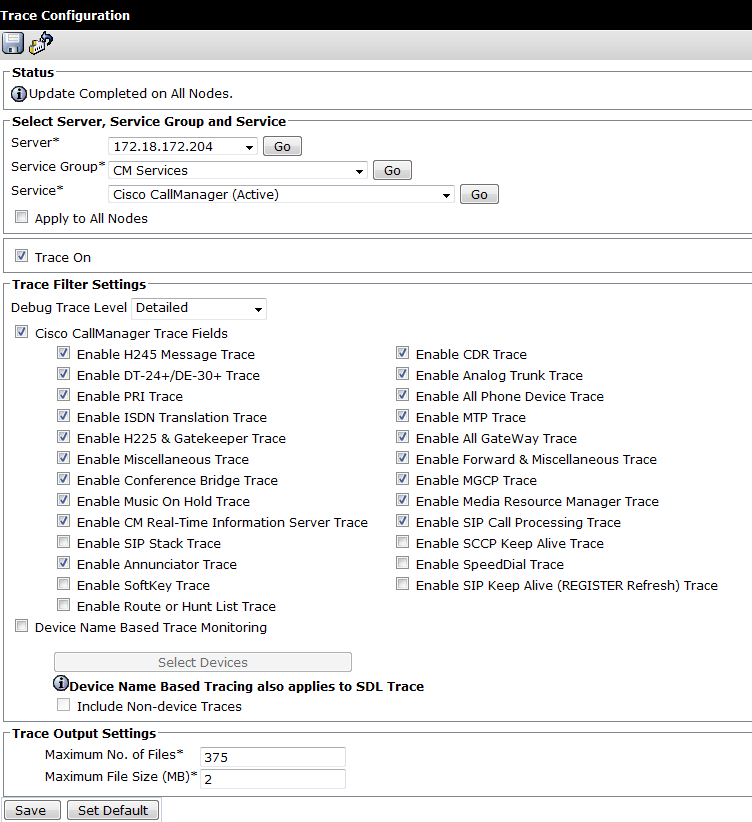
7. Click "Save"
Enable Verbose Mode
In order to perform the dump of any data, Verbose mode needs to be enabled within ccm. Depending on CUCM version, this process varies slightly. The change was introduced by the fix for CSCti91688.
CSCti91688 was resolved in the following versions:
Version TrainES BuildSU Build
| 6.x | 6.1.5.12028+ | 6.1(5)Su3 |
| 7.0 | 7.0.2.24049+ | None |
| 7.1(3) | 7.1.3.33037+ | None |
| 7.1(5) | 7.1.5.32022+ | 7.1(5)bSu3+ |
| 8.0(2) | 8.0.2.42019+ | None |
| 8.0(3) | 8.0.3.21008+ | 8.0(3a)Su2+ |
| 8.5(1) | All | All |
| 8.6(x)+ | All | All |
For CUCM versions without the fix for CSCti91688
1. Go offhook on an IP Phone
2. Dial **##*2
3. Wait for Reorder (fast busy) tone or "Call cannot be Completed as dialed" prompt.
For CUCM versions with the fix for CSCti91688
1. Go offhook on an IP Phone
2. Dial **##*02
3. Wait for Reorder (fast busy) tone or "Call cannot be Completed as dialed" prompt.
Perform the desired data dump
At this stage, the required data is ready to be dumped to the CCM trace file. Be careful not to do several dumps simultaneously or in rapid concurrent fashion, as this may cause system instability. The process is the same for all CUCM version:
1. Go offhook on an IP Phone
2. Dial <data dump code>
3. Wait for Reorder (fast busy) tone or "Call cannot be completed as dialed" prompt.
The data dump code varies between CUCM versions containing the fix for CSCti91688.
For CUCM versions without the fix for CSCti91688
This table lists the data dump codes for CUCM versions without the fix for CSCti91688.
Dump CodeInformation contained in the dump
| **##*1 | analysis trace on/off |
**##*2 | terse/verbose toggle |
| **##*3 | dump digit discarding instructions |
| **##*4 | dump patterns |
| **##*5 | dump partitions list |
| **##*6 | dump css list |
| **##*7 | dump feature css content list |
| **##*8 | dump device css context list |
| **##*9 | dump line appearance css context list |
For CUCM versions with the fix for CSCti91688
This table lists the data dump codes for CUCM versions without the fix for CSCti91688.
Dump CodeInformation contained in the dump
| **##*01 | analysis trace on/off |
**##*02 | terse/verbose toggle |
| **##*03 | dump digit discarding instructions |
| **##*04 | dump patterns |
| **##*05 | dump partitions list |
| **##*06 | dump css list |
| **##*07 | dump feature css content list |
| **##*08 | dump device css context list |
| **##*09 | dump line appearance css context list |
| **##*10 | dump line css context list |
| **##*11 | dump multiple partitions list |
| **##*12 | dump VM Profile list |
| **##*13 | dump VM Pilot number list |
| **##*14 | dump regions list and in memory db |
| **##*15 | dump learned patternsNote: This is valid in 8.0(1) and higher only |
| **##*16 | dump SDL Process & CUCM Table Info Note: This is valid in 8.5(1) and 8.6(1)+ only |
Gather the CCM Traces for analysis
1. Launch the Cisco Unified Real Time Monitoring Tool and connect to the CUCM server.
2. Navigate to System->Tools->Trace and Log Central
3. Double Click on "Collect Files"
4. Check the box for "Cisco CallManager" for all nodes in the cluster.
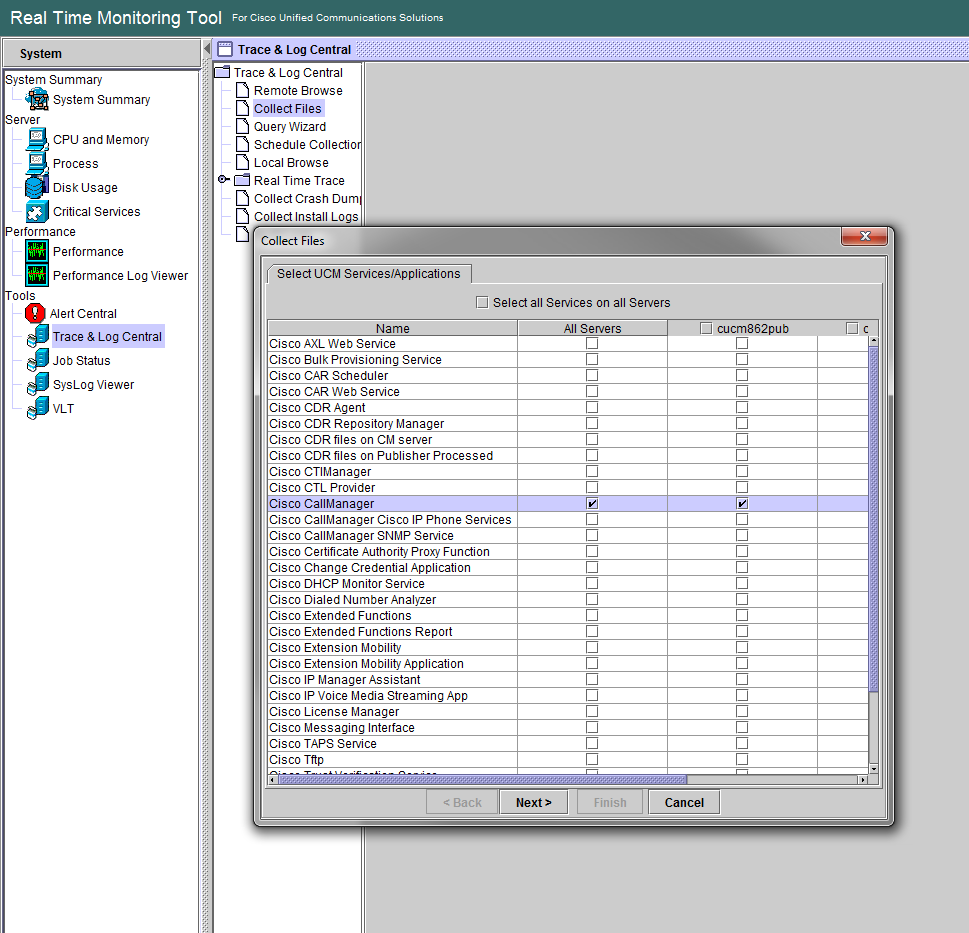
5. Click Next. Do not selected any traces on the second menu.
6. On the final screen select the time at which the dump was created as well as a download location on the local PC. Click "Finish."
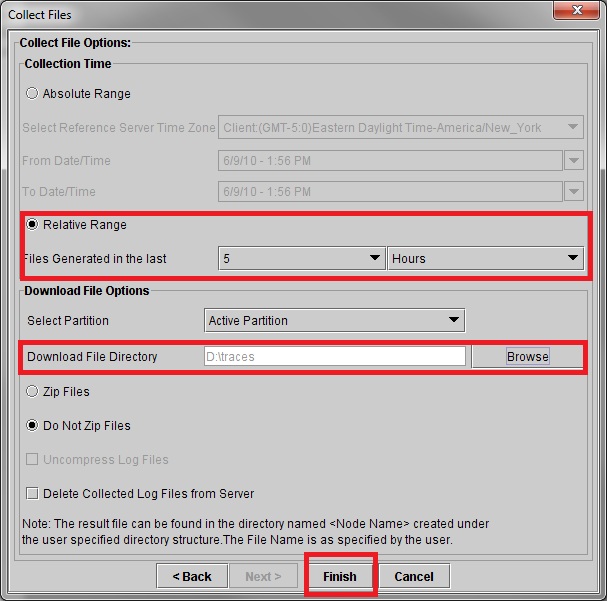
7. The traces should download to the local PC.
Disable the Dialing Forest Dump Enabled Service Parameter
It is important to disable the Dialing Forest Dump parameter to ensure the system is not adversely impacted by malicious user exploiting this setting.
1. Login to the Cisco Unified Communications Manager (CUCM) Administration Page
2. Navigate to System->Service Parameters
3. Choose any server in the cluster on which Cisco CallManager is Active from the "Server" dropdown
4. Select the the "Cisco CallManager (Active)" service from the Service dropdwn
5. Click "Advanced"
6. When the page refreshes find the "Dialing Forest Dump Enabled" Parameter under the Clusterwide Parameters (System - General) section, and set it to False.

Other Special Intercept Patterns
As of version 10.5.2.10000-5 there are a few additional special intercepts. You can see them in a dialing forest dump:
00710403.002 |13:32:04.919 |AppInfo  ||DialingForest=
{
 |DigitForest=Dialing
 {
  |Partition=
  |TreeType=TREE_TYPE_DIGIT
  |Patterns=
  {
   |(**##*01)  }
  |(**##*02) }
 |(**##*03)}
|(**##*04)}
|(**##*05)}
|(**##*06)}
|(**##*07)}
|(**##*08)}
|(**##*09)}
|(**##*10)}
|(**##*11)}
|(**##*12)}
|(**##*13)}
|(**##*14)}
|(**##*15)}
|(**##*16)}
|(**##*30) (Intercept)}
|(**##*31) (Intercept)}
|(**##*32) (Intercept)}
|(**##*35) (Intercept)}
|(**##**30) (Intercept)}
|(**##**31) (Intercept)}
|(**##**32) (Intercept)}
|(**##**33) (Intercept)}
|(**##**34) (Intercept)}
|(**##**35) (Intercept)}
Intercepts for dumping Call Forwarding:
DEBUG_PATTERN_ENABLE[] = "**##*30";
DEBUG_PATTERN_DUMP_INTERCEPT_TABLE[] = "**##*31";
DEBUG_PATTERN_DUMP_ACTIVE_CALL_TABLE[] = "**##*32";
DEBUG_PATTERN_CLEAR_FORWARD_LOOP_PREVENTION_TABLES[] = "**##*35";
Intercepts for Call Pickup:
enableDebug = "**##**30";
printPickupGroupNumberTable = "**##**31";
printPickupMemberDNTable = "**##**32";
printMonitoredAlertingCallTable = "**##**33";
printActivePickupTable = "**##**34";
printActivePickupMonitoringTable = "**##**35";
Find answers to your questions by entering keywords or phrases in the Search bar above. New here? Use these resources to familiarize yourself with the community: