There are several ways to upgrade the firmware available in a UCM cluster. This method describes the steps to easily upload a new code without the need of a FTP server, using only the Communications Manager web interface and built-in TFTP service.
Cons:
- The Callmanager component will not be automatically advertised of the firmware change. When a firmware patch is introduced for a specific model, say the 7945/65s, the patching process updates the Device Defaults (Device > Device Settings > Device Defaults) for that model to whatever firmware you installed. Through the process outlined in this document, you must manually tell the system at various option levels what firmware will each phone take.
- Must upload from 5 to 8 files manually for each device model. Again, if uploading firmware for the 7945, there are about 7 files to be manually uploaded, although its a speedy transaction.
Pros:
- No need of an SFTP/FTP machine.
- Doesn't mess with the global defaults so you can be sure the phones won't be affected until you manually tell a phone or group of phones to grab a different code.
- In my opinion, its a faster, easier process overall.
- Works for SCCP and SIP loads.
- Compatible with UCM 6 and above including version 9.
Procedure
- Each phone type has several download options. In the case of a 6941 for example, there is cmterm-69xx-sip.9-3-1-5.cop.sgn, and a cmterm-69xx-sip.9-3-1-5.zip. The first 1 is the "patch", that one requires going through a regular "Callmanager Software Upgrade" . Instead, we will download the latter one, which contains the individual files in ZIP compression format.
- Save the ZIP package to your computer, and extract the contents.
- Go to your UCM's OS Administration web interface (http://<CM IP>/cmplatform) > Software Upgrades > TFTP File Management. Make sure to do this on all servers running the TFTP service.
- Click on Upload and you will get a new window
- Click on the Browse button to navigate to the folder from step 2.
- Select one file inside the ZIP package.
- Back in the pop window that UCM generated, in the Directory field, just enter a forward slash /
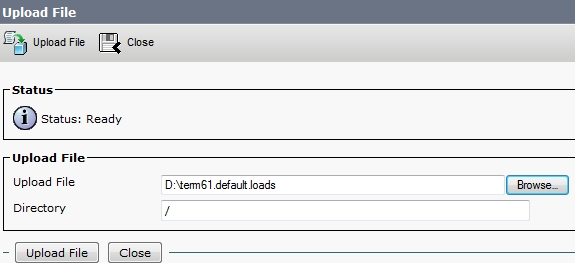
- Hit Upload File.
- Repeat steps 4 through 8 for each file contained in the ZIP package.
- Once complete, you may click on the Close button, and if in doubt, do a Find for each file in the TFTP File Management page. Remember this search engine is case sensitive.
- Go to Unified Serviceability > Tools > Control Center - Feature Services and reset the TFTP Service. Sometimes this will not even be necessary.
- Now it is time to specify at either the model level, or on a per-phone basis that a new code is available.
- Go to Device > Device Settings > Device Defaults, find the desired model and protocol, and replace the value with for example SCCP41.9-2-1S. That is always the text that indicates the version, it is part of the file SCCP41.9-2-1S.loads, but the .loads extension needs be removed.
- The other option is to go to 1 particular phone and modify the Phone Load field with for example SCCP41.9-2-1S, same as in option A.
- Go to Bulk Administration Tool > Phones > Update Phones > Query, Filter and Find the devices you wish to modify, and then modify the Phone Load Name. This will modify the phones in bulk.
- Once at this step, the only thing remaining is to reset the phones.