- Cisco Community
- Technology and Support
- Collaboration
- Collaboration Knowledge Base
- IP Phone, SCCP & SIP Phone Registration Process with CUCM
- Subscribe to RSS Feed
- Mark as New
- Mark as Read
- Bookmark
- Subscribe
- Printer Friendly Page
- Report Inappropriate Content
- Subscribe to RSS Feed
- Mark as New
- Mark as Read
- Bookmark
- Subscribe
- Printer Friendly Page
- Report Inappropriate Content
12-19-2011 09:42 PM - edited 03-12-2019 09:42 AM
Introduction
This document covers the IP Phone Registration Process with the Cisco Unified Communications Manager (CUCM). It covers both SCCP and SIP Phone Registration Process to help the beginners to understand the basics of IP Phone boot process better which will help in Configuration and Troubleshooting the Network related issues easily.
IP Phone Registration Process
SCCP Phone Registration Process
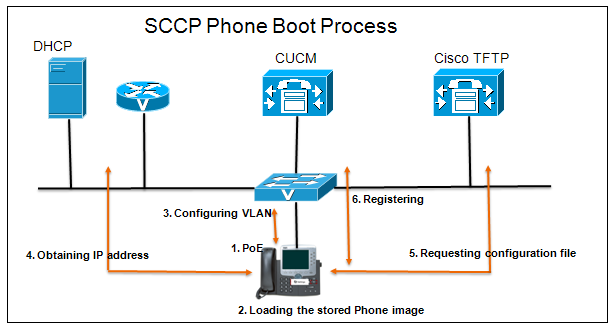
1. SCCP phone obtains the Power (PoE or AC adapter).
2. The phone loads its locally stored firmware image.
3. The phone learns the Voice VLAN ID via CDP from the switch.
4. The phone uses DHCP to learn its IP address, subnet mask, default gateway and TFTP server address.
5. The phone contacts the TFTP server and requests its configuration file. Each phone has a customized configuration file named SEP<mac_address>.cnf.xml created by CUCM and uploaded to TFTP when the administrator creates or modifies the phone.
6. The phone registers with the primary CUCM server listed in its configuration file. CUCM then sends the softkey template to the phone using SCCP messages.

What is in that SEP<mac_address>.cnf.xml file ?
This file contains a list of CUCM server, in order, that the phone should register with. It lists teh TCP ports it should use for SCCP communication. It also lists the firmware version for each device model and the service URLs that each device should be using.
The CUCM server sends other configurations such as DNs, softkeys and speed dials via the SCCP messages in the last phase of the registration process.
SIP Phone Registration Process
SIP Phones use a different set of steps to achieve the same goal. Steps 1 to 4 are the same as SCCP Phones, refer the steps as illustrated in the figure: SCCP Phone Boot Process .
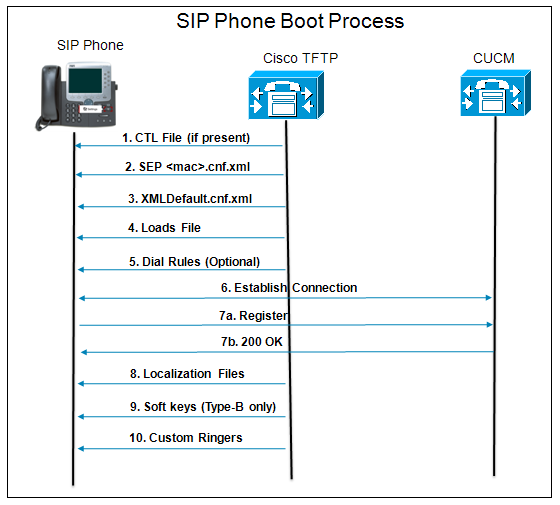
1. The phone contacts the TFTP server and requests the Certificate Trust List file (only if the cluster is secured).
2. The phone contacts the TFTP server and requests its SEP<mac-address>.cnf.xml configuration file.
3. If the SIP Phone has not been provisioned before boot time, the SIP Phone downloads the default configuration XMLDefault.cnf.xml file from the TFTP server.
4. The SIP phone requests a firmware upgrade (Load ID file), if one was specified in the configuration file. This process allows the phone to upgrade the firmware image automatically when required for a new version of CUCM.
5. The phone downloads the SIP dial rules configured for that phone.
6. The phone Establish connection with the primary CUCM and the TFTP server end to end.
7. The phone Registers with the primary CUCM server listed in its configuration file.
8. The phone downloads the appropriate localization files from TFTP.
9. The phone downloads the softkey configurations from TFTP.
10. The phone downloads custom ringtones (if any) from TFTP.

About TFTP server:
TFTP is a critical service for IP Phones. The Phone use TFTP to download their config files, firmware and other data. Without TFTP, the phones simply do not function properly. When you make a configuration change to a device, CUCM creates or modifies a config file for the device and uploads it to the TFTP server. TFTP service much therefore provided by one or more CUCM servers in the cluster.
Note: A generic TFTP server will not have the integrated capability that a CUCM TFTP server does and will not correctly fulfill the role.
Recommendation
Take note of the place where the files are logged. Cisco CallManager 3.x and 4.x, by default, stores trace files in the C:\Program Files\Cisco\Trace\CCM\ directory, but these files can be specified to be stored elsewhere in the trace configuration. Other services log their traces in their respective directories. As mentioned earlier, in Versions 5.x/6.x/7.x, they are stored in the location that the RTMT specifies.
Browse in the Windows Explorer to the trace directory in order to collect the correct trace files. Then choose View > Details from the menu bar in order to view dates and times. Make the window large enough to see these values.
Note: If you reproduce a problem, make sure to select the file for the timeframe when you reproduced it. Look at the modification date and the timestamps in the file. The best way to collect the right traces is to reproduce a problem, quickly locate the most recent file, and copy it from Cisco CallManager.
Files are overwritten after some period of time. In order to find the current file that is logged, click View > Refresh on the menu bar and look at the dates and times on the files. You can view and configure the location, size, and lifespan of the trace files, as shown in the preceding diagram.
Traces can be CPU intensive for the Cisco CallManager server. It is a good practice to turn off traces after you have collected them. Follow the same procedure used to enable the traces, but uncheck the "Trace On" settings and save.
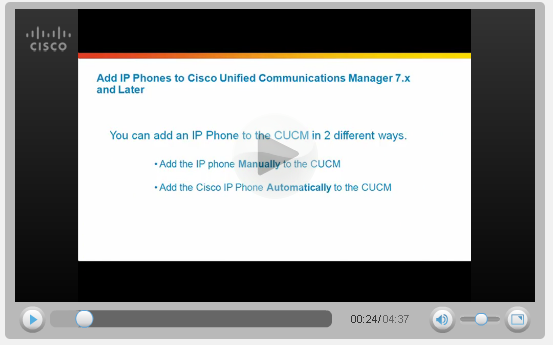
Video: Add IP Phones to Cisco Unified Communications Manager 7.x and later
This video explains the step by step procedure to quickly add a Cisco IP phone to Cisco Unified Communications Manager 7.x and later.
Related Information
- Mark as Read
- Mark as New
- Bookmark
- Permalink
- Report Inappropriate Content
This video is really good to understand the basics of "Boot up" process of the IP phones, but it seems like FLP (fast link pulse), option 66 (TFTP server Name), option 150 (TFTP server IP), etc... are missing.
- Mark as Read
- Mark as New
- Bookmark
- Permalink
- Report Inappropriate Content
could you explain these options in detail..
- Mark as Read
- Mark as New
- Bookmark
- Permalink
- Report Inappropriate Content
DHCP Options:
>
http://www.cisco.com/c/en/us/td/docs/net_mgmt/network_registrar/6-1-1/user/guide/users/UserApB.html
>
https://tools.ietf.org/html/rfc2132
FLP
>
http://en.wikipedia.org/wiki/Autonegotiation
>
http://www.networkpcworld.com/how-autonegotiation-an-works-with-fast-link-pulse-flp/
- Mark as Read
- Mark as New
- Bookmark
- Permalink
- Report Inappropriate Content
Hello,
excelent Post, may i ask you a question?,
i have a pc over wifi, on different network from my cme, i want to register the cipc, which mac address will arrive to the cme?
- Mark as Read
- Mark as New
- Bookmark
- Permalink
- Report Inappropriate Content
It should use the default physical address (MAC) of the NIC.
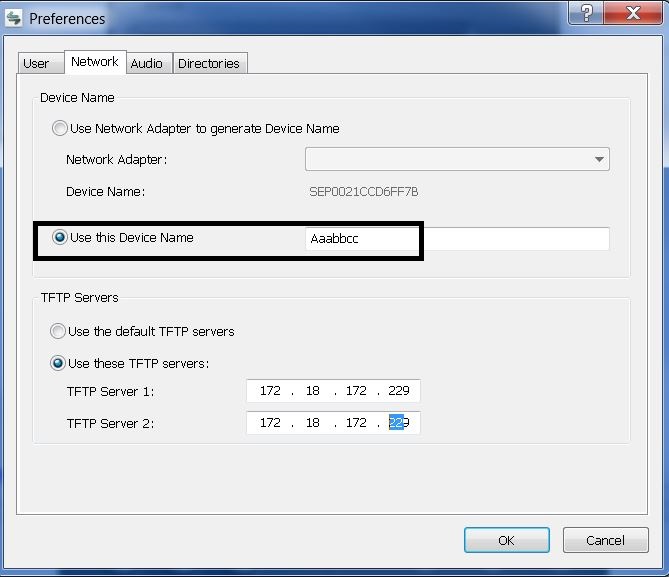
To check the available physical addresses list you may hit 'getmac' command on the CLI (CMD) & you may also configure the device name manually (good naming convention) when it comes to CIPC

- Mark as Read
- Mark as New
- Bookmark
- Permalink
- Report Inappropriate Content
It is done!,
Thanks for your Help!
- Mark as Read
- Mark as New
- Bookmark
- Permalink
- Report Inappropriate Content
i have an issue that some phones cannot register with supscriber and got an error says
" registeration rejected security error " and register only with the publisher although other phones can register with sub and pub with no problem
DBreplication is fine
what can cause this problem ?
- Mark as Read
- Mark as New
- Bookmark
- Permalink
- Report Inappropriate Content
ra 011,
The security error references an issue with the CTL or ITL the phone retrieves. When a phone registers, it will first request the CTL. If that does not exist, it will request the ITL. If neither of those exist the phone will reach out to TVS for verification. For the sake ease, we'll discuss as though the phone is having ITL issues (as CTL is for secure registration)
If the phone's ITL does not match the ITL on the TFTP, it will then need to reach out to TVS for verification of trust. If the phone's current ITL has different TVS information than what's contained on the cluster, then the phone can never get verification of an ITL and will receive a security error.
Most often, the simplest workaround to this issue is to manually remove the ITL from the device. However, if you want to get further into troubleshooting, you can compare hash values of what the phone has to what the phone is being sent via TFTP.
- Mark as Read
- Mark as New
- Bookmark
- Permalink
- Report Inappropriate Content
Phone function unavailable due to problem with CUCM configuration file please contact ....
@Muthurani Lavanya Paneerselvam wrote:
Introduction
This document covers the IP Phone Registration Process with the Cisco Unified Communications Manager (CUCM). It covers both SCCP and SIP Phone Registration Process to help the beginners to understand the basics of IP Phone boot process better which will help in Configuration and Troubleshooting the Network related issues easily.
IP Phone Registration Process
SCCP Phone Registration Process
1. SCCP phone obtains the Power (PoE or AC adapter).
2. The phone loads its locally stored firmware image.
3. The phone learns the Voice VLAN ID via CDP from the switch.
4. The phone uses DHCP to learn its IP address, subnet mask, default gateway and TFTP server address.
5. The phone contacts the TFTP server and requests its configuration file. Each phone has a customized configuration file named SEP<mac_address>.cnf.xml created by CUCM and uploaded to TFTP when the administrator creates or modifies the phone.
6. The phone registers with the primary CUCM server listed in its configuration file. CUCM then sends the softkey template to the phone using SCCP messages.
What is in that SEP<mac_address>.cnf.xml file ?
This file contains a list of CUCM server, in order, that the phone should register with. It lists teh TCP ports it should use for SCCP communication. It also lists the firmware version for each device model and the service URLs that each device should be using.
The CUCM server sends other configurations such as DNs, softkeys and speed dials via the SCCP messages in the last phase of the registration process.
SIP Phone Registration Process
SIP Phones use a different set of steps to achieve the same goal. Steps 1 to 4 are the same as SCCP Phones, refer the steps as illustrated in the figure: SCCP Phone Boot Process .
1. The phone contacts the TFTP server and requests the Certificate Trust List file (only if the cluster is secured).
2. The phone contacts the TFTP server and requests its SEP<mac-address>.cnf.xml configuration file.
3. If the SIP Phone has not been provisioned before boot time, the SIP Phone downloads the default configuration XMLDefault.cnf.xml file from the TFTP server.
4. The SIP phone requests a firmware upgrade (Load ID file), if one was specified in the configuration file. This process allows the phone to upgrade the firmware image automatically when required for a new version of CUCM.
5. The phone downloads the SIP dial rules configured for that phone.
6. The phone Establish connection with the primary CUCM and the TFTP server end to end.
7. The phone Registers with the primary CUCM server listed in its configuration file.
8. The phone downloads the appropriate localization files from TFTP.
9. The phone downloads the softkey configurations from TFTP.
10. The phone downloads custom ringtones (if any) from TFTP.
About TFTP server:
TFTP is a critical service for IP Phones. The Phone use TFTP to download their config files, firmware and other data. Without TFTP, the phones simply do not function properly. When you make a configuration change to a device, CUCM creates or modifies a config file for the device and uploads it to the TFTP server. TFTP service much therefore provided by one or more CUCM servers in the cluster.
Note: A generic TFTP server will not have the integrated capability that a CUCM TFTP server does and will not correctly fulfill the role.
Recommendation
Take note of the place where the files are logged. Cisco CallManager 3.x and 4.x, by default, stores trace files in the C:\Program Files\Cisco\Trace\CCM\ directory, but these files can be specified to be stored elsewhere in the trace configuration. Other services log their traces in their respective directories. As mentioned earlier, in Versions 5.x/6.x/7.x, they are stored in the location that the RTMT specifies.
Browse in the Windows Explorer to the trace directory in order to collect the correct trace files. Then choose View > Details from the menu bar in order to view dates and times. Make the window large enough to see these values.
Note: If you reproduce a problem, make sure to select the file for the timeframe when you reproduced it. Look at the modification date and the timestamps in the file. The best way to collect the right traces is to reproduce a problem, quickly locate the most recent file, and copy it from Cisco CallManager.
Files are overwritten after some period of time. In order to find the current file that is logged, click View > Refresh on the menu bar and look at the dates and times on the files. You can view and configure the location, size, and lifespan of the trace files, as shown in the preceding diagram.
Traces can be CPU intensive for the Cisco CallManager server. It is a good practice to turn off traces after you have collected them. Follow the same procedure used to enable the traces, but uncheck the "Trace On" settings and save.
Video: Add IP Phones to Cisco Unified Communications Manager 7.x and later
This video explains the step by step procedure to quickly add a Cisco IP phone to Cisco Unified Communications Manager 7.x and later.
Related Information
- Phone function unavailable due to problem with CUCM configuration file please contact ....
- Mark as Read
- Mark as New
- Bookmark
- Permalink
- Report Inappropriate Content
- Mark as Read
- Mark as New
- Bookmark
- Permalink
- Report Inappropriate Content
use the tool in the website given below to pull the registration report:
Find answers to your questions by entering keywords or phrases in the Search bar above. New here? Use these resources to familiarize yourself with the community:

