- Cisco Community
- Technology and Support
- Collaboration
- Collaboration Knowledge Base
- Provisioning UCCX 7.0
- Subscribe to RSS Feed
- Mark as New
- Mark as Read
- Bookmark
- Subscribe
- Printer Friendly Page
- Report Inappropriate Content
- Subscribe to RSS Feed
- Mark as New
- Mark as Read
- Bookmark
- Subscribe
- Printer Friendly Page
- Report Inappropriate Content
02-26-2012 09:18 PM - edited 08-29-2017 11:49 AM
- Introduction
- Components Used
- Provisioning Cisco Unified Contact Center Express (UCCX)
- Related Information
Introduction
This document covers the Provisioning of Cisco Unified Contact Center Express (UCCX) including the assigning of Unified CCX Extensions to Agents in Cisco Unified Communications Manager (CUCM), Creating Skills in UCCX, Resource groups, Contact service queues, Creating and assigning teams in UCCX. This document will help the users post installation of UCCX in your network and it will assist getting your UCCX configuration done easily.
Components Used
- Cisco Unified Contact Center Express 7.0(1)
- Cisco Unified Communications Manager 6.0
Note: Configurations in this document are tested on specific lab environment using UCCX 7.0(1) and CUCM version 6.0.
Provisioning Cisco Unified Contact Center Express (UCCX)
1. Assign Unified CCX Extensions to Agents in CUCM
To use any version of Cisco Unified CCX, you must first assign extensions for the users who will be agents in your Cisco Unified CCX subsystem. Those extensions must be associated with the JTAPI Call Manager user in Cisco Unified Communications Manager.
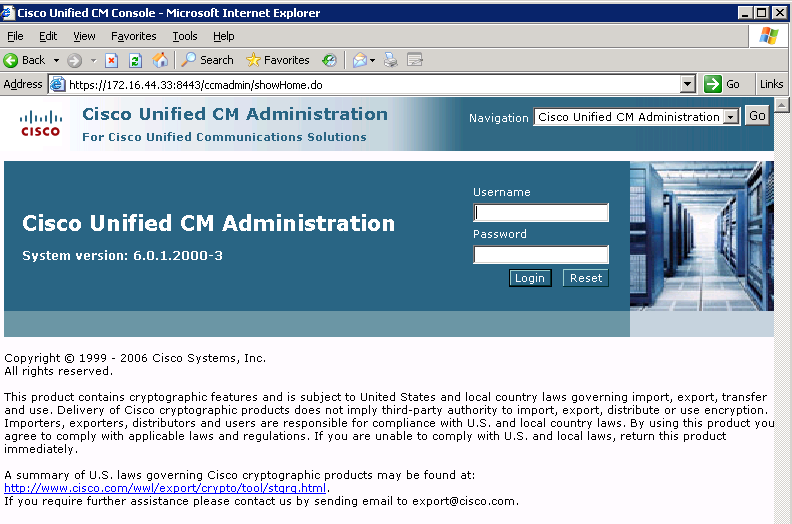
Step 1: To access the Call Manager (Cisco Unified Communications Manager) administration pages, from your web browser, enter the following URL: https://<servername>/ccmadmin.
Step 2: Enter logon name and password. Typically, logon name is <ccmadministrator> and password < enter password >
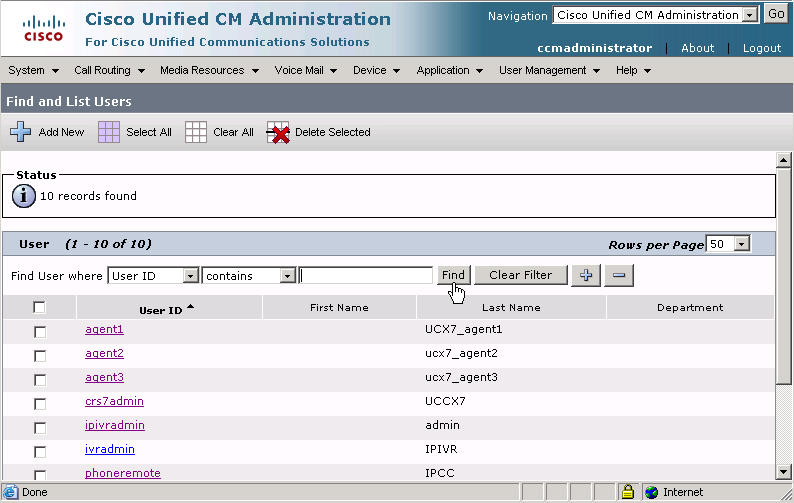
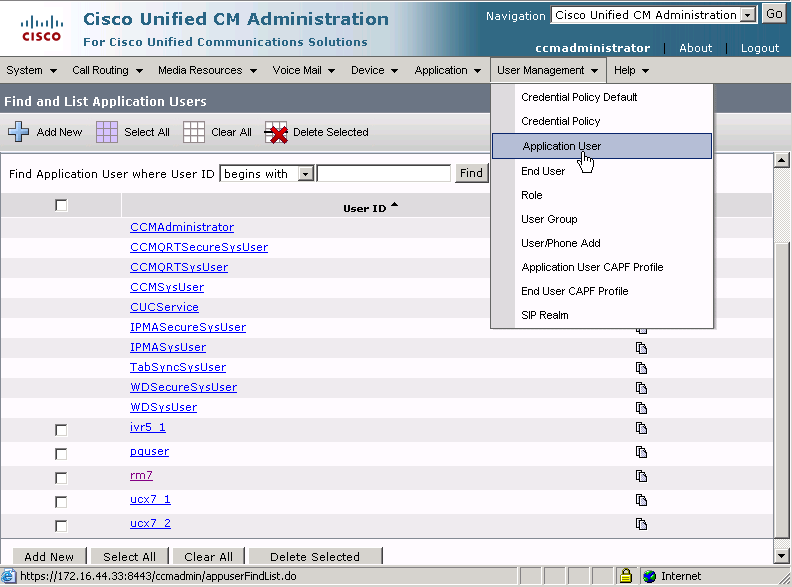
Step 3: From the Cisco CallManager Administration menu bar, choose User Management> End User. The User information for Basic Search Web appears.If you know a search parameter(i.e. UserID) you can find the specific user.

Step 4: Alternatively, if you simply hit ‘find’ (with no search criteria inputted) then all configured end users will be returned.
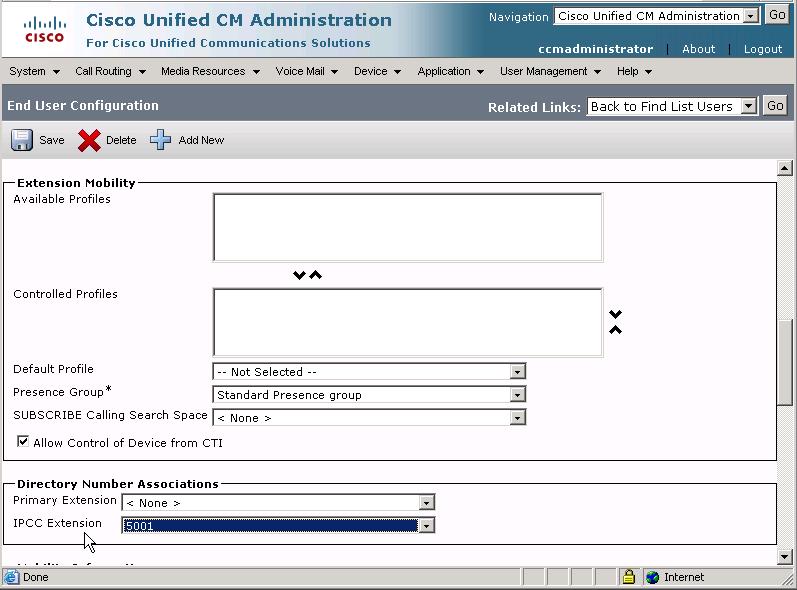
Step 5: Select the appropriate user and the End User Configuration page appears. Ensure that Allow Control of Device from CTI is checked, Primary Extension is set to <None> and IPCC extension includes the value of the agent’s extension.
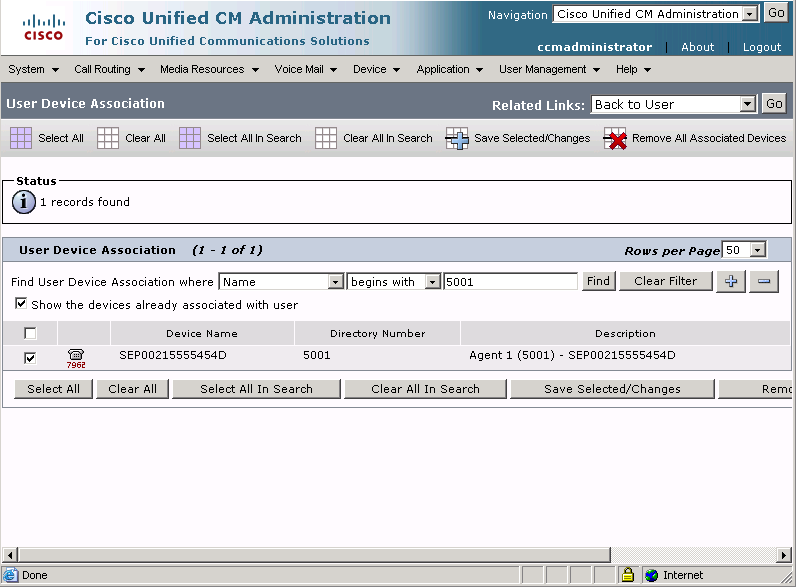
Step 6: On the End User Configuration page, locate and click on the Device Association hyperlink. The User Device Association web page appears. Note the telephone device directory number associated with your user ID also appears in the Description field with your device MAC address.
Step 7: Now, select User Management>Application User to ensure that the JTAPI CallManager User (called rm7 in the example below) controls the device associated with agent1.
Step 8: Simply move down the available appropriate device (associated to agent 1 ) to make it a controlled device by user rm7.
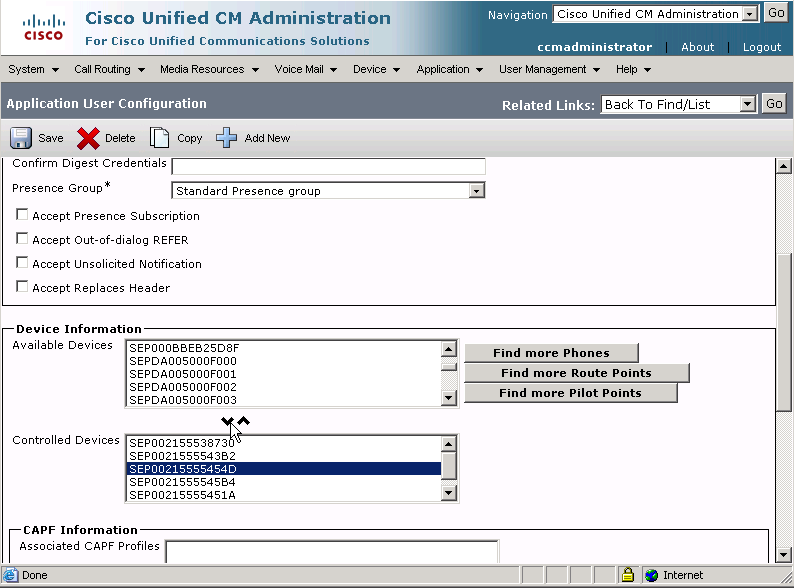
Step 9: Click on ‘Save’ button once complete. The Unified CCX extension on your phone has now been associated with the JTAPI user ‘rm7’. The JTAPI user can now manage the contact center functions for your IPCC extension.

Activity Verification You have completed this task when you see these results: Go back into Application User and verify the MAC address of the agent phone is a controlled device by the JTAPI user.
2. Create Skills in Unified Contact Center Express(UCCX)
Complete these steps to add new skills to UCCX.
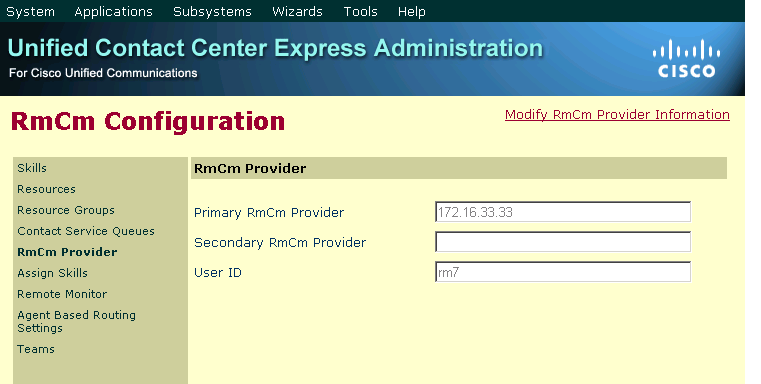
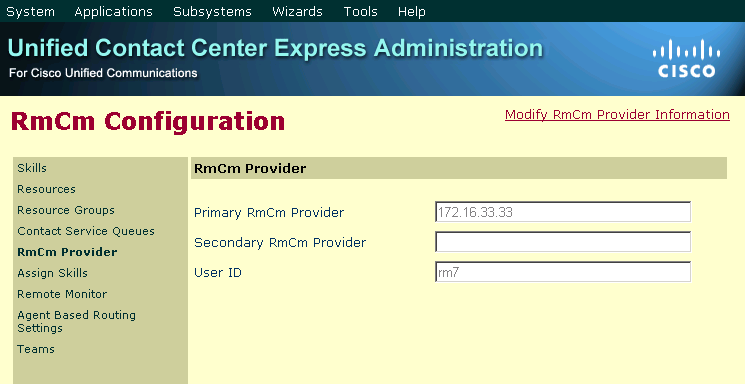
Step 10: From the Unified Contact Center Administration page, select Subsystems>RmCM. The RmCM Configuration page appears, displaying the RmCM (JTAPI) provider information.
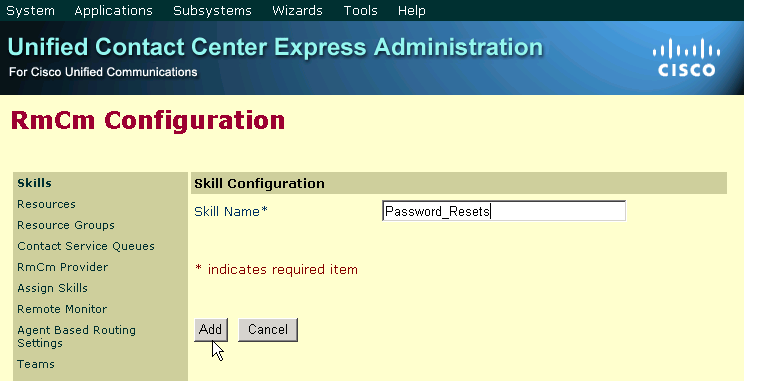
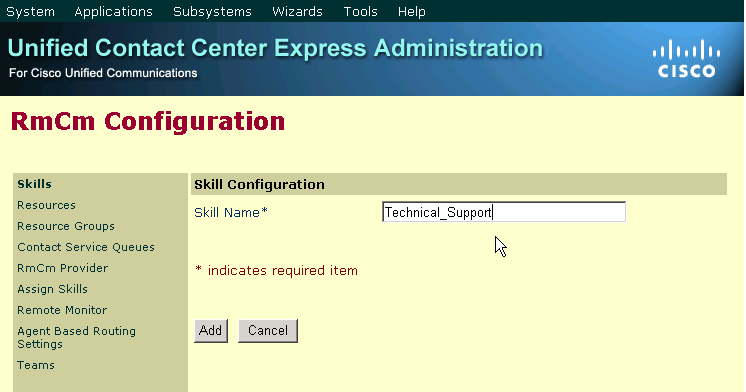
Step 11: Select the Skills link. A list of existing skills appears. Select Add a new skill hyperlink.

Step 12: Create a new skill name called “Password_Resets”. Then click on ‘Add’ button.
Step 13: Create another new skill name called “Technical_Support”. Then click on ‘Add’ button.
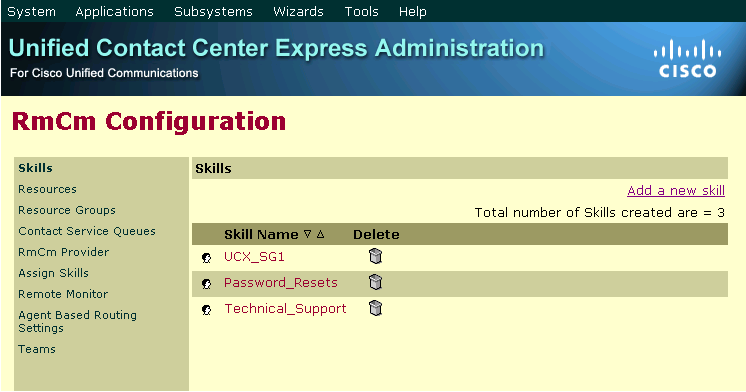
Activity Verification: You have completed this task when you see these results:
You should be able to view the 2 new skills you created.
3. Create Resource (Agent) Groups in UCCX
Resource Groups are collections of agents that your CSQ uses to handle incoming Cisco Unified CCX calls. To use resource group-based CSQs, you must specify a resource group.
Step 14: From the Unified Contact Center Administration page, select Subsystems>RmCM. The RmCM Configuration page appears, displaying the RmCM (JTAPI) provider information.

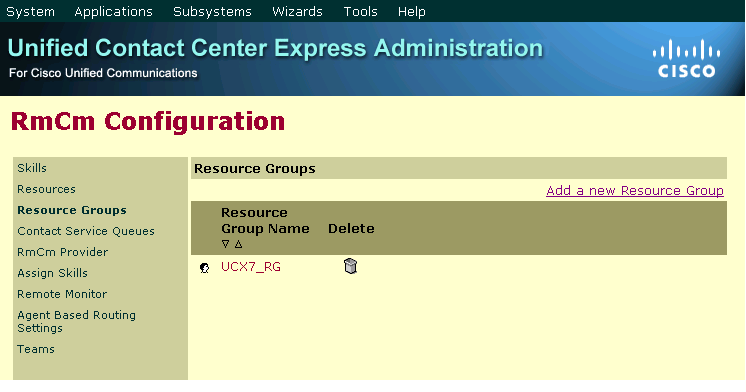
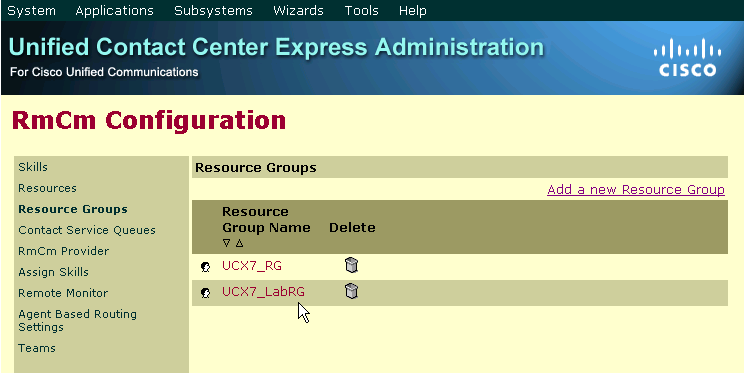
Step 15: Click on the Resource Groups hyperlink. The Resource Groups summary web page opens.
Step 16: Click on the Add a New Resource Group
Step 17: In the Resource Group Configuration page, enter <UCX7_LabRG> and click the ‘Add’ button.
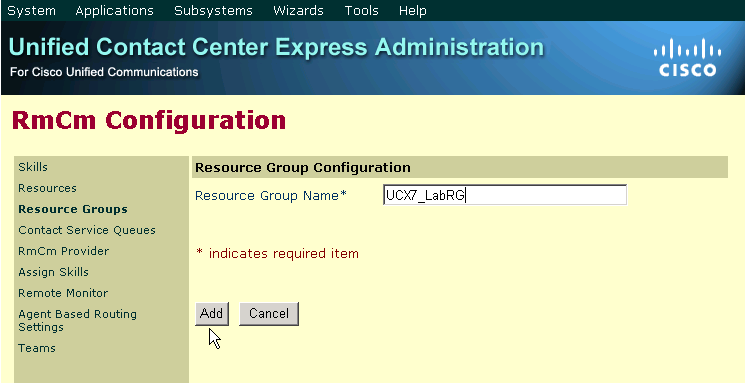
Step 18: In the Resource Group Configuration page, enter <UCX7_LabRG> and click the ‘Add’ button.
Activity Verification You have completed this task when you see these results:
You should be able to view the new Resource Group you entered.
4. Assign Resource Groups and Skills to Agents in UCCX
Agents that handle calls are also called resources. After you create a resource group, you can assign agents (resources) to that group. An agent can only be assigned to one resource group.
If you have either Unified CCX Enhanced or Premium packages, you can add skills to agents once the skills have been created (You need to be a supervisor and access is granted through the Unified Contact Center Express Administration page). You can also select the competency level of the agent(s) in assigned skills. Competency levels indicates the agent’s level of expertise in that skill (1 indicated beginner and 10 indicating expert).
You can assign resource groups and skills to agents either individually or in bulk. The bulk option enables you to assign skills and resources groups for many agents at the same time. You can assign up to 50 skills to agents.
Step 19: From the Unified Contact Center Express Administration page, choose Subsystems>RmCm. The Unified CCX Configuration Web page opens, displaying the RmCM (JTAPI) provider area.

Step 20: On the Unified CCX configuration navigation bar, click the Resources hyperlink. The Resource summary web page opens. These agents appear because you assigned the agent device extensions and associated with rm7 user.

Step 21: Click the name of the agent (agent 1) in the Resource Name column. The Unified CCX Configuration – Resource Configuration area web page opens.
Assign the Resource Group = UCX7_LabRG
Automatically Available = Enabled (Automatically puts the agent in the Available state after the agent finishes a Unified CCX call and disconnects).
Assigned Skills= Password Resets (5)
Team=Default (for now)
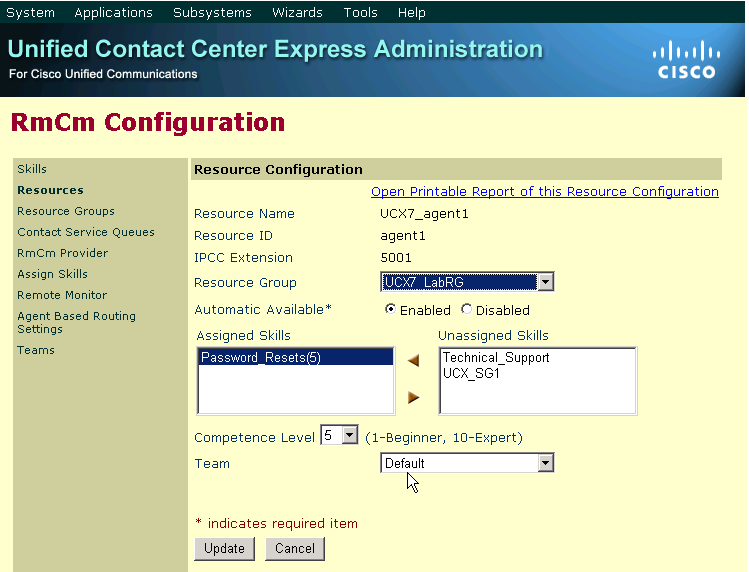
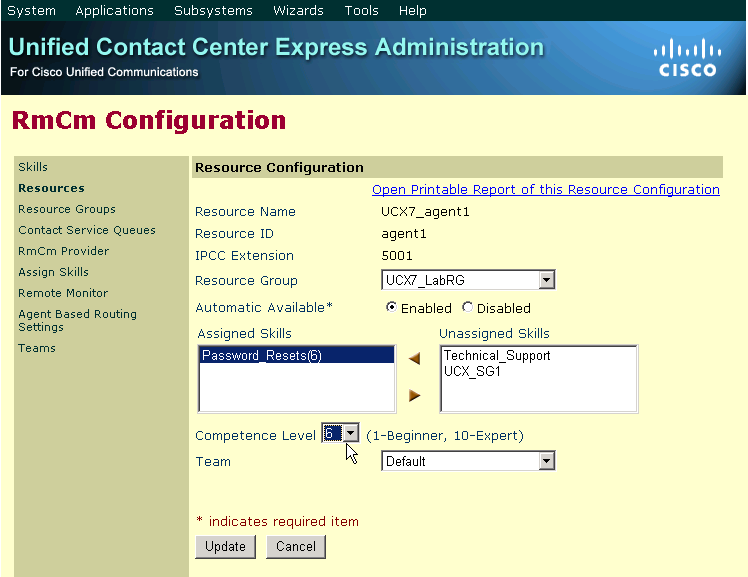
Step 22: To increase the default competency level from (5), highlight the Password_Resets(5) in the Assigned Skills window and use the drop down to elevate the skill level from 5 to 6. The highlighted skill in the Assigned Skills window will change from 5 to 6. Click on Update to save your changes.
Step 23: Now click the name of the agent (agent 2) in the Resource Name column. The Unified CCX Configuration – Resource Configuration area web page opens.
Assign the Resource Group = UCX7_LabRG
Automatically Available = Enabled (Automatically puts the agent in the Available state after the agent finishes a Unified CCX call and disconnects).
Assigned Skills= None
Team=Default (for now)
Activity Verification: You have completed this task when you see these results:
When opening the Resource page, you should now see agent1 as a member of Resource Group ‘UCX7_LabRG’ and assigned the skill ‘Password_Resets(6)’ with the Team assignment set to ‘Default’
When opening the Resource page, you should now see agent2 as a member of Resource Group ‘UCX7_LabRG’ and with the Team assignment set to ‘Default’
5. Create Contact Service Queues in UCCX
The Contact Services Queue (CSQ) controls incoming Cisco Unified CCX calls by determining where an incoming call should be placed in the queue and to which agent to send the call. During a call (run-time) the specific CSQ is determined within the CRS script as a result of information collected from the caller or other methods.
Two types of CSQs can be configured:
1. Resource Groups CSQs: Agents are selected from a specific resource (agent) group.
2. Skills Groups CSQs: Agents are selected from a pool of agents based on a combination of assigned skills and competency levels.
Caution: A CSQ cannot be configured to be both types. It can be either Resources or Skills but not both.
CSQs are associated to either a resource group or a set of skills. Agents in the selected resource group, or having been assigned the selected skills, are therefore in a resource pool and are qualified to be selected by the CSQ. Agents can be selected by many different CSQs.
Create Resource Skills CSQ
Step 24: From the Unified Contact Center Express Administration page, choose Subsystems>RmCm. The Unified CCX Configuration Web page opens, displaying the RmCM (JTAPI) provider area.

Step 25: Click on the Contact Services Queue hyperlink. The Contact Service Queues summary web page opens.
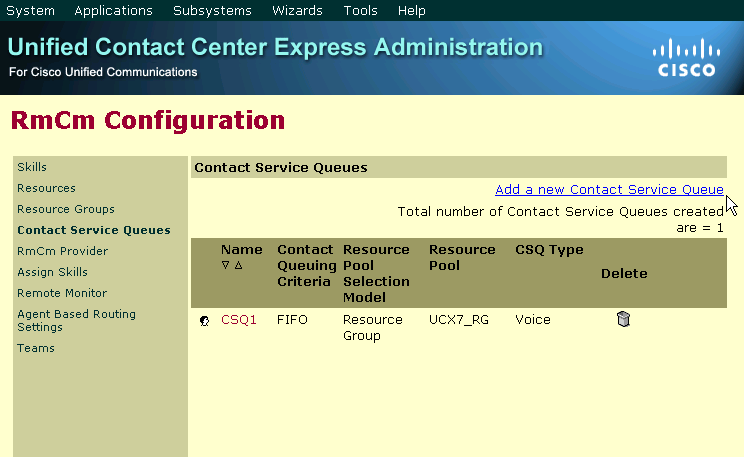
Step 26: Click the Add a new Contact Service Queue hyperlink. The first Contact Service Queue Configuration page opens.
Step 27: From the Contact Service Queue Configuration page, configure the following information:
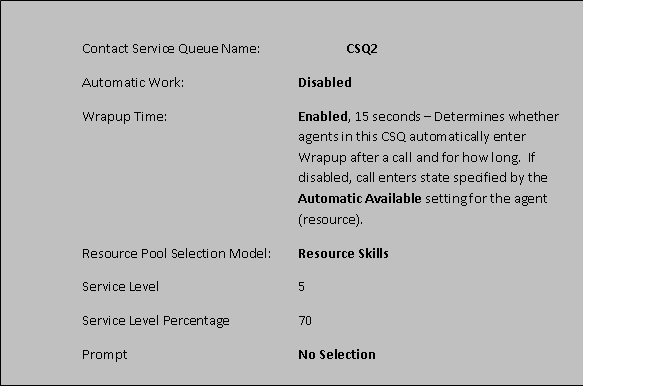
Note: The Contact Service Name in the variable pane (see below) of CRS editor MUST match the Contact Service Queue name (CSQ2).
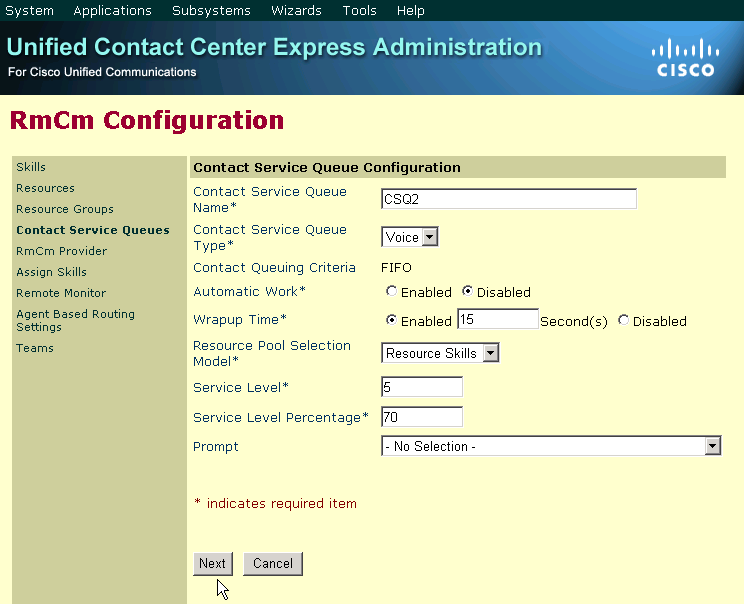
Step 28: Click on the ‘Next’ button. The second Contact Service Queue Configuration page opens for a Resource type of (CSQ2).
Step 29: Configure the following details:
Field Name | Description |
Resource Selection Criteria | Most Skilled |
Assigned Skills | Password_Resets |
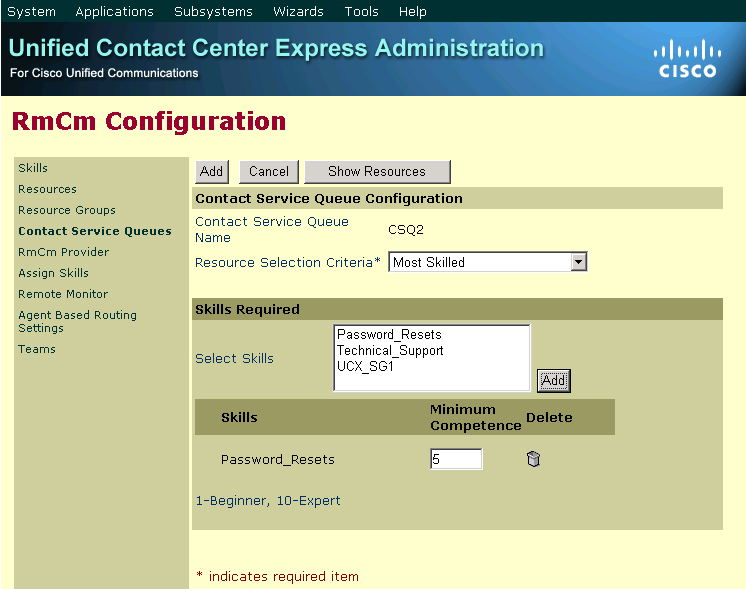
Step 30: Click Show Resources. You should see ‘agent1’
Step 31: Click cancel, then click on ‘Add’. The CSQ2 should now appear.
Activity Verification You have completed this task when you see these results:
Your CSQ (CSQ2) should now appear in the CSQ list.
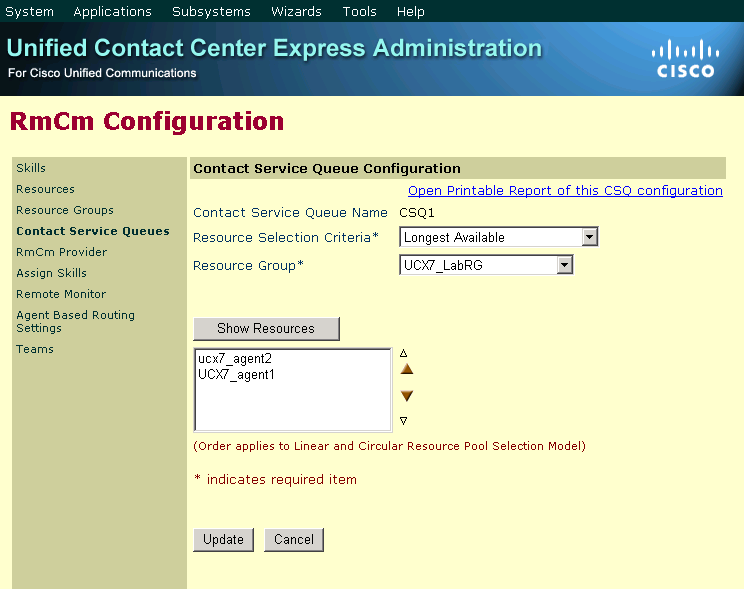
5. Create Resource Group CSQ in UCCX
Step 32: From the Unified Contact Center Express Administration page, choose Subsystems>RmCm. The Unified CCX Configuration Web page opens, displaying the RmCM (JTAPI) provider area.

Step 33: Click on the Contact Services Queue hyperlink. The Contact Service Queues summary web page opens.
Step 34: Click the Add a new Contact Service Queue hyperlink. The first Contact Service Queue Configuration page opens.
Step 35: From the Contact Service Queue Configuration page, configure the following information:
Note:The Contact Service Name in the variable pane of CRS editor MUST match the Contact Service Queue name above (CSQ1).
Step 36: Click on the ‘Next’ button. The second Contact Service Queue Configuration page opens for a Resource type of CSQ1.
Step 37: If it is not already selected, select the Longest Available option from the Resource Selection Criteria drop-down menu. Use the following table to verify the configuration.
Field Name | Description |
Resource Selection Criteria | Longest Available |
Resource Groups | UCX7_LabRG |
Step 38: Click Show Resources to observe the agents qualified to be in this selection pool. You will note BOTH agents are part of CSQ1.
Note: If you DO NOT want to include agent2 as part of CSQ1, then go into resources and assign agent2 to a different Resource Group.
If you DO NOT wish to include agent1 as part of CSQ1, then go into resources and assign agent1 to a different Resource Group.
Step 39: Click Cancel to close the window.
Step 40: Click Add. The Contact Service Queue list appears.
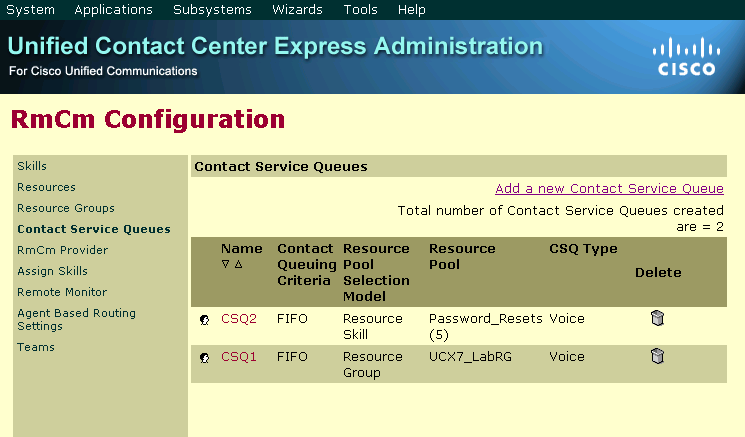
Activity Verification: You have completed this task when you see these results: Your CSQ (CSQ1) should now appear in the CSQ list with CSQ2.
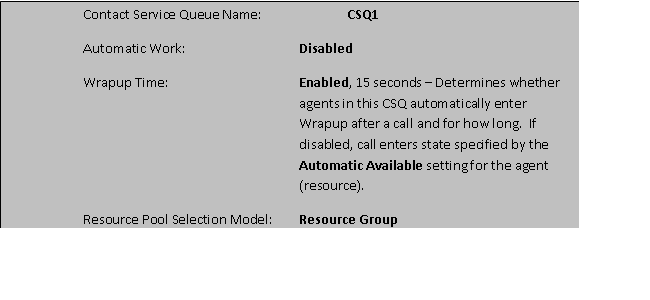
6. Configure Agent-based Routing – Observe Only
Agent based routing provides the ability to send calls to a specific agent, rather than any agent available in a CSQ. Use the Agent Based Routing Settings web page to configure system-wide parameters to be used in an agent-based routing application.
Step 1: From the Unified Contact Center Express Administration page, choose Subsystems>RmCm. The Unified CCX Configuration Web page opens, displaying the RmCM (JTAPI) provider area.

Step 2: On the Unified CCX Configuration navigation bar, click Agent Based Routing Settings hyperlink. The Agent Based Routing window opens.
Step 3: Review the settings for Automatic Work, a system-wide parameter that determines whether the agents involved in agent-based routing automatically move to the Work State after a call.
- Enabled: Causes the agent to go into Work State automatically when a call ends.
- Disabled (default): Causes agent to enter Ready or Not Ready state when a calls ends, depending on the Automatic Available setting for the agent.
Step 4: Observe the settings for Wrapup Time, as system-wide parameter that determines how long the agent can stay in the Work State if Automatic Work is enabled for the CSQ.
- Enabled button with seconds field: Controls how long the agent can stay in the Work state if Automatic work is enabled for the CSQ.
- Disabled: This setting sets no limit of how long the agent can stay in the Work state if Automatic Work for the CSQ is enabled. The agent must manually make themselves “ready”.
Step 5: Click Cancel to leave the settings unchanged.
7.Create Teams and Make Assignments
A team is a group of agents who report to the same supervisor. When an agent is assigned to a team, it means that the team’s supervisor can barge-in and/or intercept any call being handled by the agent.
Step 6: From the Unified Contact Center Express Administration page, choose Subsystems>RmCm. The Unified CCX Configuration Web page opens, displaying the RmCM (JTAPI) provider area
Step 7: On the Unified CCX Configuration navigation bar, click the Teams hyperlink. The Teams summary web page opens.
Step 8: Click on Add a new Team.

Step 9: Create a team called Help_Desk and configure to match the details below:
Primary Supervisor: ucx7_super1
Assigned Resources: UCX7_agent1
ucx7_agent2
Assigned CSQs: CSQ1 CSQ2
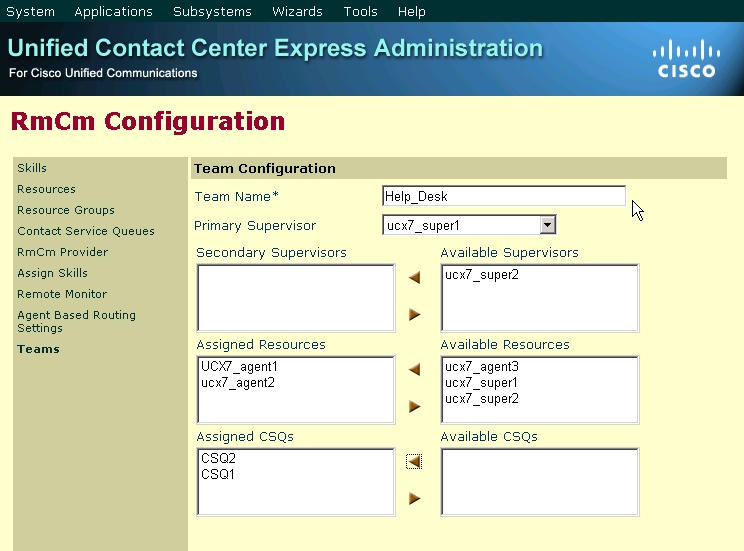
Step 10: Now click on ‘Add’ button. Your Help_Desk team should appear in the list below.
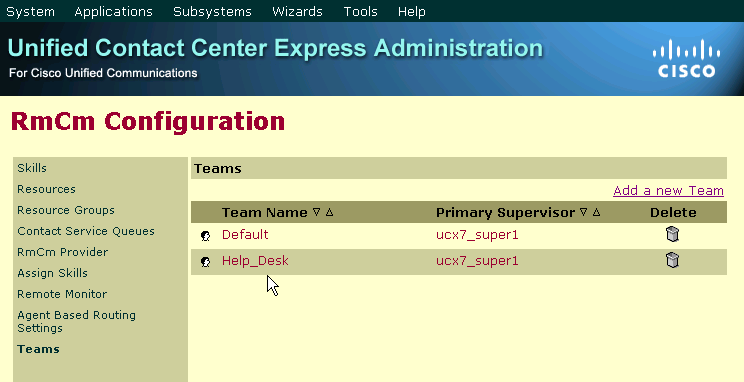
Activity Verification: You have completed this task when you see these results:
A new team called ‘Help_Desk’ was created with primary supervisor as ucx7_super1 and agent1 and agent 2 have been added as assigned resources.
Related Information
- Mark as Read
- Mark as New
- Bookmark
- Permalink
- Report Inappropriate Content
Excellent procedure! Thank you mpaneers !
- Mark as Read
- Mark as New
- Bookmark
- Permalink
- Report Inappropriate Content
Great document, thanks for sharing such a good help.
Find answers to your questions by entering keywords or phrases in the Search bar above. New here? Use these resources to familiarize yourself with the community: