
Turn on suggestions
Auto-suggest helps you quickly narrow down your search results by suggesting possible matches as you type.
Showing results for
- Cisco Community
- Technology and Support
- Security
- Security Blogs
- ISE - Dot1x Policy Configuration
14773
Views
10
Helpful
4
Comments
Options
- Subscribe to RSS Feed
- Mark as New
- Mark as Read
- Bookmark
- Subscribe
- Printer Friendly Page
- Report Inappropriate Content
08-09-2016
06:51 PM
In this next post, I'm going to walk through the policy creation for dot1x for wired and wireless access. As stated in a previous post, I'm going to be using PEAP-EAP-TLS but there are many different methods you can use. I'm also going to configure differentiated access based on a user's role to demonstrate some of the possibilities with ISE.
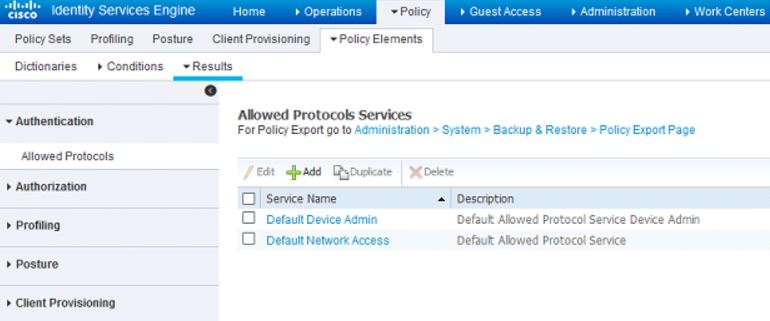
To start building the policy, we're going to have to create the allowed protocol list to use in our policy. If you use the default, you'll be pretty much allowing most protocols for authentication which is usually not preferred. Navigate to Policy>Policy Elements>Results>Authentication>Allowed Protocols and click Add:
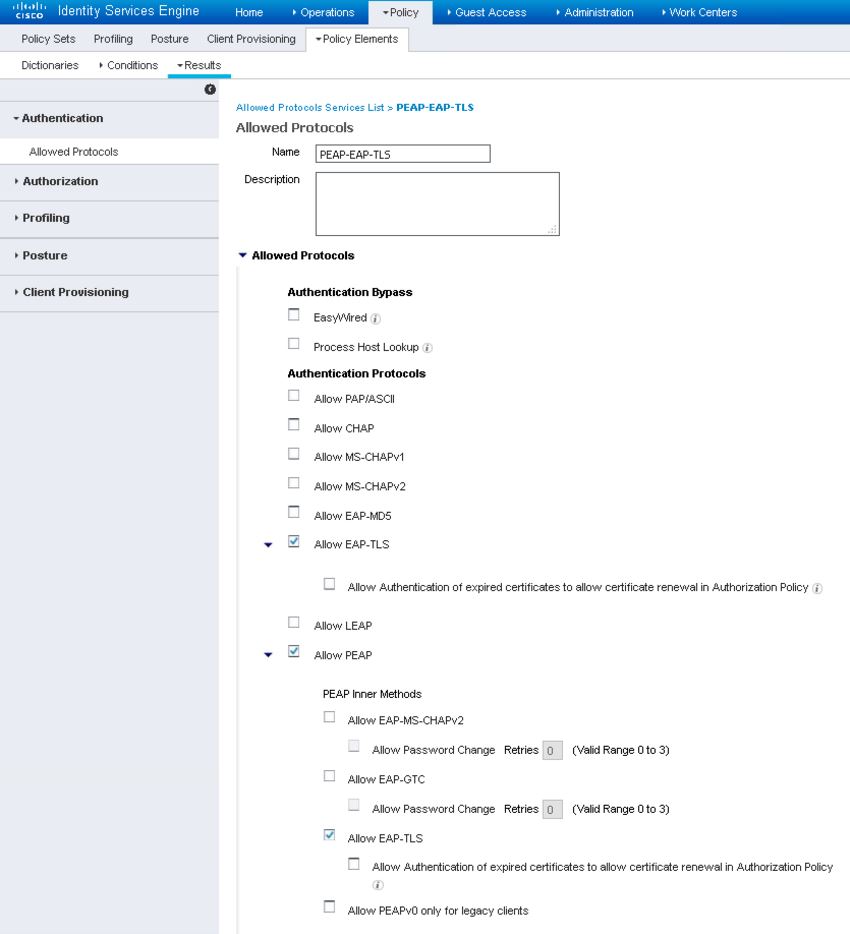
On this Allowed Protocol list, name it whatever makes sense to you. In this case, I named mine PEAP-EAP-TLS and I unchecked all the boxes, except for EAP-TLS (Used for BYOD in later policies) and PEAP with EAP-TLSand MS-CHAPv2 (Used for later) as the inner method:
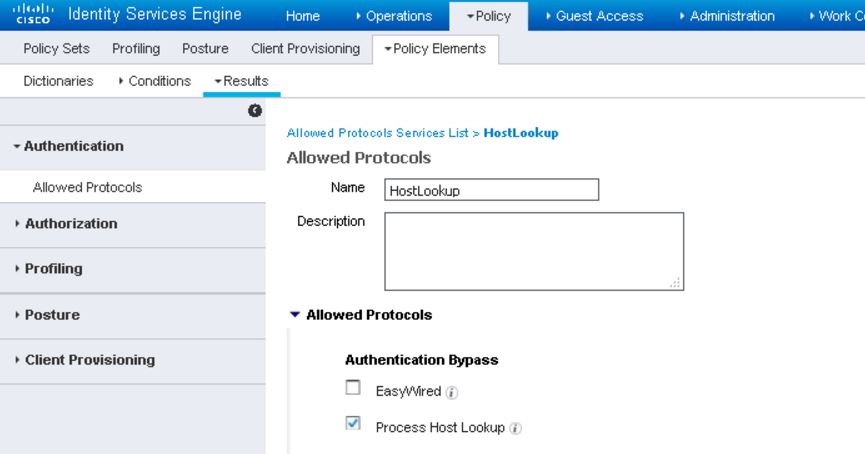
Create another Allowed Protocols List named HostLookup and only check the box for Process Host Lookup and uncheck everything else.
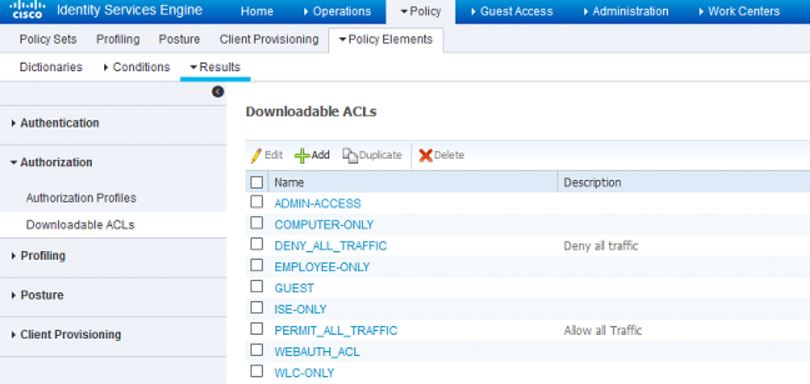
Next we are going to configure the DACLs use in our policy. Navigate to Policy>Policy Elements>Results>Authorization>Downloadable ACLs and click Add. I will create the following DACLs:
Name: COMPUTER-ONLY
ACL:
permit udp any eq bootpc any eq bootps
permit udp any any eq domain
permit ip any host 10.1.100.40
deny ip any any
Name: WLC-ONLY
ACL:
permit udp any eq bootpc any eq bootps
permit udp any any eq domain
permit ip any host 10.1.100.41
deny ip any any
Name: EMPLOYEE-ONLY
ACL:
permit udp any eq bootpc any eq bootps
permit udp any any eq domain
permit ip any host 10.1.100.21
permit ip any host 10.1.100.40
deny ip any host 10.1.10.3
deny ip any 10.1.100.0 255.255.255.0
permit ip any any
Name: GUEST
ACL:
permit udp any eq bootpc any eq bootps
permit udp any any eq domain
permit ip any host 10.1.100.21
permit ip any host 10.1.100.40
deny ip any 10.0.0.0 255.0.0.0
deny ip any 172.16.0.0 255.240.0.0
deny ip any 192.168.0.0 255.255.0.0
permit ip any any
Name: ADMIN-ACCESS
ACL:
permit ip any any
The next thing I'm going to do is to create my authorization profiles. These profiles are used as the in your authorization policy to essentially give permissions to the endpoint. Some of the more commonly used attributes in an authorization profile are:
- DACL
- VLAN
- Voice Domain Permission
- Posture Discovery
- Centralized Web Authentication
- Auto SmartPort
- Filter-ID
- Reauthentication
- MACSec Policy
- NEAT
- Local Web Authentication
- Wireless Controller ACL
- ASA VPN
There's a lot of options you can choose and configure in an authorization profile and I might go into them in more detail in future posts but for now I'm going to use some of the more common attributes that you'd see in a typical enterprise environment such as DACL, VLAN assignment, etc.
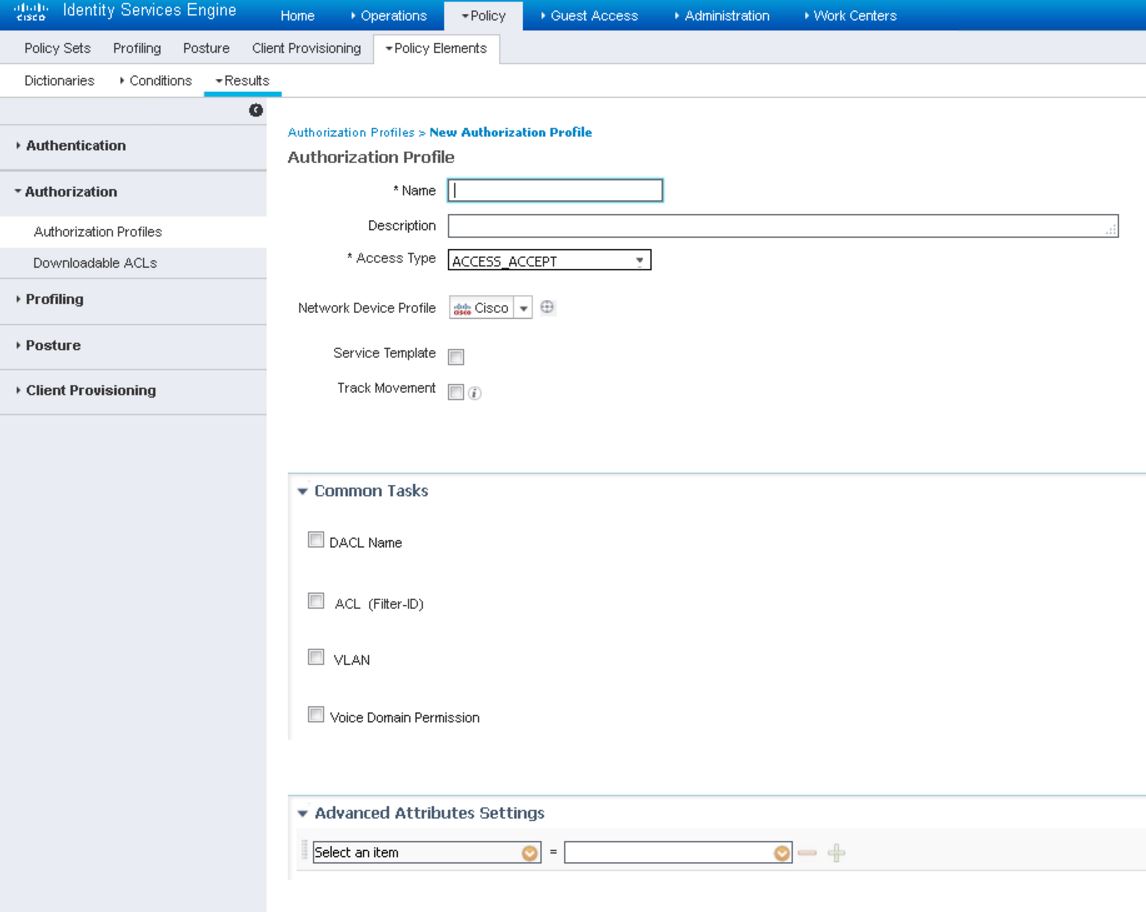
To create our authorization profiles, I'm going to navigate to Policy>Policy Elements>Results>Authorization>Authorization Profiles and click Add

During my creation of my authorization profile, I usually create it so that I can use for both my wired and wireless policies if possible. For my lab, I'm going to create several authorization profiles with the following elements:
Name: AD-ONLY
- Check DACL Name and choose COMPUTER-ONLY from the drop-down. This is for wired access
- Check VLAN and choose ID/Name 50
- Check the box next to Airespace ACL Name and enter COMPUTER-ONLY <- this is the ACL we configured in the WLC previously. As I stated in the previous post, the wireless controller does not support dACLs so we have to let the WLC know which ACL to use locally.
Name: GUEST-ACCESS
- Check DACL Name and choose GUEST from the drop-down
- Check VLAN and choose ID/Name 70
- Check the box next to Airespace ACL Name and enter GUEST
Name: ADMIN-ACCESS
- Check DACL Name and choose ADMIN-ACCESS
- Check VLAN and choose ID/Name 50
- Check the box next to Airespace ACL Name and enter ADMIN-ACCESS
Name: WLC-ONLY <- This will be used later for our profiling policy in a later post
- Check DACL Name and choose WLC-ONLY
- Check VLAN and choose ID/Name 100
The next thing I'm going to configure is the authorization conditions for our policy. These rule-based conditions form the basis of the ISE policies. A simple condition consists of an attribute, operator, and a value. Compound conditions are typically made up of two or more simple conditions. Most of the time, your ISE policy is built from compound conditions.
You can create conditions from within the policy pages or as separate policy elements to be reused by other types of ISE policies. For the purposes of troubleshooting policies, it's typically better to create your conditions on the policy set itself but to make the policy more readable and neater, creating the reusable conditions is better. You have to decide which way is "right" for you but I personally do not see either way as a wrong way of doing it.
In my lab, I'm going to create the reusable compound conditions to later use in my policy. To do so, navigate to Policy>Policy Elements>Authorization>Compound Conditions and click Add.
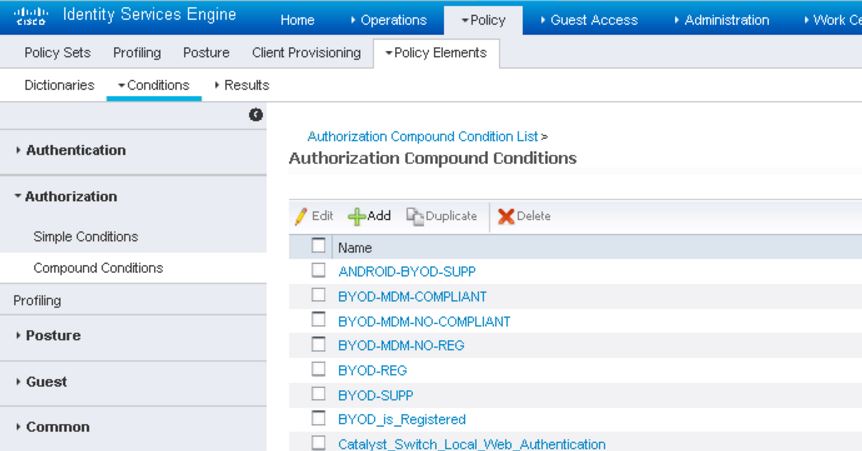
I am going to create the following compound conditions:
Name: WIRED-MACHINE-DOT1X
Conditions:
Radius:Service-Type equals Framed
Radius:NAS-Port-Type equals Ethernet
ad1:ExternalGroups equal Domain Computers
Network Access:EapTunnel equals PEAP <- This is to specify that the outer authentication method is PEAP
Network Access:EapAuthentication equals EAP-TLS <- This is specifying the inner authentication method as EAP-TLS
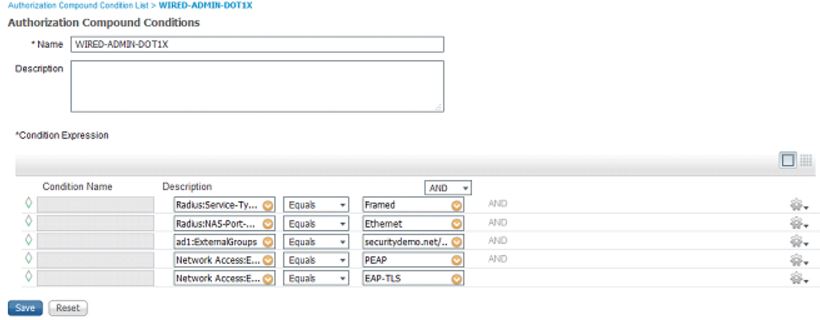
Name: WIRED-ADMIN-DOT1X
Conditions:
Radius:Service-Type equals Framed
Radius:NAS-Port-Type equals Ethernet
ad1:ExternalGroups equals Domain Admins
Network Access:EapTunnel equals PEAP
Network Access:EapAuthentication equals EAP-TLS
Name: WIRED-EMPLOYEE-DOT1X
Conditions:
Radius:Service-Type equals Framed
Radius:NAS-Port-Type equals Ethernet
ad1:ExternalGroups equals Employee
Network Access:EapTunnel equals PEAP
Network Access:EapAuthentication equals EAP-TLS
Name: WIRED-VENDOR-DOT1X
Conditions:
Radius:Service-Type equals Framed
Radius:NAS-Port-Type equals Ethernet
ad1:ExternalGroups equals Vendor
Network Access:EapTunnel equals PEAP
Network Access:EapAuthentication equals EAP-TLS
Name: WIRELESS-MACHINE-DOT1X
Conditions:
Radius:Called-Station-ID Ends With SecurityLabCorp <- If you remember when we configured our WLC, we specified the Called-Station ID as AP Mac Address:SSID in our AAA RADIUS server configuration. Because of that, we can pull out the SSID that the endpoint is connected to from the RADIUS request and make policies based upon that. Since the Called-Station-ID includes the AP MAC address as well, you want to make sure you specify "Ends With" here or else condition will fail.
Radius:NAS-Port-Type equals Wireless - IEEE 802.11
ad1:ExternalGroups equals Domain Computers
Network Access:EapTunnel equals PEAP
Network Access:EapAuthentication equals EAP-TLS
Name: WIRELESS-ADMIN-DOT1X
Conditions:
Radius:Called-Station-ID Ends With SecurityLabCorp
Radius:NAS-Port-Type equals Wireless - IEEE 802.11
ad1:ExternalGroups equals Domain Admins
Network Access:EapTunnel equals PEAP
Network Access:EapAuthentication equals EAP-TLS
Name: WIRELESS-EMPLOYEE-DOT1X
Conditions:
Radius:Called-Station-ID Ends With SecurityLabCorp
Radius:NAS-Port-Type equals Wireless - IEEE 802.11
ad1:ExternalGroups equals Employee
Network Access:EapTunnel equals PEAP
Network Access:EapAuthentication equals EAP-TLS
Name: WIRELESS-VENDOR-DOT1X
Conditions:
Radius:Called-Station-ID Ends With SecurityLabCorp
Radius:NAS-Port-Type equals Wireless - IEEE 802.11
ad1:ExternalGroups equal Vendor
Network Access:EapTunnel equals PEAP
Network Access:EapAuthentication equals EAP-TLS
Now I'm going to be creating my policy from the elements we previously created. Navigate to Policy>Policy Sets and click on + on the left-hand side to create a new policy set.
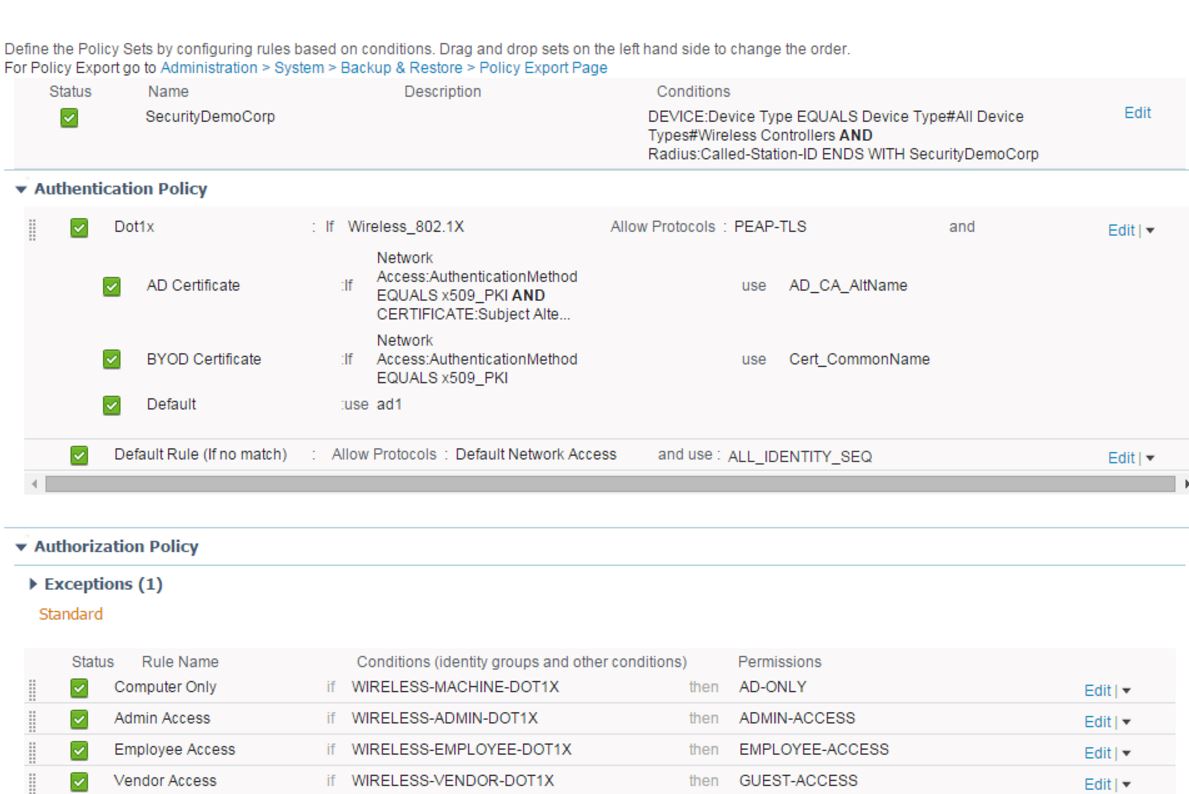
For my policy set, I'm going to create it for wireless dot1x so I'm going to name it WirelessDot1x. Since I'm using policy sets in my ISE deployment, I need to create a top-level condition or conditions to be met in order for this policy set to be used. For the top-level conditions, I will choose the following:
Device:Device type equals Wireless Controllers
Radius:Called-Station-ID ends with SecurityLabCorp [Alternatively, you could also use the existing simple condition of WirelessDot1x]

Under the Authentication Policy, click on the arrow next to the default policy and choose Insert new row above. The policy logic is simple: If {condition} then {result}. In the case of authentication policy, it'sFor this authentication policy, I created the following policy:
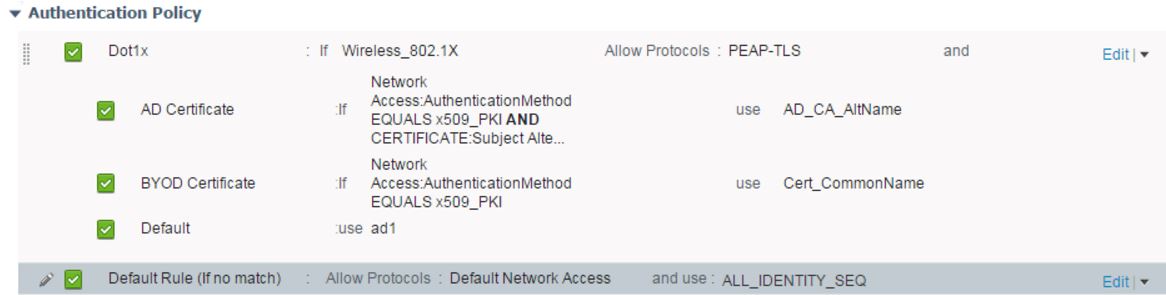
Name: Dot1x- If Wireless_802.1x (Add Condition From Library>Compound Condition - This is a prebuilt condition in the existing library)
then Allowed Protocols: PEAP-EAP-TLS (Allowed Protocol list we created before)
At this point, I would click on the Action downward arrow and choose to Insert Row Below. This is where I would get more specific with my rules and conditions. I would add the following rows:
Name: AD Certificate, If Network Access:Authentication Method EQUALS x509_PKI ANDCERTIFICATE:Subject Alternative Name CONTAINS securitydemo.net then use AD_CA_AltName <- which specifies to user just the CA for this authentication.
Name: BYOD Certificate, If Network Access:Authentication Method EQUALS x509_PKI then use Cert_CommonName <- this specifies to use the BYOD certificate
Default: Ad1 <- AD as the catchall for this ruleset
On the Default Rule, I'm going to change it to use the ALL_IDENTITY_SEQ sequence we previously created. In a production environment, you would probably lock this down more.
Next, I am going to create the Authorization Policy and click on the arrow next to the Default Policy and choose Insert new row above. The policy logic is still the same as the above. In this policy, I'm going to create the following policies in the following order:
Rule Name: Computer-Only
If: Leave at Any
Condition(s): Select Condition from Library>Compound Conditions>WIRELESS-MACHINE-DOT1X
Then: Standard>AD-ONLY
Rule Name: IT-Admin-Access
If: Leave at Any
Condition(s): Select Condition from Library>Compound Conditions>WIRELESS-ADMIN-DOT1X
Then: Standard>ADMIN-ACCESS
Rule Name: Employee-Access
If: Leave at Any
Condition(s): Select Condition from Library>Compound Conditions>WIRELESS-EMPLOYEE-DOT1X
Then: Standard>EMPLOYEE-ACCESS
Rule Name: Vendor-Access
If: Leave at Any
Condition(s): Select Condition from Library>Compound Conditions>WIRELESS-VENDOR-DOT1X
Then: Standard>GUEST-ACCESS
Click Save to save your policy set.
We can test out this policy by navigating to Operations>RADIUS Livelog. You can have a test computer that's already joined to the domain and has the certificate pushed down from the group policy. If everything is working correctly, you should see it automatically jumping on the wireless and accepted thanks to the group policy setting the dot1x policy on the wireless NIC and telling the computer to automatically connect to the SSID when it's seen. Depending on which AD user you're signed in as, you should see a different authorization profile assigned by user:

Now try logging off the computer as the user but leaving the computer turned on. If everything is configured correctly, the computer should be granted access based on the AD-ONLY authorization profile which means the computer has access to AD only for authentication/GPO/patching/etc like you would want it to have in a production environment:

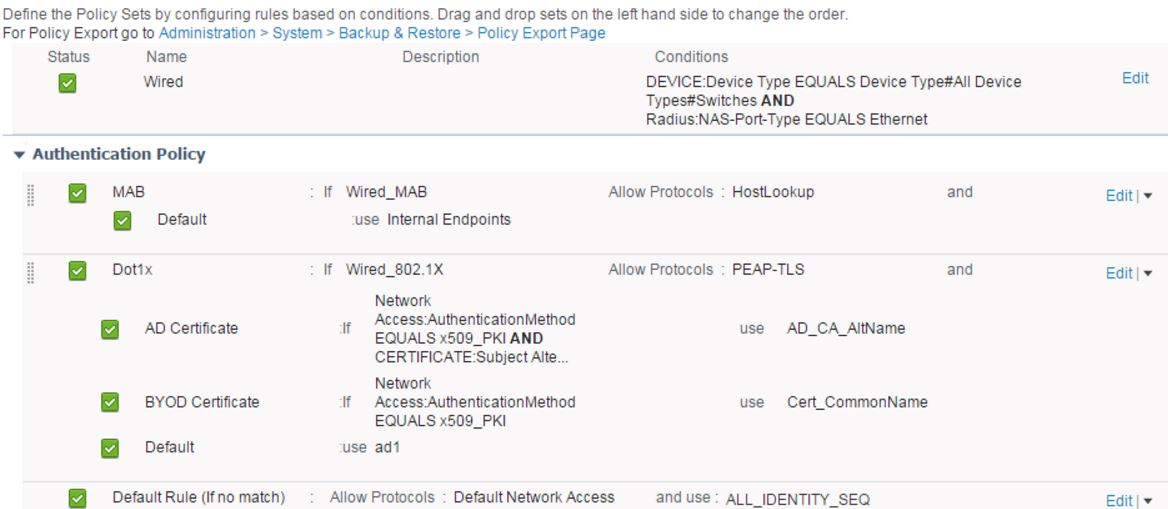
Now we're going to create another policy set which will do the same thing for wired access. Navigate to Policy>Policy Sets and click on + to create a new policy set. This time I am going to name itWired and have it match the following for the top-level condition:
Device Type equals Switches
NAS-Port-Type equals Ethernet

Under the Authentication Policy, we're going to create a top condition for MAB. This will come in handy later for profiling and other things:
Name: Wired MAB
If Condition(s): Select Existing Condition>Compound Condition>Wired_MAB
Allowed Protocols: HostLookup
Use: Internal Endpoints and If User Not Found Continue

I'll create another authentication policy rule for dot1x under the MAB policy. The authentication policy will be:
Name: Wired Dot1x
If Condition(s): Select Existing Condition From Library>Compound Conditions>Wired_802.1x
Allowed Protocols: PEAP-EAP-TLS
At this point, I would click on the Action downward arrow and choose to Insert Row Below. This is where I would get more specific with my rules and conditions. I would add the following rows:
Name: AD Certificate, If Network Access:Authentication Method EQUALS x509_PKI ANDCERTIFICATE:Subject Alternative Name CONTAINS securitydemo.net then useAD_CA_AltName <- which specifies to user just the CA for this authentication.
Name: BYOD Certificate, If Network Access:Authentication Method EQUALS x509_PKI then useCert_CommonName <- this specifies to use the BYOD certificate
Default: Ad1 <- AD as the catchall for this ruleset
On the Default Rule, I'm going to change it to use the ALL_IDENTITY_SEQ sequence we previously created. In a production environment, you would probably lock this down more.
Moving onto the authorization policy, I'm going to create the following policy rules:
Rule Name: Computer-Only
If: Leave at Any
Condition(s): Select Condition from Library>Compound Conditions>WIRED-MACHINE-DOT1X
Then: Standard>AD-ONLY
Rule Name: IT-Admin-Acess
If: Leave at Any
Condition(s): Select Condition from Library>Compound Conditions>WIRED-ADMIN-DOT1X
Then: Standard>ADMIN-ACCESS
Rule Name: Employee-Access
If: Leave at Any
Condition(s): Select Condition from Library>Compound Conditions>WIRED-EMPLOYEE-DOT1X
Then: Standard>EMPLOYEE-ACCESS
Rule Name: Vendor-Access
If: Leave at Any
Condition(s): Select Condition from Library>Compound Conditions>WIRED-VENDOR-DOT1X
Then: Standard>GUEST-ACCESS
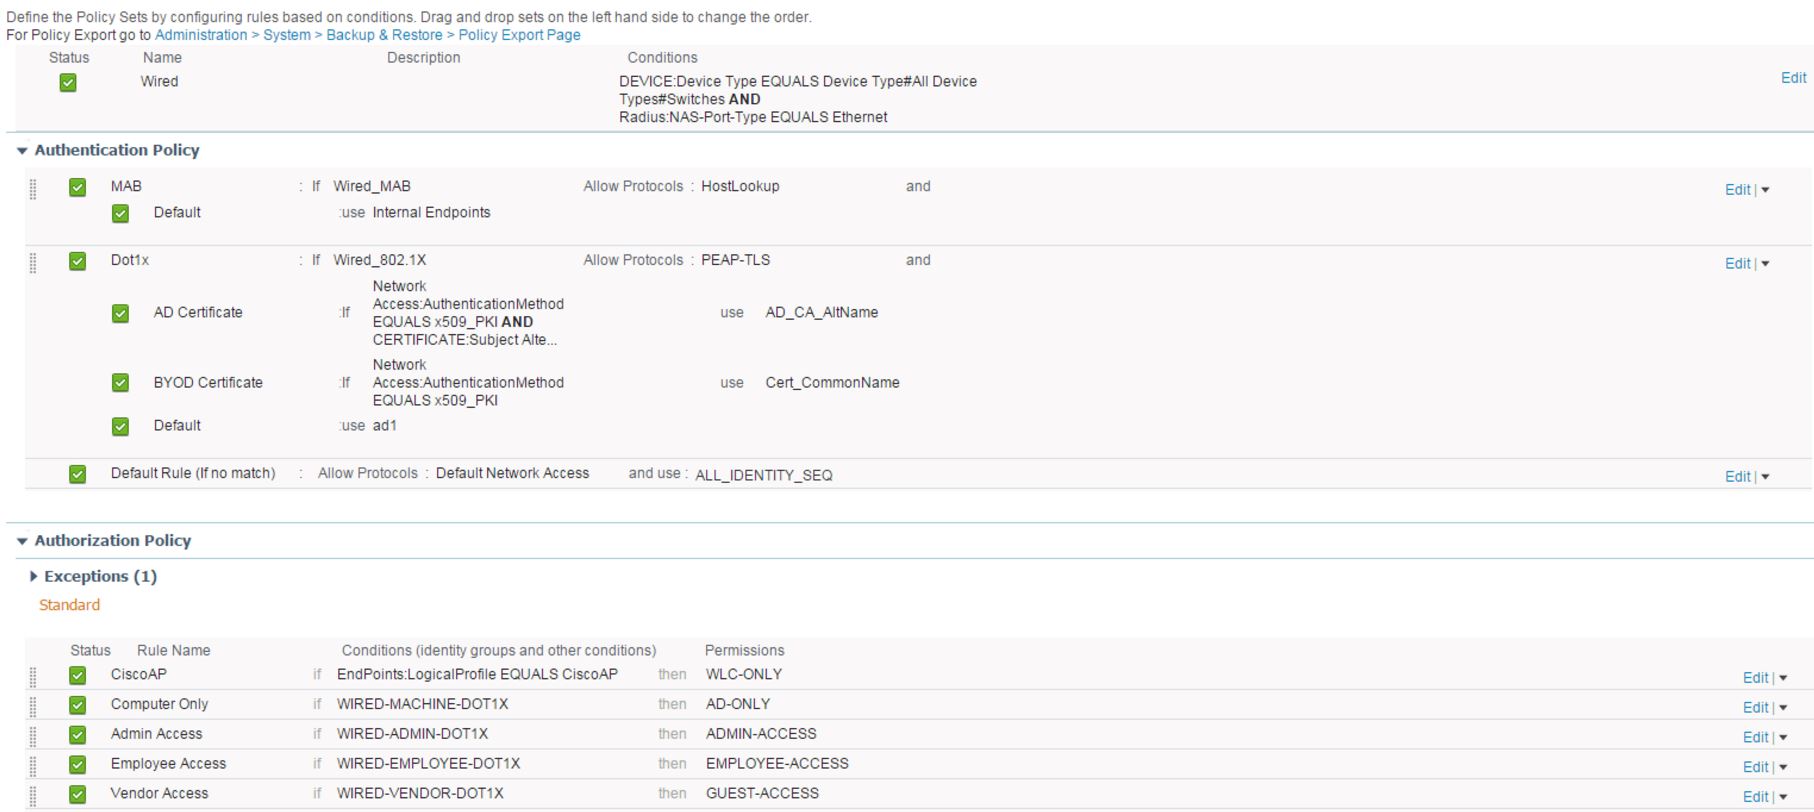
Editors note: Ignore the CiscoAP rule. That's part of my profiling policy that I'll show later
Click Save to save your policy set.
You can once again test this policy by using the same domain PC that used in the previous policy set test and plug it into one of the dot1x ports on the switch we previously configured. After doing so, navigate to Operations>RADIUS Livelog in ISE.
If you haven't logged into the PC but it's turned on, you should see the AD-Only authorization profile being assigned to the endpoint:

After logging into the computer, you should see the profile change and access granted based on the user you log in as:

That concludes our dot1x policy creation! In this post, we did quite a bit: We created reusable conditions, DACLS we will condition to use in other policies, and authorization profiles. After that, we used a combination of those policy elements to create our policy and then test it.
Labels:
4 Comments
You must be a registered user to add a comment. If you've already registered, sign in. Otherwise, register and sign in.
Getting Started
Find answers to your questions by entering keywords or phrases in the Search bar above. New here? Use these resources to familiarize yourself with the community:

Customers Also Viewed These Support Documents