- Cisco Community
- Technology and Support
- Wireless - Mobility
- Wireless - Mobility Knowledge Base
- Access Point ROMMON Recovery AP: prompt Recovery Example
- Subscribe to RSS Feed
- Mark as New
- Mark as Read
- Bookmark
- Subscribe
- Printer Friendly Page
- Report Inappropriate Content
")
")
- Subscribe to RSS Feed
- Mark as New
- Mark as Read
- Bookmark
- Subscribe
- Printer Friendly Page
- Report Inappropriate Content
on
01-10-2011
02:31 AM
- edited on
07-28-2024
05:53 PM
by
![]() Rich R
Rich R

")
Access Point ROMMON Recovery AP: prompt Recovery
Here is the step by step procedure for 1140 series AP.. Its the same for almost 90% or all the Aironet product series
Image used
c1140-k9w7-tar.124-21a.JY.tar
Assuming We have the IP 192.168.100.101 assigned to the LAPTOP or the DESKTOP Ethernet port which runs as the TFTP server and assigning 192.168.100.100 as the IP to AP.
Make sure you have the TFTP server or download it from google (tftpd32.exe)
Using the CLI
Follow the steps below to reload the access point image using the CLI. When the access point begins to boot, you interrupt the boot process and use boot loader commands to load an image from a TFTP server to replace the image in the access point.
First of all, I would like to let you know that there is a problem if you don’t see the extensions of the files in your folders. The problem is that, when you rename the file, you just rename the name, and not the extension.
The solution for this is:
Go to the folder that contains the IOS image and go to the tools option in the window bar. Click on folder options
Go to the view tab and uncheck the option that says: “Hide file extensions for known file types”.
Note Your access point configuration is not changed when using the CLI to reload the image file.
Step 1 Open the CLI using a Telnet session or a connection to the access point console port.
Step 2 Reboot the access point by removing power and reapplying power.
Step 3 Let the access point boot until it begins to inflate the image. When you see these lines on the CLI, press Esc:
Loading "flash:/c1140-k9w7-tar.124-21a.JY.tar"
...###########################################################################
################################################################################
################################################################################
####################
Step 4 When the ap: command prompt appears, enter the set command to assign an IP address, subnet mask, and default gateway to the access point.
Note You must use upper-case characters when you enter the IP-ADDR, NETMASK, and DEFAULT_ROUTER options with the set command.
Your entries might look like this example:
ap: set IP_ADDR 192.168.100.100
ap: set NETMASK 255.255.255.0
ap: set DEFAULT_ROUTER 192.168.100.1
Step 5 Enter the tftp_init command to prepare the access point for TFTP.
ap: tftp_init
ap: ether_init
ap: flash_init
Step 6 Enter the tar command to load and inflate the new image from your TFTP server. The command must include this information:
•the -xtract option, which inflates the image when it is loaded
•the IP address of your TFTP server
•the directory on the TFTP server that contains the image
•the name of the image
•the destination for the image (the access point Flash)
Your entry might look like this example:
ap: tar -xtract tftp://192.168.100.101/images/c1140-k9w7-tar.124-21a.JY.tar flash:
Step 7 When the display becomes full the CLI pauses and displays --MORE--. Press the spacebar to continue.
extracting info (229 bytes)
c1140-k9w7-tar.124-21a.JY/ (directory) 0 (bytes)
c1140-k9w7-tar.124-21a.JY/html/ (directory) 0 (bytes)
c1140-k9w7-tar.124-21a.JY/html/level1/ (directory) 0 (bytes)
extracting c1140-k9w7-tar.124-21a.JY/html/level1/appsui.js (558 bytes)
extracting c1140-k9w7-tar.124-21a.JY/html/level1/back.htm (205 bytes)
extracting c1140-k9w7-tar.124-21a.JY/html/level1/cookies.js (5027 bytes).
extracting c1140-k9w7-tar.124-21a.JY/html/level1/forms.js (15704 bytes)...
extracting c1140-k9w7-tar.124-21a.JY/html/level1/sitewide.js (14621 bytes)...
extracting c1140-k9w7-tar.124-21a.JY/html/level1/config.js (2554 bytes)
extracting c1140-k9w7-tar.124-21a.JY/html/level1/stylesheet.css (3215 bytes)
c1140-k9w7-tar.124-21a.JY/html/level1/images/ (directory) 0 (bytes)
extracting c1140-k9w7-tar.124-21a.JY/html/level1/images/ap_title_appname.gif (1422 bytes)
extracting c1140-k9w7-tar.124-21a.JY/html/level1/images/apps_button_1st.gif (1171 bytes)
extracting c1140-k9w7-tar.124-21a.JY/html/level1/images/apps_button_cbottom.gif (318 bytes)
extracting c1140-k9w7-tar.124-21a.JY/html/level1/images/apps_button_current.gif (348 bytes)
extracting c1140-k9w7-tar.124-21a.JY/html/level1/images/apps_button_last.gif (386 bytes)
extracting c1140-k9w7-tar.124-21a.JY/html/level1/images/apps_button_last_filler.gif (327 bytes)
extracting c1140-k9w7-tar.124-21a.JY/html/level1/images/apps_button_last_flat.gif (318 bytes)
extracting c1140-k9w7-tar.124-21a.JY/html/level1/images/apps_button_nth.gif (1177 bytes)
extracting c1140-k9w7-tar.124-21a.JY/html/level1/images/apps_leftnav_dkgreen.gif (869 bytes)
-- MORE --
If you do not press the spacebar to continue, the process eventually times out and the access point stops inflating the image.
Step 8 Enter the set BOOT command to designate the new image as the image that the access point uses when it reboots. The access point creates a directory for the image that has the same name as the image, and you must include the directory in the command. Your entry might look like this example:
ap: set BOOT flash:/c1140-k9w7-tar.124-21a.JY/c1140-k9w7-tar.124-21a.JY
And save the boot variable
ap: sync <- not supported or needed on more recent AP models
Step 9 Enter the set command to check your bootloader entries.
ap: set
BOOT=flash:/c1140-k9w7-tar.124-21a.JY/c1140-k9w7-tar.124-21a.JY
DEFAULT_ROUTER=192.168.100.1
IP_ADDR=192.168.100.100
NETMASK=255.255.255.0
Step 10 Enter the boot command to reboot the access point. When the access point reboots, it loads the new image.
ap: boot
This will get the AP to Autonomous image AP# prompt after reload..
Drop a comment if we are facing any issues!!


- Mark as Read
- Mark as New
- Bookmark
- Permalink
- Report Inappropriate Content
Try this from the cli:
delete /recursive /force flash:/ap3g2-k9w7-mx.153-3.JAB
delete /recursive /force flash:/ap3g2-k9w7-mx.153-3.JBB
This will delete the directory and the files in the directory.
-Scott
- Mark as Read
- Mark as New
- Bookmark
- Permalink
- Report Inappropriate Content
That command is not available in ROMMON mode as you can see. Boot the AP and run the command when it boots up.
-Scott
- Mark as Read
- Mark as New
- Bookmark
- Permalink
- Report Inappropriate Content
You can erase flash, but you better understand how to get the AP to work again. Look at this link before trying to do this:
https://supportforums.cisco.com/discussion/11011226/restoring-1131ag-access-point-after-flash-has-been-erased
-Scott
- Mark as Read
- Mark as New
- Bookmark
- Permalink
- Report Inappropriate Content
Yes brother it worked,
Thanks alot..
Your quick response saved me...Thanks a lot once again...
- Mark as Read
- Mark as New
- Bookmark
- Permalink
- Report Inappropriate Content
Thank you Scott for helping Shahbaz (particularly on weekend) with lighting fast response, much appreciated.
Many Regards,
Vinay Sharma
Community Manager
- Mark as Read
- Mark as New
- Bookmark
- Permalink
- Report Inappropriate Content
Hi Surendra
Thanks, this post was very useful and worked well. I only had a couple of issues, when I first set up the tftpd32 server on my laptop I had the AP going through a switch to the laptop and the ftp connection was timing out (the connection would start but no data was transferred). Once I connected the AP directly in the laptop and rebooted it, the ftp download was successful.
I then tried to use the boot command you have documented but this failed to load the image and it booted back into the lightweight image once more.
The error I got was the following:
"Loading "flash:/c1140-k9w7-mx.124-25d.JA2"...flash:/c1140-k9w7-mx.124-25d.JA2: is a directory
Error loading "flash:/c1140-k9w7-mx.124-25d.JA2" "
I noticed that the old image used a different format to load the image.
The boot command should be in the following format:
ap: set BOOT flash:/image_name/image_name
The command I used that worked was:
ap: set BOOT flash:/c1140-k9w8-mx.124-25e.JA/c1140-k9w8-mx.124-25e.JA
This then tells the router to uncompress the image and then install it.
This took me a while to figure out so hope this helps someone avoid the same struggle in the future.
Regards
Anthony
- Mark as Read
- Mark as New
- Bookmark
- Permalink
- Report Inappropriate Content
Hi, thanks for the awesome tutorial. I have one issue though, when my aironet 1250 is loading the flash I cannot press esc to get into the ap: mode. I've also had no luck with using the tftp server mode button method.
A little background, I tried to update the firmware via the GUI and it failed out after about 400 minutes. I can no longer access the GUI but I can get in with CLI. Am I even on the right page?
- Mark as Read
- Mark as New
- Bookmark
- Permalink
- Report Inappropriate Content
Hi Anthony.
Product/Model Number: AIR-AP1131AG-E-K9
I keep on getting the below message
Loading "flash:/c1130-k9w7-mx.124-25d.JA2/c1130-k9w7-mx.124-25d.JA2"...flash:/c1130-k9w7-mx.124-25d.JA2/c1130-k9w7-mx.124-25d.JA2: no such file or directory
Error loading "flash:/c1130-k9w7-mx.124-25d.JA2/c1130-k9w7-mx.124-25d.JA2"
and this other message when I try to load the tar image. Any idea what I am dong wrong?
tar /xtract tftp://10.211.55.7/c1130-k9w7-tar.124-25d.JA2.tar flash:
usage: tar <-table | -xtract> <tar file> <destination>
I have tried on five different AP's which I need to be autonomous from LWAP.
Thanks for your help geeks out there. By the I am using a MacBook Pro to work on this. If any of you have experience with doing this on a Mac please help me out.
- Mark as Read
- Mark as New
- Bookmark
- Permalink
- Report Inappropriate Content
Hi Surendra.
Great post and well explained.
Product/Model Number: AIR-AP1131AG-E-K9
I keep on getting the below message
Loading "flash:/c1130-k9w7-mx.124-25d.JA2/c1130-k9w7-mx.124-25d.JA2"...flash:/c1130-k9w7-mx.124-25d.JA2/c1130-k9w7-mx.124-25d.JA2: no such file or directory
Error loading "flash:/c1130-k9w7-mx.124-25d.JA2/c1130-k9w7-mx.124-25d.JA2"
and this other message when I try to load the tar image. Any idea what I am dong wrong?
tar /xtract tftp://10.211.55.7/c1130-k9w7-tar.124-25d.JA2.tar flash:
usage: tar <-table | -xtract> <tar file> <destination>
I have tried on five different AP's which I need to be autonomous from LWAP.
Thanks for your help geeks out there.
Thanks for your help geeks out there. By the I am using a MacBook Pro to work on this. If any of you have experience with doing this on a Mac please help me out.
- Mark as Read
- Mark as New
- Bookmark
- Permalink
- Report Inappropriate Content
Hello, Eberd,
I have 1552 Outdoor AP, I can't download ois in rommon mode. I did all steps in above. When I did
tar -xtract tftp:/URL flash: connection time out
I closed all firewalls, I can't ping AP from PC. I tried to replace PC.
ap: arp <ip address PC> is shown
Please help
- Mark as Read
- Mark as New
- Bookmark
- Permalink
- Report Inappropriate Content
hi all;
i have a new issue with AP Cisco 702i. i can not change mode lightweight to autonomous. please help me.
thanks all
")

- Mark as Read
- Mark as New
- Bookmark
- Permalink
- Report Inappropriate Content
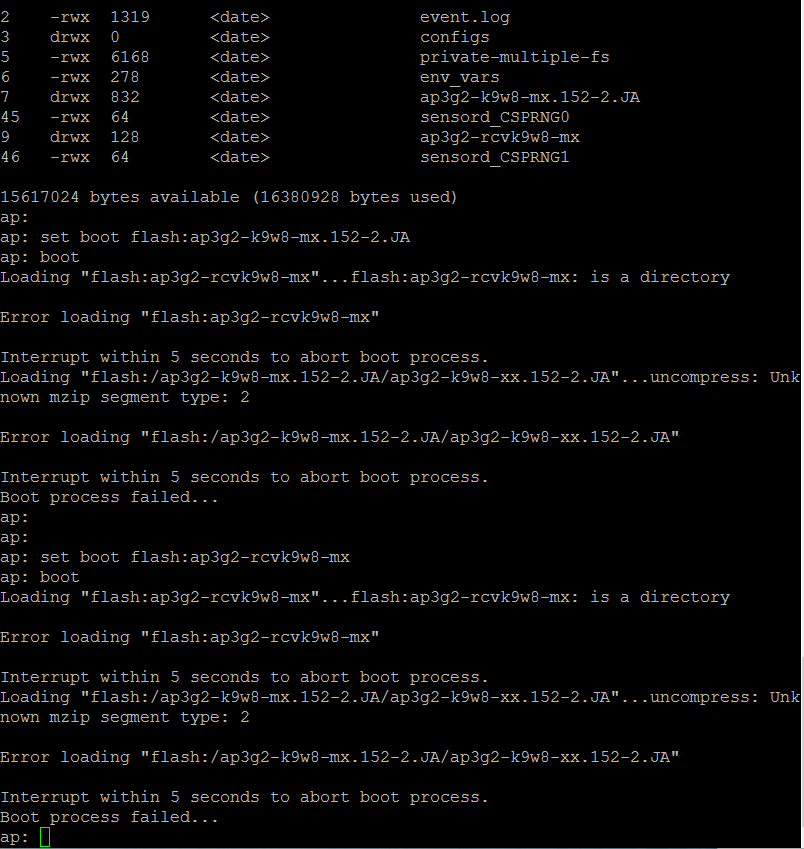
tsubakaran: do you see line 7 where it says "drwx"? This means it is a directory and the directory name is: ap3g2-k9w8-mx.152-2.JA. The command you issued was: set boot flash:ap3g2-k9w8-mx.152-2.JA which points to the directory and not the file. Remember, you must point to the file.
So the command should be: set boot flash:ap3g2-k9w8-mx.152-2.JA/ap3g2-k9w8-mx.152-2.JA
to verify that this is the correct file, from ap: issue the "cd ap3g2-k9w8-mx.152-2.JA" command (without the quotes) and then do "dir". See if the "ap3g2-k9w8-mx.152-2.JA" file is listed (it should be about 11000000 bytes big. by the way you can do "cd .." to get back to root directory. I also see this in your picture up there: Error loading "flash:/ap3g2-k9w8-mx.152-2.JA/ap3g2-k9w8-xx.152-2.JA". See the "xx". That is wrong. It should be "mx" in both.
Last I see you tried to boot to the recovery image (set boot flash:ap3g2-rcvk9w8-mx). Again, try to use the "set boot flash:ap3g2-rcvk9w8-mx/ap3g2-rcvk9w8-mx" and see if that works.
One more thing. Remember that in rommon mode, all commands are case sensetive, so try using the "?" after commands to verify if the command has capital letters in it (i.e. "set<space>?<enter>") From what I've been reading the "set boot xxxxxx" command should be "set BOOT xxxxxx". Sorry, I don't have any equipment in front of me right now to test it myself or I'd give you a definite answer.
If all else fails, erase your flash and try this method: restoring-access-point-after-flash-has-been-erased
Hope it works for you.
Peter W.
- Mark as Read
- Mark as New
- Bookmark
- Permalink
- Report Inappropriate Content
Thanks for suggesting all.. I tried as you mentioned but end up as below:
ap: set boot flash:ap3g2-k9w8-mx.152-2.JA/ap3g2-k9w8-mx.152-2.JA
ap: boot
Loading "flash:/ap3g2-k9w8-mx.152-2.JA/ap3g2-k9w8-mx.152-2.JA"...#########################
File "flash:/ap3g2-k9w8-mx.152-2.JA/ap3g2-k9w8-mx.152-2.JA" uncompressed and installed, entry point: 0x2003000
executing...
Secondary Bootloader - Starting system.
Xmodem file system is available.
flashfs[0]: 35 files, 9 directories
flashfs[0]: 0 orphaned files, 0 orphaned directories
flashfs[0]: Total bytes: 31997952
flashfs[0]: Bytes used: 7030272
flashfs[0]: Bytes available: 24967680
flashfs[0]: flashfs fsck took 8 seconds.
Reading cookie from SEEPROM
Base Ethernet MAC address: 44:03:a7:01:b6:2f
Boot CMD: 'boot flash:/ap3g2-k9w8-mx.152-2.JA/ap3g2-k9w8-xx.152-2.JA'
Loading "flash:/ap3g2-k9w8-mx.152-2.JA/ap3g2-k9w8-xx.152-2.JA"...flash:/ap3g2-k9w8-mx.152-2.JA/ap3g2-k9w8-xx.152-2.JA: no such file or directory
Error loading "flash:/ap3g2-k9w8-mx.152-2.JA/ap3g2-k9w8-xx.152-2.JA"
Interrupt within 5 seconds to abort boot process.
Boot process failed...
The system is unable to boot automatically. The BOOT
environment variable needs to be set to a bootable
image.
ap: set
DEFAULT_ROUTER=10.0.0.1
ENABLE_BREAK=yes
IOS_STATIC_DEFAULT_GATEWAY=192.168.20.1
IP_ADDR=10.0.0.2
MANUAL_BOOT=no
NETMASK=255.255.255.224
NEW_IMAGE=yes
RELOAD_REASON=23
ROM_PERSISTENT_UTC=1357163559
TERMLINES=0
boot=flash:ap3g2-k9w8-mx.152-2.JA/ap3g2-k9w8-mx.152-2.JA
Any other suggestion please? flash infomration details as below:
ap: dir flash:
Directory of flash:/
2 -rwx 1319 <date> event.log
3 drwx 0 <date> configs
5 -rwx 6168 <date> private-multiple-fs
6 -rwx 267 <date> env_vars
7 drwx 768 <date> ap3g2-k9w8-mx.152-2.JA
45 -rwx 64 <date> sensord_CSPRNG0
9 drwx 128 <date> ap3g2-rcvk9w8-mx
46 -rwx 64 <date> sensord_CSPRNG1
24967680 bytes available (7030272 bytes used)
------------------------------------------------------
ap: dir flash:ap3g2-k9w8-mx.152-2.JA
Directory of flash:ap3g2-k9w8-mx.152-2.JA/
8 -rwx 5830 <date> Y2.bin
12 -rwx 15158 <date> X2.bin
13 -rwx 18656 <date> E2.bin
15 -rwx 203061 <date> ap3g2-k9w8-mx.152-2.JA
16 -rwx 9328 <date> B2.bin
17 drwx 64 <date> html
39 -rwx 92114 <date> E5.bin
40 -rwx 1093008 <date> 8004.img
41 -rwx 61798 <date> X5.bin
42 -rwx 284 <date> info
43 -rwx 106106 <date> B5.bin
44 -rwx 75790 <date> Y5.bin
24967680 bytes available (7030272 bytes used)
Find answers to your questions by entering keywords or phrases in the Search bar above. New here? Use these resources to familiarize yourself with the community: