In this post, I'm going to walk through the BYOD policy configuration. This policy will be pushing certificate to my users via the SCEP profile we previously created inside ISE. I'll walk through some of the different options you can configure in this policy but overall, I'm going to keep the policy itself pretty simple.
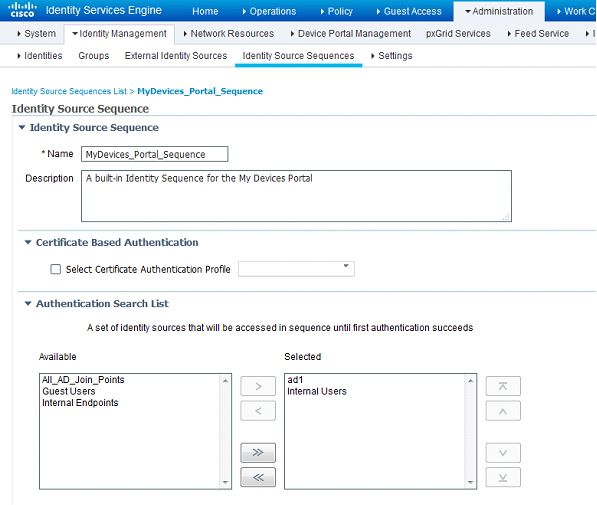
First, I'm going to modify the identity source sequence for this specific policy. In ISE, navigate toAdministration>Identity Management>Identity Source Sequences and edit theMyDevices_Portal_Sequence. In this policy, add the AD server in the Selected column and make sure it is on the top of the list:
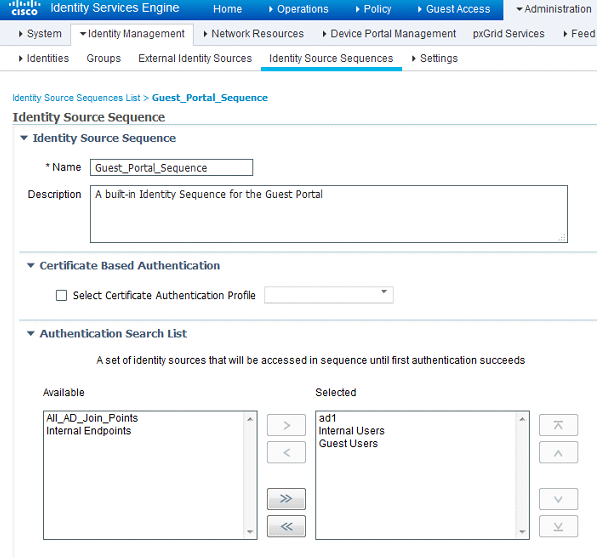
After saving this identity source sequence, we're next going to edit the Guest_Portal_Sequence and add the AD server to the top of the Selected column:
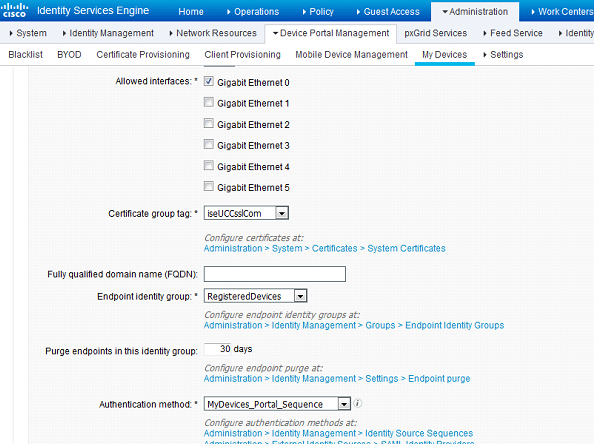
After saving the identity source sequences, I will modify the My Devices portal. Navigate toAdministration>Device Portal Management>My Devices and edit My Devices Portal (default). One thing to note: If you don't want to have to edit the default portal, you can always copy it or create a completely new one.
Under the Portal Settings page, make sure that you choose MyDevices_Portal_Sequence from theAuthentication method drop-down:
That's the only thing I'm going to change in this page but I'd like to point out some different things you can change depending on your environment.
Portal Settings -
- HTTPS port: The default is 8443 but you can change it to whatever you would like for this portal. Just be sure to update any ACLs or firewalls to open these ports.
- Allowed interfaces - Pretty self explanatory. I usually just keep this at default but if you have an ISE appliance and a large ISE deployment, you might want to direct this traffic to a different interface
- Certificate group tag - This is a unique identifier that helps ISE identify the certificate that has to be used when communicating with this portal
- Fully qualified domain name (FQDN) - FQDN for this portal. You need to make sure that this matches with DNS if you fill this option in
- Endpoint identity group - This is the logical group that the endpoints will be placed in after being registered
- Purge endpoints in this identity group - How many days this endpoints will remain in this identity group before being timed out
- Authentication Method - This is the identity source sequence that will be used
- Idle timeout - This is the timeout for the portal
- Display language - Pretty self explanatory
Login Page Settings -
- Maximum failed login attempts before rate limiting - Default is 5
- Time between login attempts when rate limiting - Default is 2 minutes
- Include an AUP - You can check this box if you'd like to include it as a link or on the page and you can also require acceptance of the AUP.
Acceptance Use Policy (AUP) Page Settings -
- Here you can choose to include an AUP page, require scrolling to the end of the AUP, and specify to show the AUP on the first login, every login or during a certain amount of days starting at the first login
Post-Login Banner Page Settings -
- This is where you can specify to include a post-login banner page
Employee Change Password Settings -
- This is where you can specify that internal users can change their own passwords
Support Information Page Settings -
- You can include certain fields for support information such as the MAC address, IP address, policy server, etc and even display empty fields
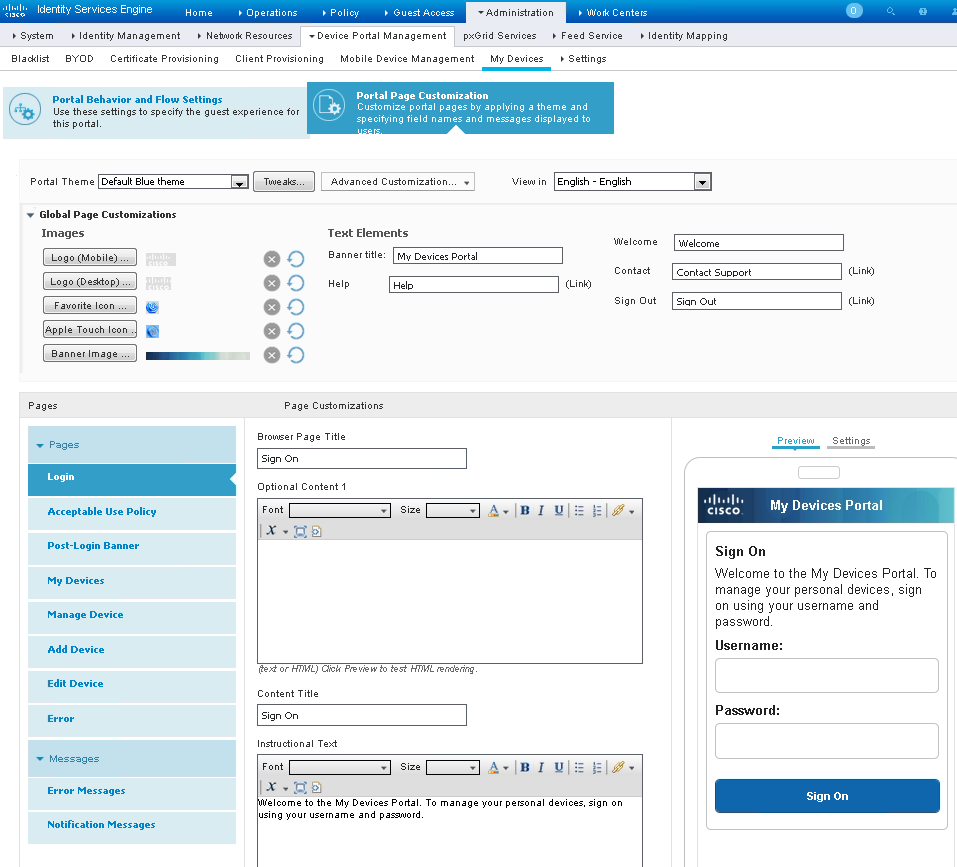
You can also navigate to the Portal Page Customization tab and further customize the look and the content of the My Devices portal for your users. After you have completed any customizations, you can preview it as well:
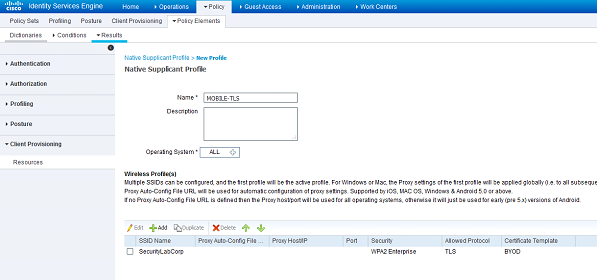
Now that we have finished modifying the MyDevices portal, I'm going to create a native supplicant profile. Navigate to Policy>Policy Elements>Results>Client Provisioning>Resources and click Add>Native Supplicant Profile. I am creating a native supplicant profile for my mobile devices here so I named it MOBILE-TLS. I could specify IOS or Android here but I'm instead going to keep ALLselected under Operating System.Under Wireless Profiles, click Add. I configure it with the following:
- SSID Name - SecurityLabCorp
- Security - WPA2 Enterprise
- Allowed Protocol- TLS
- Certificate Template - BYOD
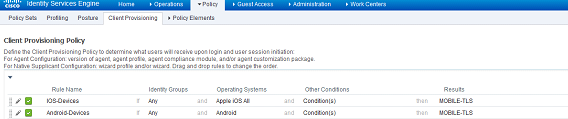
After saving this profile, I'll configure the client provisioning policy. Navigate to Policy>Client Provisioning. There I will create the following rules to use the supplicant profile I just crated for IOS and Apple devices:
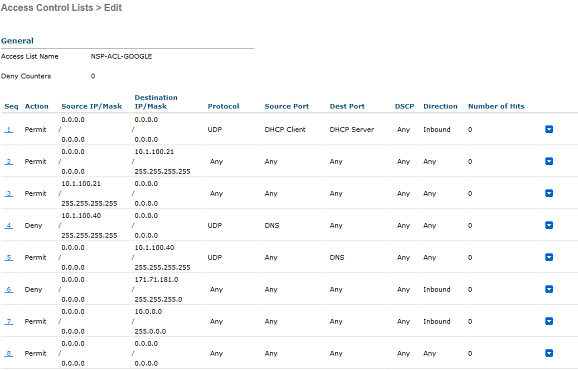
I'm going to create some ACLs in the wireless controller specifically for our BYOD policies. I'm going to create an ACL for Google, NSP, and Blackhole. Androids are a little bit of a special case in which they need to be treated differently than IOS because no two Androids are the same and because the supplicant-provisioning app is required to configure the certificate for Android. Android devices require it to be downloaded from the Android App Store. There are ways to lock the ACL down a bit more but I'm going to be a little more open in my ACLs. Part of the reason is because logging in for BYOD access already requires AD credentials.
If you'd like to know the logic behind the ACLs I'm creating, please click here to view the official How To guide. I'm using the ACLs directly from this document.
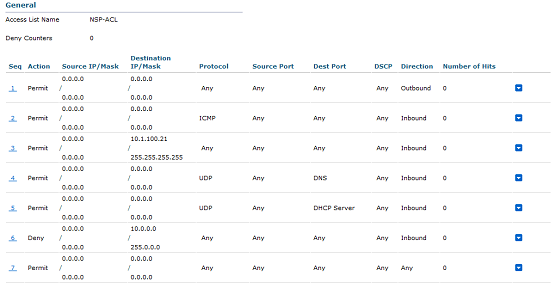
In the wireless controller, I'm going to navigate to Security>Access Control Lists>Accss Control Lists and create the following ACLs:
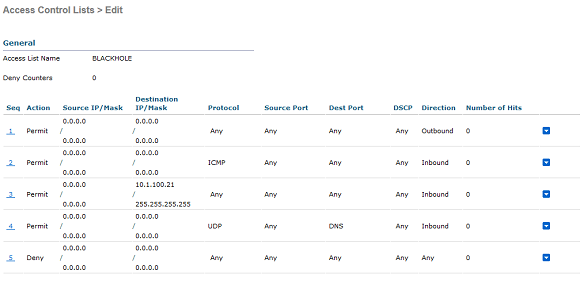
Back in ISE, I'm going to create an ACL for future policies. I'm going to navigate to Policy>Policy Elements>Results>Authorization>Downloadable ACLs and create the following ACL:
Name: BLACKHOLE
ACL:
permit udp any eq bootpc any eq bootps
permit udp any any eq domain
permit icmp any any
permit ip any host 10.1.100.21
deny ip any any
Using the ACLs I created both in the wireless controller and in ISE, I'm going to create authorization profiles. I am going to navigate to Policy>Policy Elements>Results>Authorization>Authorization Profiles and create the following profiles:
Name: BLACKHOLE
Check ACL and choose BLACKHOLE from the drop-down
Check Airespace ACL Name and type in BLACKHOLE
Note: For extra security, you can also create a blackhole VLAN and add it to this authorization profile
Name: BYOD-SUPP
Check the box for Web Redirection and from the drop-down, choose Native Supplicant Provisioning. In the ACL section, type in ISE-ONLY. In the Value field, choose BYOD Portal (default)
Name: BYOD-SUPP-ANDROID
Check the box for Web Redirection and from the drop-down choose Native Supplicant Provisioning. In the ACL section, type NSP-ACL-GOOGLE. In the Value field, choose BYOD Portal (default)
After finishing with our authentication profiles, I will create the reusable compound conditions for my policies. I'll navigate to Policy>Policy Elements>Conditions>Authorization>Compound Conditions and create the following conditions:
Name: BYOD-SUPP
Conditions:
Network Access:EapAuthentication equals EAP-MSCHAPv2
AD1:ExternalGroups equals BYOD-User <- In my policy and possibly even in a production environment, I only want select individuals to be able to utilize BYOD which is why I'm specifying a different group than Domain Users.
Name: ANDROID-BYOD-SUPP
Conditions:
Network Access:EapAuthentication equals EAP-MSCHAPv2
AD1:ExternalGroups equals BYOD-User
Session:Device-OS equals Android
Name: BYOD-REG
Conditions:
NetworkAccess:EapAuthentication equals EAP-TLS
Endpoints:BYODRegistration equals Yes
Now that I've completed the configuration of my policy elements, I'm going to configure the policy now. I'll navigate to Policy>Policy Sets and edit the WirelessDot1x policy I previously created.
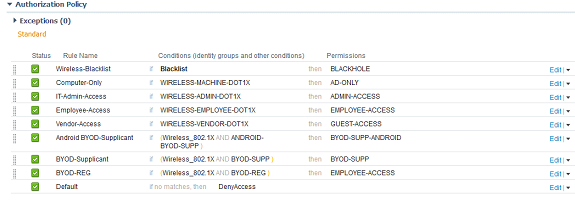
Under the Authorization Policy, I'm going to add the following rule on the top of all other rules:
Rule Name: Wireless-Blacklist
If: Blacklist <- Default logical group that should exist in ISE already
Then: BLACKHOLE
After adding that rule, I'm going to create the following rules under my Vendor-Access rule in the following order:
Rule Name: Android BYOD-Supplicant
If: Leave at Any
Condition(s): Wireless_802.1X and ANDROID-BYOD-SUPP
Then: BYOD-SUPP-ANDROID
Rule Name: BYOD-Supplicant
If: Leave at Any
Condition(s): Wireless_802.1X and BYOD-SUPP
Then: BYOD-SUPP
Rule Name: BYOD-REG
If: Leave at Any
Condition(s): Wireless_802.1X and BYOD-REG
Then: EMPLOYEE-ACCESS
Go ahead and make sure the default rule is at DenyAccess
After saving the policy, you can test it out by navigating to Operations>RADIUS Livelog and trying to login to the corp SSID with an Android and iOS device.
You should see it hitting the BYOD-SUPP-ANDROID policy:

After going through the BYOD flow and downloading the Network Assistant Setup from the Google Marketplace, this is what it should show on the RADIUS Livelog:

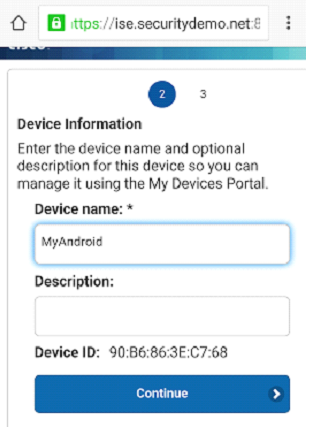
In terms of user experience, this is what the flow looks like from the perspective of the end-user on my Android test device:
Step 1 - Redirect and AUP
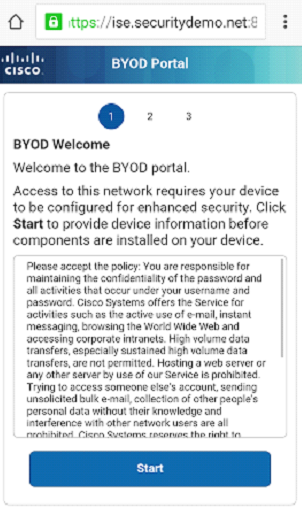
Step 2 - Adding Device Information
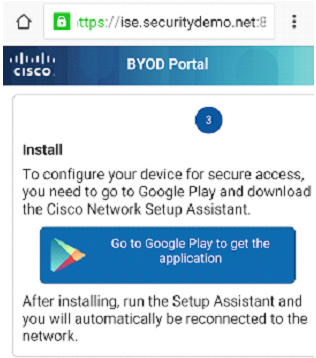
Step 3 - Prompt and link to install the Cisco Network Assistant from the Google Marketplace
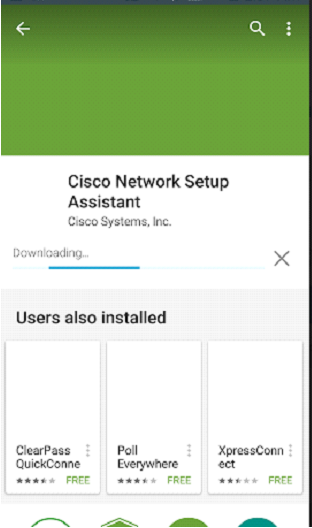
Step 4 - Installation of Cisco Network Assistant
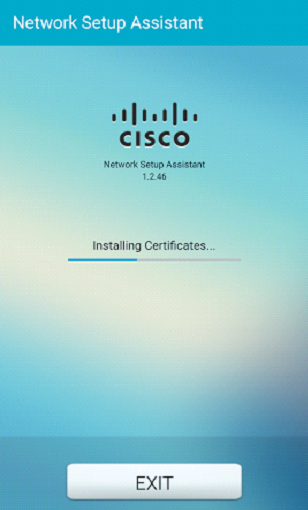
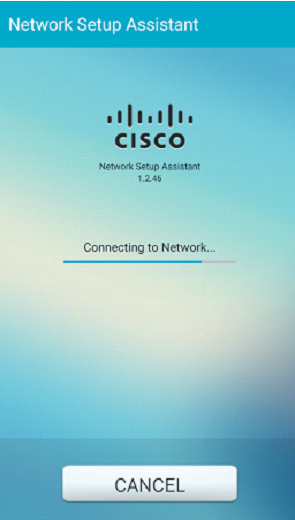
Step 5- Network Setup Assistant downloads and installs the certificate from ISE
Step 6 - Connecting to the Network
With iOS devices, the flow is a bit different. From the perspective of the RADIUS Livelog, much is the same:

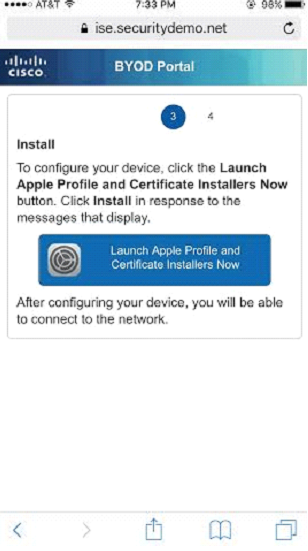
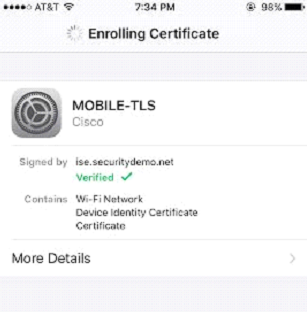
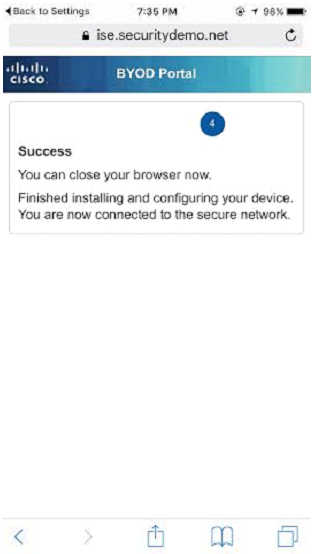
From the user perspective, the flow is almost identical except with Apple, the supplicant is native to Apple IOS so there is no need to download the Network Setup wizard. You will get to Step 3 and this is what it will look like in iOS:
Note: I am using the default portal in ISE for BYOD. If you would like to customize it, you may navigate to Administration>Device Portal Management>BYOD to customize this portal. Alternatively, you may use the online ISE portal builder by clicking here and creating a portal you can upload in minutes