To help with the understanding of bots, we put together a walkthrough of a Github to Spark integration – official integrations with Github exist now, and will be expanded, so this is purely for demonstration purposes (but you can use the code now if you want an integration you can more directly control).
The bot we outline in this blog listens for commits and comments on a particular repo, and then posts the details into a group or team room. The below parameters will be included in the message to a Spark room:
- Author Name
- Committer Name
- Pusher Name
- Commit id
- Commit time
- Repository
- Link to the Commit
- Comment
- Comment Link
- Comment User
- Repo
- Commit id
Refer to the Github docs on Event Types for more information on the parameters themselves.
Now we’ll go through the steps to build the bot.
Step 1: Create the bot
To have a bot account, you will need to log into Spark with an actual user account (a real email and password) and then create the bot under that account: https://developer.ciscospark.com/add-app.html
Step 2: Add the bot to a dedicated Room
The bot needs to be in the room in order to POST messages to it – you can add the bot via the client (just search for the bot email) or you can add it using an API call.
Step 3: Create a Github Webhook
We’ll assume you already have a repository on Github, as how to create and upload files to Github is outside the scope of this blog, so the next step is to get a Github Webhook (not a Spark webhook – similar concept, just going the other direction).
To set up a repository webhook on GitHub, you can either use the Github GUI or the API. If using the GUI, navigate to the Settings page of your repository and click on Webhooks & services. After that, click on Add Webhook.
Alternatively, you can choose to build and manage a webhook through the Webhooks API, which is what we’ll use. Before we proceed, we recommend reviewing the links below for more details on using the API to create a webhook:
Once you’ve reviewed those links, we can start making the actual API calls. First one will be a POST to /repos/:owner/:repo/hooks. Make sure to update the :owner and :repo fields with your Github username and the name of your repository respectively:
Here’s how the body of our request should look:
{
"name": "web",
"active": true,
"events": [
"push",
"commit_comment"
],
"config": {
"url": "https://example.io", #Replace this with Your_POST_Server_URL
"content_type": "json",
"secret":"EventsToSparkRoom" #Webhook secret which is used to validate requests
}
}
Once it’s been successfully created, you should get a response similar to this:
{
"type": "Repository",
"id": 9415141,
"name": "web",
"active": true,
"events": [
"push",
"commit_comment"
],
"config": {
"url": "https://example.io",
"content_type": "json",
"secret": "********"
},
"updated_at": "2016-08-06T22:38:05Z",
"created_at": "2016-08-06T22:38:05Z",
"url": "https://api.github.com/repos/Colbyter/TestWebhook/hooks/9415141",
"test_url": "https://api.github.com/repos/Colbyter/TestWebhook/hooks/9415141/test",
"ping_url": "https://api.github.com/repos/Colbyter/TestWebhook/hooks/9415141/pings",
"last_response": {
"code": null,
"status": "unused",
"message": null
}
}
You also have the option of securing your webhook using a secret, to validate the payload is really coming from Github; you would need to do a quick signature check if you elected to go that route. Check this link for more details on securing your Github webhooks.
With the webhook created, we’ll move on to configuring your server.
Step 4: Configure Your Server
We will now set up a simple Flask Server with a Python application, which receives incoming payloads from Github and sends them to Spark:
In this example, the server code is hosted on Cloud9 (C9). However, you can run locally and expose it to the web using ngrok, host it on an Amazon EC2 instance, or use any other hosting solution of your choice. We’ll first import the various dependencies:
from flask import Flask, request, abort
import json
import urllib, urllib2
import hmac
import hashlib
Then we’ll define a couple variables – one for the server setup and one for a webhook secret:
app = Flask(__name__)
#Secret provided in the Github webhook config.Change this to your own secret phrase
SECRET_TOKEN = "EventsToSparkRoom"
Next we’ll setup the function that validates the secret with a fairly straightforward if/else (the docs on the Github site about securing your webhook will explain most of this logic) and then establish some message formatting (using Markdown) so our POST to the Spark room is readable:
@app.route('/', methods =['POST'])
def githubCommits():
''' This function validates if the request is properly signed by Github. (If not, this is a spoofed webhook.). Then collects the webhook payload sent from Github and parses the parameters you want to send to Spark Room
'''
headers = request.headers
incoming_signature = headers.get('X-Hub-Signature')
signature = 'sha1=' + hmac.new(SECRET_TOKEN, request.data, hashlib.sha1).hexdigest()
if incoming_signature is None:
abort(401)
elif signature == incoming_signature:
json_file = request.json
if 'push' == headers.get('X-GitHub-Event'):
commit = json_file['commits'][0]
commit_id = commit['id']
commit_message = commit['message']
commit_time = commit['timestamp']
commit_url = commit['url']
commit_author_name = commit['author']['name']
committer_name = commit['committer']['name']
pusher_name = json_file['pusher']['name']
repo_name = json_file['repository']['name']
results = """**Author**: %s\n\n**Committer**: %s\n\n**Pusher**: %s\n\n**Commit Message**: %s\n\n**Commit id**: %s\n\n**Time**: %s\n\n**Repository**: %s\n\n**Commit Link**: %s<br><br>""" % (commit_author_name,committer_name,pusher_name,commit_message,commit_id,commit_time,repo_name,commit_url)
toSpark(results)
return 'Ok'
elif 'commit_comment' == headers.get('X-GitHub-Event'):
comment_raw = json_file['comment']
comment_url = comment_raw['html_url']
comment_user = comment_raw['user']['login']
commit_id = comment_raw['commit_id']
comment = comment_raw['body']
comment_repo = json_file['repository']['name']
results = """**User**: %s\n\n**Comment on Commit**: %s\n\n**Comment url**: %s\n\n**Commit id**: %s\n\n**Repository**: %s<br><br>""" % (comment_user,comment,comment_url,commit_id,comment_repo)
toSpark(results)
return 'Ok'
else:
print "Spoofed Hook"
abort(401)
Then here we will extract the content from the Github webhook and POST it back to a Spark room – note you will need to populate BOT_TOKEN with your bot’s access token, so the message will post from the bot user in the room, and “YOUR_ROOM_ID” with the actual Spark roomId:
# POST Function that sends the commits & comments in markdown to a Spark room
def toSpark(commits):
url = 'https://api.ciscospark.com/v1/messages'
headers = {'accept':'application/json','Content-Type':'application/json','Authorization': 'Bearer BOT_TOKEN'}
values = {'roomId':'YOUR_ROOM_ID', 'markdown': commits }
data = json.dumps(values)
req = urllib2.Request(url = url , data = data , headers = headers)
response = urllib2.urlopen(req)
the_page = response.read()
return the_page
if __name__ == '__main__':
app.run(host='0.0.0.0' , port=8080, debug =True)
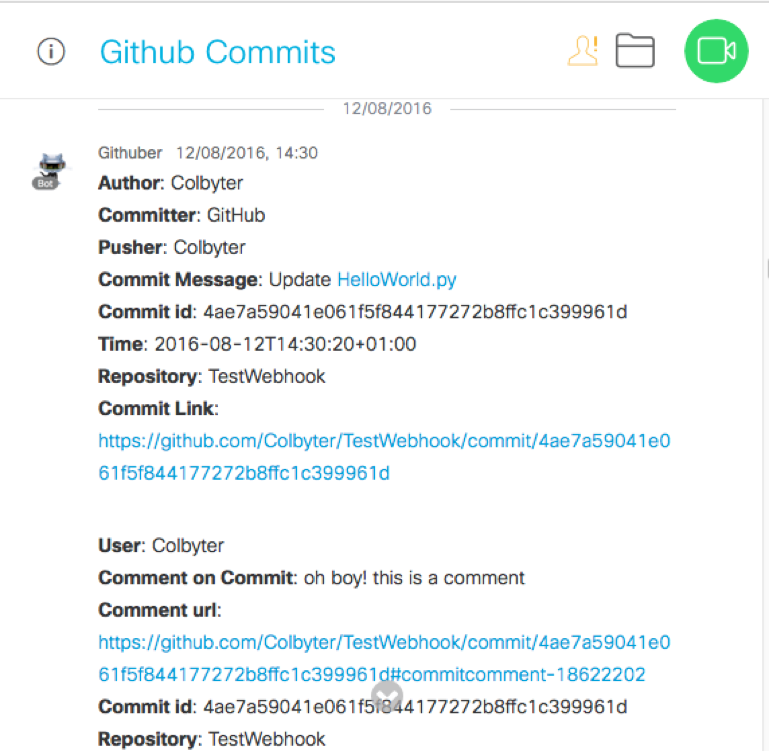
Put it all together and you have an application that takes data from a Github webhook, validates it’s from Github, formats the content using Markdown, and POSTs the easily readable content to the Spark room from a bot. Here’s an example of the formatted content:
The complete code can be found on Github and if you have any questions, please contact [email protected] or join us in the #spark4devs room.
For additional information on using Spark bots, check out this blog.
Colby Alladaye, Customer Support Engineer