- Cisco Community
- Technology and Support
- Data Center and Cloud
- Data Center and Cloud Knowledge Base
- Configure or Change CIMC IP address on UCS C200 series servers
- Subscribe to RSS Feed
- Mark as New
- Mark as Read
- Bookmark
- Subscribe
- Printer Friendly Page
- Report Inappropriate Content
- Subscribe to RSS Feed
- Mark as New
- Mark as Read
- Bookmark
- Subscribe
- Printer Friendly Page
- Report Inappropriate Content
06-30-2014 06:03 AM - edited 03-01-2019 06:00 AM
Introduction
This documents provides steps to configure IP address for CIMC access to UCS C series servers.
KVM Features
Overview of KVM features:
1. Cisco C-Series Rack Servers provides a physical local video and two usb connections for a usb keyboard, video monitor, and usb mouse connection through the front panel of the Rack Server using the Cisco provided dongle connector.
2. All Rack Servers can have up to 4 active KVM over IP sessions in addition to the local connection at front or rear panels. All active sessions have full control of the console
3. KVM over IP supports text and graphics modes of the graphics controller and needs no manual setting to view data
4. Graphics modes supported are up to the video chips maximum capabilities of 1600 x 1200 with 16 bit color.
Configure CIMC IP address
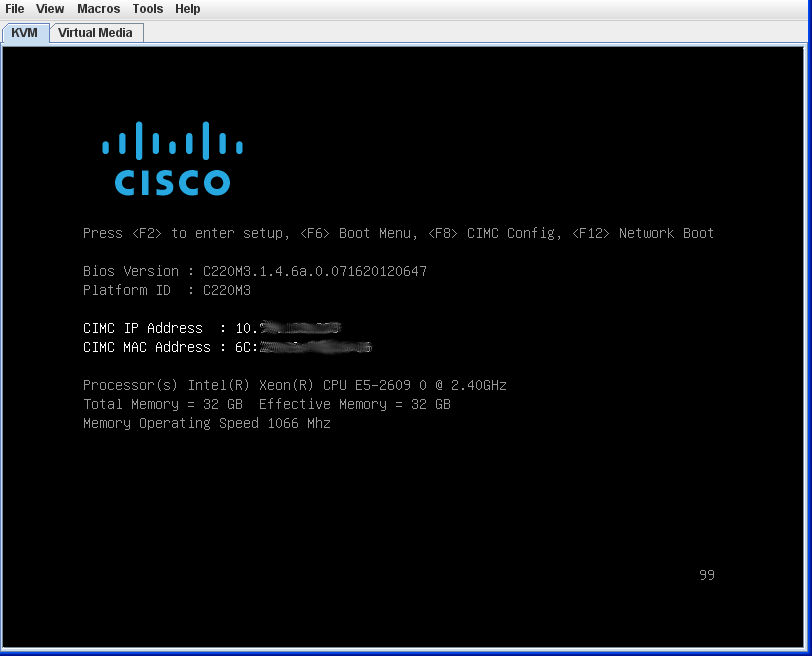
Step 1: Boot the server. You will get the following screen.
Note: if you miss the initial CIMC setup follow the unit’s power-up procedure Press (Y) to continue, next Press 9 then Enter to update all.

Step 2: Quickly Press the “F8” key to enter the “CIMC Config” setup before the UCS server goes into auto reboot.

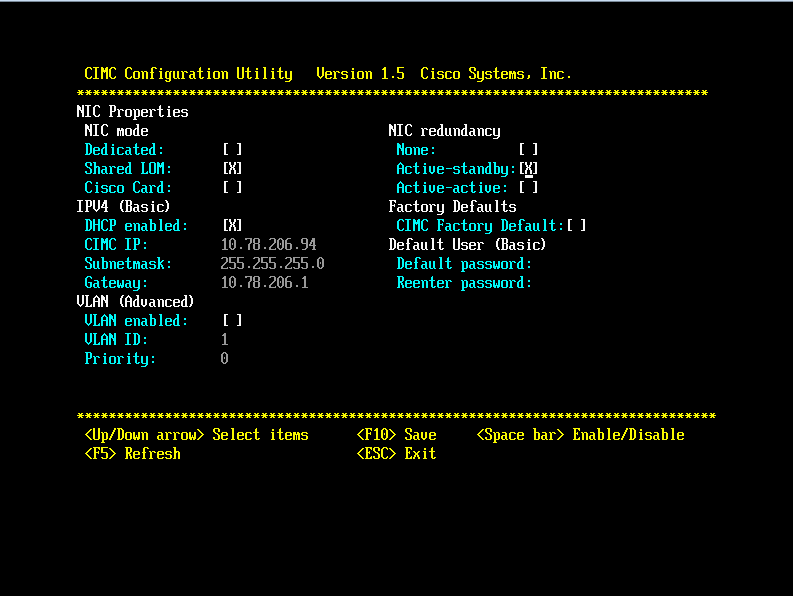
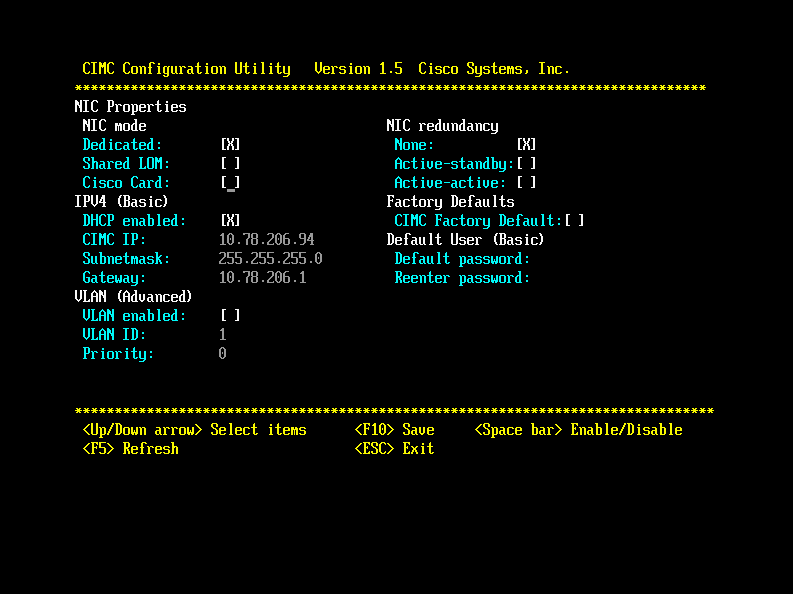
Step 3: For the “NIC mode”, enable “Dedicated” and for “NIC redundancy” enable “None”. This ensures that the dedicated Management Port will be used for CIMC instead of the Intel NIC at port 1.

Step 4: To use fixed/static IP Address, disable the “DHCP enabled” option. Specify the required values for three options below :
1. CIMC IP
2. Subnet mask
3. Gateway

Step 5: To use DHCP, enable the “DHCP enabled” option

Step 6: Press the “F10” key to save the changed settings done so far.

Step 7: After 45 seconds, press the “F5” key to refresh the display.

Step 8: Press the “ESC” key to exit the CIMC Configuration Utility.
Logging In to CIMC
Follow these steps to login to the CIMC.
Step 1 In your web browser, type or select the web link for CIMC.
Step 2 If a security dialog box displays, do the following:
Click Yes to accept the certificate and continue.
Step 3 In the log in window, enter your username and password.
Step 4 Click Log In.
Related Information
- Mark as Read
- Mark as New
- Bookmark
- Permalink
- Report Inappropriate Content
Is it possible to change the IP address (in my case also network connection information) from the GUI? It seems that I would change the address, mask, gateway, NIC mode and NIC redundancy all at once and hit save. I should then be able to login using the new network information. Does anyone know if this will work? If so, can this be done without a server reboot? Thanks.
- Mark as Read
- Mark as New
- Bookmark
- Permalink
- Report Inappropriate Content
Yes, you can change these parameters without rebooting the host, since these are all managed by the CIMC.
I would ensure to have someone available locally in case something is not configured correctly and you need physical KVM access.
- Mark as Read
- Mark as New
- Bookmark
- Permalink
- Report Inappropriate Content
Thanks for the info - that's good news. I am talking about an ISE appliance and really don't want to do a reboot. I am scrambling to find my KVM dongle - just in case.
- Mark as Read
- Mark as New
- Bookmark
- Permalink
- Report Inappropriate Content
- Mark as Read
- Mark as New
- Bookmark
- Permalink
- Report Inappropriate Content
Hi all,
I'm already install the ucs C220, CIMC and APIC. I can reach the CIMC from web and APIC from kvm.
This my APIC configuration :
HQ_Fabric ==>> OVO-GTN-SIMULATOR
Fabric ID ==> 1
Controller ==>> 3
POD ID ==> 1
Controller ID == 1
Controller Name ==>> APIC1
Address Pool for TEP ==>> 10.0.0.0/16
ID Infra Network ==>> 3967
BD Multicast Address (GIPO) 225.0.0.0/15
OOB
Gateway 10.33.10.1
APIC1 (10.33.10.10/24)
My question how to integrate apic (and fabric in there) with cimc ?
Thanks and Regrads,
Fido
- Mark as Read
- Mark as New
- Bookmark
- Permalink
- Report Inappropriate Content
Hello fidogirgazit,
Thank you for your question. Since an ACI APIC is running on a C220 Series Server Hardware, the CIMC is natively integrated. There is no actions necessary besides setting up the CIMC IP Address as described on this article.
- Mark as Read
- Mark as New
- Bookmark
- Permalink
- Report Inappropriate Content
hi,
can anyone please guide me to configure CIMC without rebooting the server.
- Mark as Read
- Mark as New
- Bookmark
- Permalink
- Report Inappropriate Content
Hello Akbar,
The only recommended way to configure the CIMC IP address is the method described in this article. Sorry for the inconvenience.
- Mark as Read
- Mark as New
- Bookmark
- Permalink
- Report Inappropriate Content
It is disappointing that we cannot interact with the CIMC from the ACI OS, I see Cisco included the ipmitool open source package in the ACI OS but I get an error when I try to run the command on an APIC. I validated that the driver is loaded so it looks like without TAC support it's a no go.
APIC1# ipmitool
Could not open device at /dev/ipmi0 or /dev/ipmi/0 or /dev/ipmidev/0: No such file or directory
I would like basic commands to reset the CIMC and set IP/Mask/GW.
Other vendors offer OS configuration tools from to modify iLO/iDRAC/iLOM
- Mark as Read
- Mark as New
- Bookmark
- Permalink
- Report Inappropriate Content
Customer change its network parameters an now do not have access to the UCS CIMC interface. Is that possible, with physical local video / keyboard or console access to change the CIMC network parameters without boot the server?
Thanks in advance!
- Mark as Read
- Mark as New
- Bookmark
- Permalink
- Report Inappropriate Content
I'm assuming it's a C-series UCS, if so then no it's not possible to my knowledge to interact with CIMC from the OS. You need to reboot the server and press F8. another option is to reconfigure the switch port with the original network granting access to CIMC network. Console access only works prior to OS boot.
edit: looks like it's possible from a Windows OS: https://www.cisco.com/c/en/us/support/docs/servers-unified-computing/integrated-management-controller/215415-manage-or-view-cimc-configuration-withou.html
- Mark as Read
- Mark as New
- Bookmark
- Permalink
- Report Inappropriate Content
Hi,
ISE SNS-3515 appliances is already in production but CIMC is not configured. what is the recommended way to configured the CIMC?
Regards,
sohail
- Mark as Read
- Mark as New
- Bookmark
- Permalink
- Report Inappropriate Content
@s.rashid the only documented option is a maintenance window, reboot the server, press F8 and configure CIMC IP. you could try ipimutil if it's part of ISE appliance OS but it's undocumented as far as I know.
Find answers to your questions by entering keywords or phrases in the Search bar above. New here? Use these resources to familiarize yourself with the community:


