Hello All,
are you planing to install cisco ASA firewall which have no configuration at all? to enable access to the firewall through the ASDM you can carry below steps initially, (guess there is nothing in the ASA configuration )
1 – Connect to Firewall through console to your PC
2 – check the license for 3DES-AES encryption. to connect with HTTPS and secured manner, device needs 3DES-AES license. use show version command and scroll to license output.
#show version
Licensed features for this platform:
Maximum Physical Interfaces : Unlimited perpetual
Maximum VLANs : 30 perpetual
Inside Hosts : Unlimited perpetual
Failover : Active/Standby perpetual
Encryption-DES : Enabled perpetual
Encryption-3DES-AES : Enabled perpetual
Carrier : Disabled perpetual
AnyConnect Premium Peers : 4 perpetual
AnyConnect Essentials : Disabled perpetual
Other VPN Peers : 50 perpetual
Total VPN Peers : 50 perpetual
AnyConnect for Mobile : Disabled perpetual
AnyConnect for Cisco VPN Phone : Disabled perpetual
Advanced Endpoint Assessment : Disabled perpetual
Shared License : Disabled perpetual
Total TLS Proxy Sessions : 160 perpetual
Botnet Traffic Filter : Disabled perpetual
Cluster : Disabled perpetual
if device not includes 3DES-AES license, download it freely from cisco traditional license portal and install the license key.
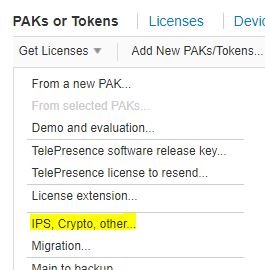
go to – https://slexui.cloudapps.cisco.com/SWIFT/LicensingUI/Quickstart#.
Select ‘IPS,Crypto,Other’ menu under ‘Get Licenses’
Select Security products and Cisco ASA 3DES-AES license
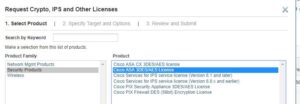
enter correct serial for serial number and submit the request. license portal will send the key to email or download it from portal.
Add key to device using below command. and after activation, reload the device.
asa(config)# activation-key 0xxxxxxxxx 0xxxxxxxxx 0xxxxxxxxx 0xxxxxxxxx 0xxxxxxxxx
3 – Copy ASDM image to firewall flash and configure to use image as a ASDM image.
download ASDM from Cisco software portal
https://software.cisco.com/download/home/279513399/type/280775064/release/7.9.2.152
configure firewall management network interface to IP address 192.168.1.1 255.255.255.0 and 192.168.1.2 255.255.255.0 to management computer.
connect management computer and firewall management interface directly.
install ‘tftpd’ software in computer and start software – turn off the software firewalls if any in computer
use below command to copy image to firewall and set it up as current ASDM image.
asa# copy tftp: flash:
Address or name of remote host []? 192.168.1.2
Source filename []? asdm-792.bin
Destination filename [asdm-792.bin]?
Do you want to over write? [confirm]
Accessing tftp://192.168.1.2/asdm-792.bin… !!!!!
asa(config)# asdm image flash:/asdm-792.bin
4 – Set Authentication and login
aaa authentication enable console LOCAL
aaa authentication http console LOCAL
aaa authentication ssh console LOCAL
http server enable
http 192.168.1.0 255.255.255.0 management
ssh 192.168.1.0 255.255.255.0 management
username admin password newpassword privilege 15
crypto key generate rsa
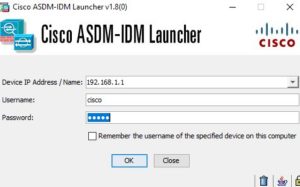
5 – Setup ASDM launcher
go to below link and install ASDM launcher
https://192.168.0.1/admin/public/index.html
6 – Open ASDM launcher and login to ASA
Additional Note – Check ASDM version with ASA OS version compatibility on any errors with connecting.
https://www.cisco.com/c/en/us/td/docs/security/asa/compatibility/asamatrx.html
")