- Cisco Community
- Technology and Support
- Collaboration
- Unified Communications Infrastructure
- RTMT plugging in Windows 10 x64 cannot install
- Subscribe to RSS Feed
- Mark Topic as New
- Mark Topic as Read
- Float this Topic for Current User
- Bookmark
- Subscribe
- Mute
- Printer Friendly Page
RTMT plugging in Windows 10 x64 cannot install
- Mark as New
- Bookmark
- Subscribe
- Mute
- Subscribe to RSS Feed
- Permalink
- Report Inappropriate Content
04-04-2019 12:26 PM
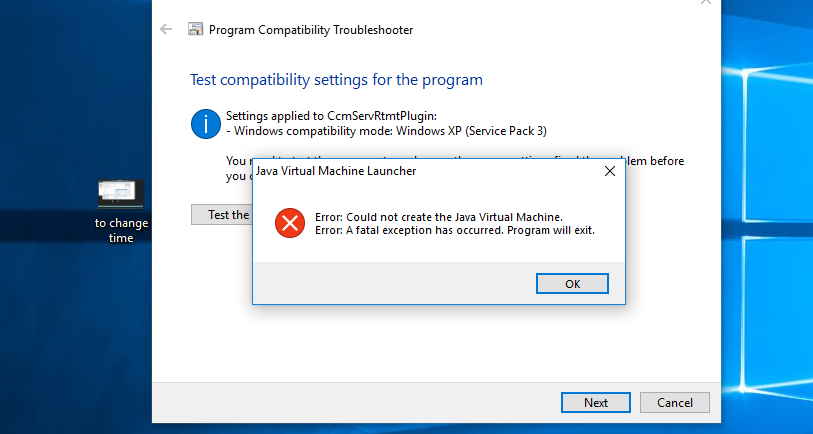
I been trying to install RTMT in this new laptop and no matter what workaround I use the result is always the same:
Error: Could not create the java virtual machine.
Error: Afatal exception has occurred. Program will exit.
The LT is running Windows 10 and 64bits. Do u guys know about any solution for this issue?
Thanks
- Labels:
-
Unified Communications
")
- Mark as New
- Bookmark
- Subscribe
- Mute
- Subscribe to RSS Feed
- Permalink
- Report Inappropriate Content
04-04-2019 02:34 PM
This is Java itself having an issue with memory size. One option is to uninstall and re-install JRE, which I have done with success.
Someone once sent me instructions about setting a bigger (smaller?) "heap size" for Java. I'm not a programmer and don't know what the implications are of that. Here is a link to that set of instructions. YMMV....
Fix "could not create the java virtual machine" issue
Maren
- Mark as New
- Bookmark
- Subscribe
- Mute
- Subscribe to RSS Feed
- Permalink
- Report Inappropriate Content
04-05-2019 07:11 AM
Thank you for the info. Let me try the JRE uninstall/re-install option. I will keep u posted.
- Mark as New
- Bookmark
- Subscribe
- Mute
- Subscribe to RSS Feed
- Permalink
- Report Inappropriate Content
04-05-2019 07:13 AM
Thank you for the info, let me try to un-install and reinstall of JRE. Hope that can fix my issue.I will keep u posted
- Mark as New
- Bookmark
- Subscribe
- Mute
- Subscribe to RSS Feed
- Permalink
- Report Inappropriate Content
06-24-2019 07:04 AM
I followed this recommendation and it worked. Use the 512 setting. 256 isn't enough and the cisco installer won't start.
https://www.ghacks.net/2014/05/22/fix-error-create-java-virtual-machine-windows/
- Mark as New
- Bookmark
- Subscribe
- Mute
- Subscribe to RSS Feed
- Permalink
- Report Inappropriate Content
06-24-2019 08:43 AM
Excellent! I'm glad it worked for you.
(If you want to be a pal, please mark my answer as Helpful!)
Maren
- Mark as New
- Bookmark
- Subscribe
- Mute
- Subscribe to RSS Feed
- Permalink
- Report Inappropriate Content
10-28-2019 01:21 PM
The heap size is the amount of memory allocated for the java application. Having it to small will create problems so play with the value on a lab machine or in a lab.
Also the messages file on the system will sometimes give a indication of an issue with the heap. You will see the application restart is quite common.
I just saw your post and thought i chip in my 2 cents about what you are not sure about.
- Mark as New
- Bookmark
- Subscribe
- Mute
- Subscribe to RSS Feed
- Permalink
- Report Inappropriate Content
01-29-2021 09:29 AM
- Mark as New
- Bookmark
- Subscribe
- Mute
- Subscribe to RSS Feed
- Permalink
- Report Inappropriate Content
10-29-2024 08:31 AM
This worked for me, thanks !!!
- Mark as New
- Bookmark
- Subscribe
- Mute
- Subscribe to RSS Feed
- Permalink
- Report Inappropriate Content
04-04-2024 05:37 AM
i was getting Flexeraax2$aaa: Windows DLL failed to load
Flexeraax2$aaa: Windows DLL failed to load
at Flexeraax2.af(Unknown Source)
at Flexeraax2.aa(Unknown Source)
at com.zerog.ia.installer.LifeCycleManager.init(Unknown Source)
at com.zerog.ia.installer.LifeCycleManager.executeApplication(Unknown Source)
at com.zerog.ia.installer.Main.main(Unknown Source)
at sun.reflect.NativeMethodAccessorImpl.invoke0(Native Method)
at sun.reflect.NativeMethodAccessorImpl.invoke(NativeMethodAccessorImpl.java:62)
at sun.reflect.DelegatingMethodAccessorImpl.invoke(DelegatingMethodAccessorImpl.java:43)
at java.lang.reflect.Method.invoke(Method.java:498)
at com.zerog.lax.LAX.launch(Unknown Source)
at com.zerog.lax.LAX.main(Unknown Source)
My fix was to use this
------------
To avoid this issue, add a system variable under Environment Variables:
Follow these steps:
From the Start menu, navigate t0
1. Control Panel
2. System and Security
3. System
4. Click Advanced system settings in the left pane.
5. In the Advanced tab, click Environment Variables
6. Under System Variables, click New
7. Add the following system variable:
JAVA_TOOL_OPTIONS
8. Set the following value for the system variable:
"-Dos.name=Windows 7"
For Windows 2019 Use
JAVA_TOOL_OPTIONS= "-Dos.name=Windows Server 2016" make sure and include the quotation marks as they are written in the Parameters value).
9. Click OK
Note:
During TibcoActiveMQ bridge installation on Windows 2016, a popup about .NET Framework 3.5 appears. Click the Close button to close the popup to proceed with the installation.
- Mark as New
- Bookmark
- Subscribe
- Mute
- Subscribe to RSS Feed
- Permalink
- Report Inappropriate Content
07-09-2025 07:18 AM
This did the trick on my Win 11 PC. Thank you!
- Mark as New
- Bookmark
- Subscribe
- Mute
- Subscribe to RSS Feed
- Permalink
- Report Inappropriate Content
07-23-2025 04:06 PM
Wow, this worked for Windows 11! Thanks so much!
- Mark as New
- Bookmark
- Subscribe
- Mute
- Subscribe to RSS Feed
- Permalink
- Report Inappropriate Content
09-03-2025 08:41 AM
We had this same problem and I'm sure the answers here helped a lot in 2019 but the root cause we found this week was that you have to specifically install an older Java SE Development Kit. RTMT installer wont even run with recent JDK versions.
For more details and steps to fix this, I wrote up some notes here: https://sideviewapps.com/blog/psa-if-youve-been-unable-to-install-or-run-rtmt

")
- Mark as New
- Bookmark
- Subscribe
- Mute
- Subscribe to RSS Feed
- Permalink
- Report Inappropriate Content
09-03-2025 09:05 AM - edited 09-03-2025 09:57 AM
I run RTMT on the current Zulu JRE with no problems.
See this post for details, https://community.cisco.com/t5/unified-communications-infrastructure/rtmt-support-only-for-java8jre/td-p/5275297

Discover and save your favorite ideas. Come back to expert answers, step-by-step guides, recent topics, and more.
New here? Get started with these tips. How to use Community New member guide