1 minute explanation:
With this integration each PowerPoint slide controls where/how big your camera video appears on the screen by looking for a specially named shape.
What happens? a macro inside the PowerPoint presentation:
1. checks if the slide contains a shape with a special name to indicate where the video should be placed
2. calculates where the DeskPro should put (your) camera feed and how big it should be
3. sends API calls to the DeskPro to put your video in the right location.
What does it consist of?
1. xAPI macro (WebexDeskSlidePresenter.js)
2. PowerPoint file that contains a macro (TemplateDeskProMacro_verXX.pptm)
Created by Joe Hughes (Cisco TSA)
Video
Here's a 4 minute explanation - click the image below

HOW TO SETUP
Before you start, download this ZIP file from GitHub. It contains the 2 files you need: the .PPTM file and the .JS file.
1._DeskPro: Get (web) access and log in.
2. DeskPro: Under SETUP click Users and "Create User"
Role: only 'RoomControl'
Password: you decide
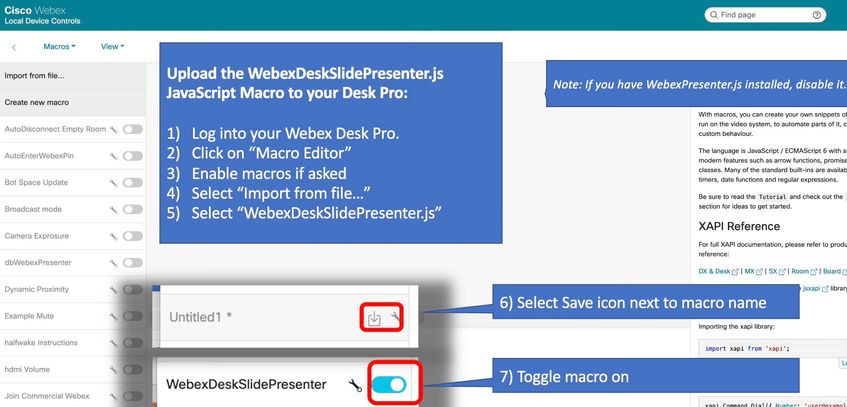
3. DeskPro: Under CUSTOMIZATION click Macro editor and "Import from file".

4. PowerPoint: Open the downloaded PPTM (M=Macro) file
- When the popup is shown, click "enable macros"
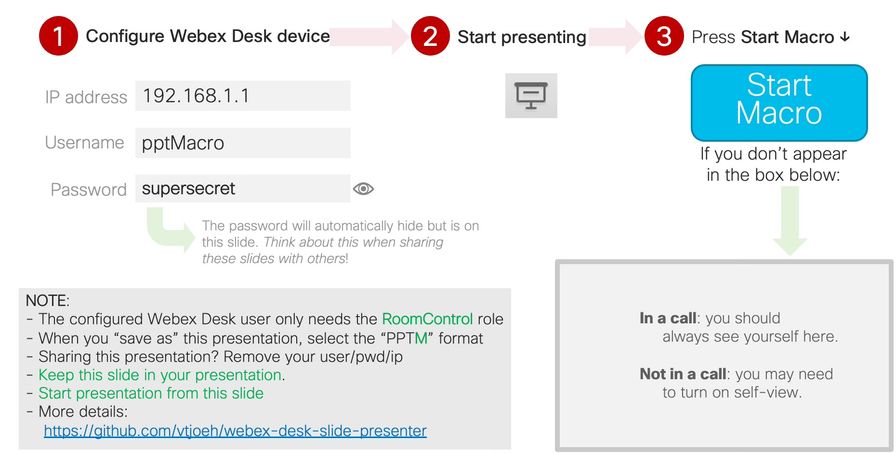
- On slide 1, enter the IP-address of your (locally accessible) Desk Pro + the username/password you created in the previous step.
NOTE that when you go into presentation view and click the "start macro" button, your password will be hidden.

5. PowerPoint: Start your presentation
- Start slideshow on slide 1 and click "Start Macro" (and confirm that you want to run the macro)
- The password is now invisible, and the presentation can start. Click the 'self-view toggle' button to check if you appear in the test box below the start button.
NOTE: In step 5, item 2 you RUN the PowerPoint macro. You have to run the macro every time when you open such a PowerPoint presentation.
HOW TO - YOUR OWN SLIDES
- Open PPTM file
- RUN the Macro (Remember: you always have to do this when opening this PPTM file)
- Copy slides from your original presentation
- Paste your slides in the PPTM file (and "keep formatting"). Paste them AFTER SLIDE 1 because that is needed for the integration with the DeskPro
- On every slide where video needs to be added, add a 'rectangle' shape (best to keep a 16:9 ratio)
- Right click on the shape
- Select “Size and Position”
- Set Height to 4.5 and Width to 8 (16:9 aspect ratio)
- Click on “Lock aspect ratio”
- Now you can resize and position the square.
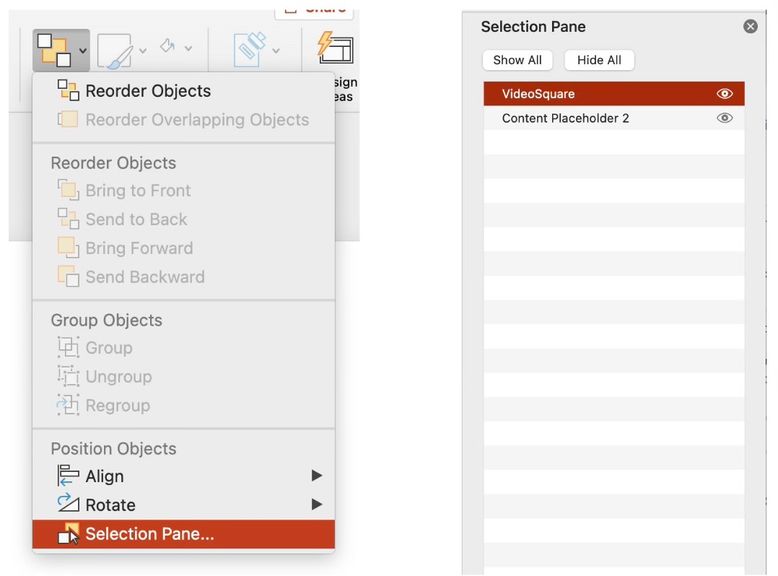
- Select the rectangle and open the "selection pane" in order to "rename" the rectangle

- RENAME your rectangle to "VideoSquare" or any of the names listed below under "Video embed options" below. The shape name defines its appearance.
- Go into presentation mode and see your video appear in the slide
(don't forget to look at the DeskPro self-view)
- swipe from right
- say "Ok Webex, open self view" / "Ok Webex, open fullscreen self view"
- Open selfview with buttons in the Macro toolkit.
VIDEO EMBED OPTIONS
- only 1 object per slide
- names are not case-sensitive
- VideoSquare object can be transparent (i.e. invisible)
|
NAME
|
IN_CALL ONLY?
|
Video
CHANNEL
|
Video on
SLIDE
|
Background
|
|
|
VideoSquare
|
-
|
no
|
yes
|
transparent
|
Or use ‘VideoShape’
|
|
VideoSquare_50
|
-
|
no |
yes |
transparent
|
(1-100) Transparency number
|
|
VideoSquare_PiP
|
-
|
no |
yes |
real
|
Pip with your physical background
|
|
VideoSquare_FlipPip
|
-
|
no |
yes |
real
|
Reverse Pip (PPT small, you big)
|
|
CameraOnly
|
-
|
no |
yes |
current
|
Show camera, no slide
|
|
ContentOnly
|
-
|
no |
no |
-
|
Slide without video
|
|
SideBySide_[123x]
|
✓
|
no |
yes |
current |
Slide and video same size
|
|
SideBySide_[123x]_u
|
✓
|
yes |
no |
current |
1=Cam,2=PC(USBc),3=HDMI,u=mute video
|
|
Prominent
|
✓
|
no |
yes |
current |
Small video outside big content
|
|
StopContentShare
|
✓
|
no |
yes |
current |
Stops sharing PPT
|
|
StopImmersiveShare
|
✓
|
yes |
no |
current |
Keeps sharing, video moves to video chan
|
|
SpeakerTrackDiagnostic
|
-
|
no |
yes |
real
|
Send Speaker track in content channel
|
|
PreviousSlide
|
-
|
-
|
-
|
-
|
Uses the previous slide’s command
|
REQUIREMENTS
- Webex video device: Desk, DeskMini, DeskPro
- Video device: ability to add a user
- Macro-enabled PowerPoint slides
- The computer running PowerPoint should be on the same network as the Webex Desk device.
FAQ
Q: Where does the video go?
A: This mechanism uses immersive share. That means the PowerPoint with your video is shared in the content channel and people can also see you via video (thumbnail)
Q: What if I have a virtual background configured?
A: That won't be visible except with the "CameraOnly" object.
Q: What if a slide does not have any of these boxes?
A: Then immersive share turns OFF and these slides will not be visible. If later slides do have these special squares immersive slides will turn on again.
Q: Can this PPTM file do my dishes?
A: Right now the PPT macros can only do your laundry.
Q: Can I use shapes like circles, triangles, etc.?
A: You could but it doesn't help you because the DeskPros video shape is a square, 16:9
Q: How to create a 16:9 shape?
A: Create a square, double click it, under size uncheck "lock aspect ratio", make the height:9 width:16, check "aspect ratio", now resize
Q: I don't see my video!
A: 1. Did you configure everything as described above? Did you start the macro?
Q: I see my video but not on a specific slide?
A: Does the rectangle that you created have the right name?
A: Did you group the rectangle? (you should not)
Q: Can KeyNote (MacOS) do something similar?
A: Yes, see this article (tnx jruys!)
