- Cisco Community
- Technology and Support
- Collaboration
- Contact Center
- Hi, This can be done by
- Subscribe to RSS Feed
- Mark Topic as New
- Mark Topic as Read
- Float this Topic for Current User
- Bookmark
- Subscribe
- Mute
- Printer Friendly Page
- Mark as New
- Bookmark
- Subscribe
- Mute
- Subscribe to RSS Feed
- Permalink
- Report Inappropriate Content
05-31-2014 05:52 PM - edited 03-14-2019 01:29 PM
Hi
When a call arrives at an agent, there is no information about CSQ. Can someone please help my why as agents wanted to know which queue the call is coming from
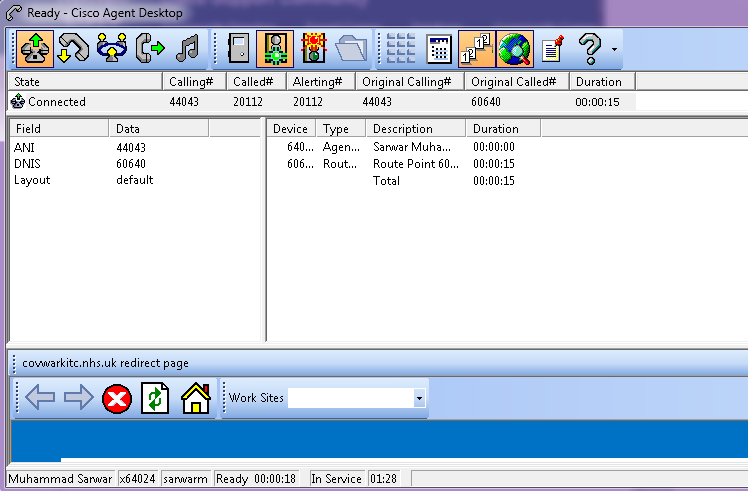
When a call arives at an agent the get the display below - Please see attached picuture
Thanks in advance
Solved! Go to Solution.
- Labels:
-
Other Contact Center
Accepted Solutions
- Mark as New
- Bookmark
- Subscribe
- Mute
- Subscribe to RSS Feed
- Permalink
- Report Inappropriate Content
06-02-2014 05:59 AM
Hi,
This can be done by implementing enterprise data in your script and passing that information to the CAD application (this feature requires a premium license of UCCX).
Check this out
1) Go to Cisco Desktop Administrator and create a custom layout.
Cisco Desktop Admin -> Enterprise Data -> Layout List -> Create new
In this case we created a new layout called “Sales_Layout”
For this example with added 3 fields
ANI (display calling number)
DNIS (display called number)
Layout (display the name of the layout)
We also added the Call Variable 1 (changed the display name to CSQ
From UCCX side this is all what we need to do, the rest of the configuration is going to be done on the script.
2) Go to CRS Editor and add a Scalar variable called "user.layout"
Go to Settings > Expanded Call Variables > Add new
Name: user.layout
Type: Scalar
Description: It is not required field
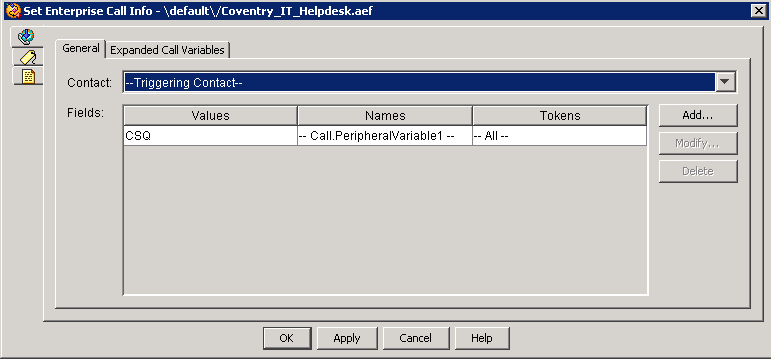
3) Add a “Set Enterprise Call info” step into the script.
Right click > properties > a new window will be display it
“General” Tab
Click on add…
Enter Value (variable) that you would like to get on the Call Peripheral Variable 1
In this case, we would like to see the CSQ name displayed on CAD, so assigned the CSQ variable to Call Peripheral Variable 1
“Expanded Call Variable” tab
Click add…
Values: the name of the layout that you created before on Cisco Desktop Admin ( “Sales_Layout” )
Names: Select the scalar variable that we created on step #2 (user.layout)
So the configuration should be:
- Values: “Sales_Layout” (case sensitive and you need “”)
- Names: -- user.layout—
- Array Indexes: – Scalar –
- Tokens: -- All --
4) This is how our script should look, validate and save it
5) Finally, call to the application and confirm that everything is working as configured
Open CAD and you should see 4 fields (ANI,DNIS, Layout, CSQ)
HTH
- Mark as New
- Bookmark
- Subscribe
- Mute
- Subscribe to RSS Feed
- Permalink
- Report Inappropriate Content
06-02-2014 05:59 AM
Hi,
This can be done by implementing enterprise data in your script and passing that information to the CAD application (this feature requires a premium license of UCCX).
Check this out
1) Go to Cisco Desktop Administrator and create a custom layout.
Cisco Desktop Admin -> Enterprise Data -> Layout List -> Create new
In this case we created a new layout called “Sales_Layout”
For this example with added 3 fields
ANI (display calling number)
DNIS (display called number)
Layout (display the name of the layout)
We also added the Call Variable 1 (changed the display name to CSQ
From UCCX side this is all what we need to do, the rest of the configuration is going to be done on the script.
2) Go to CRS Editor and add a Scalar variable called "user.layout"
Go to Settings > Expanded Call Variables > Add new
Name: user.layout
Type: Scalar
Description: It is not required field
3) Add a “Set Enterprise Call info” step into the script.
Right click > properties > a new window will be display it
“General” Tab
Click on add…
Enter Value (variable) that you would like to get on the Call Peripheral Variable 1
In this case, we would like to see the CSQ name displayed on CAD, so assigned the CSQ variable to Call Peripheral Variable 1
“Expanded Call Variable” tab
Click add…
Values: the name of the layout that you created before on Cisco Desktop Admin ( “Sales_Layout” )
Names: Select the scalar variable that we created on step #2 (user.layout)
So the configuration should be:
- Values: “Sales_Layout” (case sensitive and you need “”)
- Names: -- user.layout—
- Array Indexes: – Scalar –
- Tokens: -- All --
4) This is how our script should look, validate and save it
5) Finally, call to the application and confirm that everything is working as configured
Open CAD and you should see 4 fields (ANI,DNIS, Layout, CSQ)
HTH
- Mark as New
- Bookmark
- Subscribe
- Mute
- Subscribe to RSS Feed
- Permalink
- Report Inappropriate Content
06-02-2014 04:11 PM
- Mark as New
- Bookmark
- Subscribe
- Mute
- Subscribe to RSS Feed
- Permalink
- Report Inappropriate Content
11-10-2014 03:02 AM
Hi,
try to do the following:
- In the Cisco Unified CCX workflow, in the Expanded Call Variables tab of the Set Enterprise Call Info step, create an ECC variable called "user.layout" and set its value to the name of the custom layout created.
- Mark as New
- Bookmark
- Subscribe
- Mute
- Subscribe to RSS Feed
- Permalink
- Report Inappropriate Content
06-02-2014 04:12 PM
***
- Mark as New
- Bookmark
- Subscribe
- Mute
- Subscribe to RSS Feed
- Permalink
- Report Inappropriate Content
11-13-2014 09:27 AM
I'm having same issue. Still got default layout. Did you get this working?
Scratch that. Working now. Cheers
- Mark as New
- Bookmark
- Subscribe
- Mute
- Subscribe to RSS Feed
- Permalink
- Report Inappropriate Content
11-27-2014 03:27 AM
Yes it did work for me. I give 5+ to Walter. The only one thing you need to remember when you add step Set Enterprise Call info in the script, make sure it is just on top of the required CSQ and every time you make changes update script and UCCX application and logout and log back in on CAD.
I just also uploaded pdf file which might help you
- Mark as New
- Bookmark
- Subscribe
- Mute
- Subscribe to RSS Feed
- Permalink
- Report Inappropriate Content
04-03-2018 08:07 AM
I'm familiar with modifying the 'Set Enterprise Call Info' however that doesn't seem to change the 'Call Activity' area in CAD. I have an IVR that no matter what I do with the Enterprise Call Info it doesn't populate CSQ or Route Point info in the call activity area of CAD. I'm using the same 'Set Enterprise Call Info' in other scripts in UCCX and the call activity is populated correctly when I test it. Is their another area that I should be looking at for how the call activity area is handled?
Discover and save your favorite ideas. Come back to expert answers, step-by-step guides, recent topics, and more.
New here? Get started with these tips. How to use Community New member guide