Introduction Definition Additional Information TDMA characteristics Reference IntroductionTime Division Multiple Access DefinitionTime Division Multiplex Access (TDMA). Type of multiplexing where two or more channels of information are transmitted ...
Wireless - Mobility Knowledge Base
- Cisco Community
- Technology and Support
- Wireless - Mobility
- Wireless - Mobility Knowledge Base
-
Aironet Access Points
(380) -
Buying Recommendation
(1) -
Catalyst 9800
(3) -
Catalyst Wireless Controllers
(12) -
Mobility Express
(38) -
Other Wireless and Mobility Subjects
(3) -
Other Wireless Topics
(441) -
TAC Doc Notice
(13) -
TAC Doc Wireless
(51) -
Wi-Fi 6
(3) -
Wireless Controllers
(10) -
Wireless IP Voice and Video
(45) -
Wireless LAN Controller
(263) -
Wireless LAN Controller Config Analyzer (WLCCA)
(10) -
Wireless LAN Controller Mobility
(4) -
Wireless Network Management
(15) -
Wireless Security
(237) -
Wireless Security-Network Management
(3) -
トラブルシューティング
(1)
- « Previous
- Next »
Knowledge Base Articles
DESCRIPTION:Time Division Multiple AccessComplete Definintion:Time Division Multiplex Access (TDMA). Type of multiplexing where two or more channels of information are transmitted over the same link by allocating a different time interval ("slot" or ...
IntroductionWhen Cisco's Wirelesss Unified Architecture is deployed, the Lightweight Cisco Aironet Access Points (AP) can use a vendor specific Dynamic Host Control Protocol (DHCP) Option 43 to join specific Wireless LAN Controllers (WLCs) when the W...
Find answers to your questions by entering keywords or phrases in the Search bar above. New here? Use these resources to familiarize yourself with the community:
Implementing DHCP Option 43 and Option 60 in external MS-DHCP Server using Vendor Class Identifier.
Challenge - How to find Cisco device Vendor Class Identifier
Procedure
Step 1
Implement DHCP Server in Windows Server (Ver. any)
Step 2
Install Wireshark Network Protocol Analyzer (Packet tracer) in the Windows Server machine where the DHCP server is running.
After installation select “Ethernet” connection and start packet capturing.
Step 3
Connect Cisco device (AP/ LWAP/ Switch/ Router). Configure to devices ethernet interfaces “ip address” should be obtained from DHCP server therefore ethernet interface should be configured as “ip address dhcp”
The connected device starts sending broad casting message packets with its MAC address to lease IP address from DHCP server.
Wireshark packet tracer already started and capture ethernet packets, it will show the connected MAC address send broadcast message to DHCP server. DHCP server captured the broadcast message and replied to the device.
If you select the first line of broadcast message of the device in Wireshark packet analyzer, you can easily identify Vendor Class Identifier in left side bottom part of the window.

Implementing DHCP option 43 and 60
The generic vendor class identification option is 43. Each vendor has been given a unique vendor identification number in decimal. “241” is used for Cisco Management controller. When it converts to hexadecimal “F1 or f1”.
Conversion decimal to hexadecimal:
241 ÷ 16 = 15 R 1 —> (0.0625 x 16) = 1 = 1
15 ÷ 16 = 0 R 15 —> (0.9375 x 16) = 15 = f
When it writes to hexadecimal writes to bottom to top as a “f 1”
Internal DHCP pool configuration
Internal DHCP pool in Cisco router or switch can use as follows:
ip dhcp pool VLAN20
network 172.168.10.0 255.255.255.0
default-router 172.168.10.1
dns-server 83.68.72.2
option 43 hex f104aca80a02 <= 04-indicates one controller/aca80a02-“controller ip:172.168.10.2 in hexadecimal”
option 60 ascii “Cisco AP c3700”
External MS_Windows Server DHCP configuration.

Step 1
Open DHCP Server in Windows Server (Ver. any)
Expand the DHCP network scope under IPv4
Select on IPv4 and right click the mouse and chose “Define Vendor Classes”.

Press “Add” button in DHCP Vendor Classes dialog box.
Click “Add” button in Predefined Options and Values dialog box.
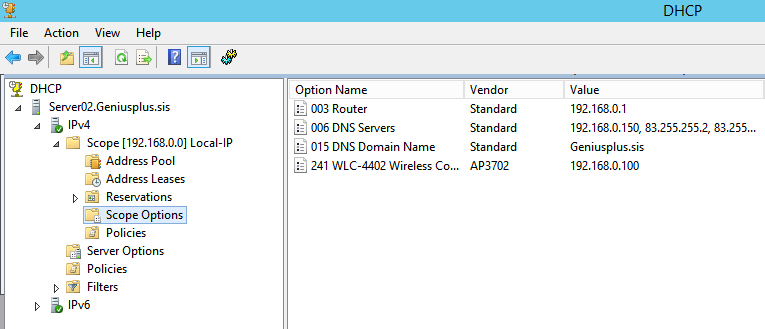
Type Name as “WLC-4402” Wireless controller device, select Data type as “IP Address” and mark Array check box, Type Code as 241 (Management Controller) and Type the Description as Management Controller IP address allocation. Press “OK” button. This is an alternative method for DHCP option 43 in DHCP server and in internal DHCP pool in Cisco router or switch.
Then you will be back to the “Predefined Options and Values” dialog box. Press “Edit Array” button. “IP Address Array Editor” dialog box appears and can type number of controllers IP address if more than one WLC controller exist on your network in IP address space. Press “OK” button.
Select “Scope Options” under created network scope and right click on it, then click “Configure Options”.
AIR-CAP3702 console port connected to PC/Laptop USB port and using Cisco CLI analyzer or Putty can read IP status of both devices. (IPs in examples are not real. Above example IP address and below message IP addresses are two different VLANs IP addresses. Don't try to match IP's equality.)


